
The method of installing multiple AnQi CMS on the server
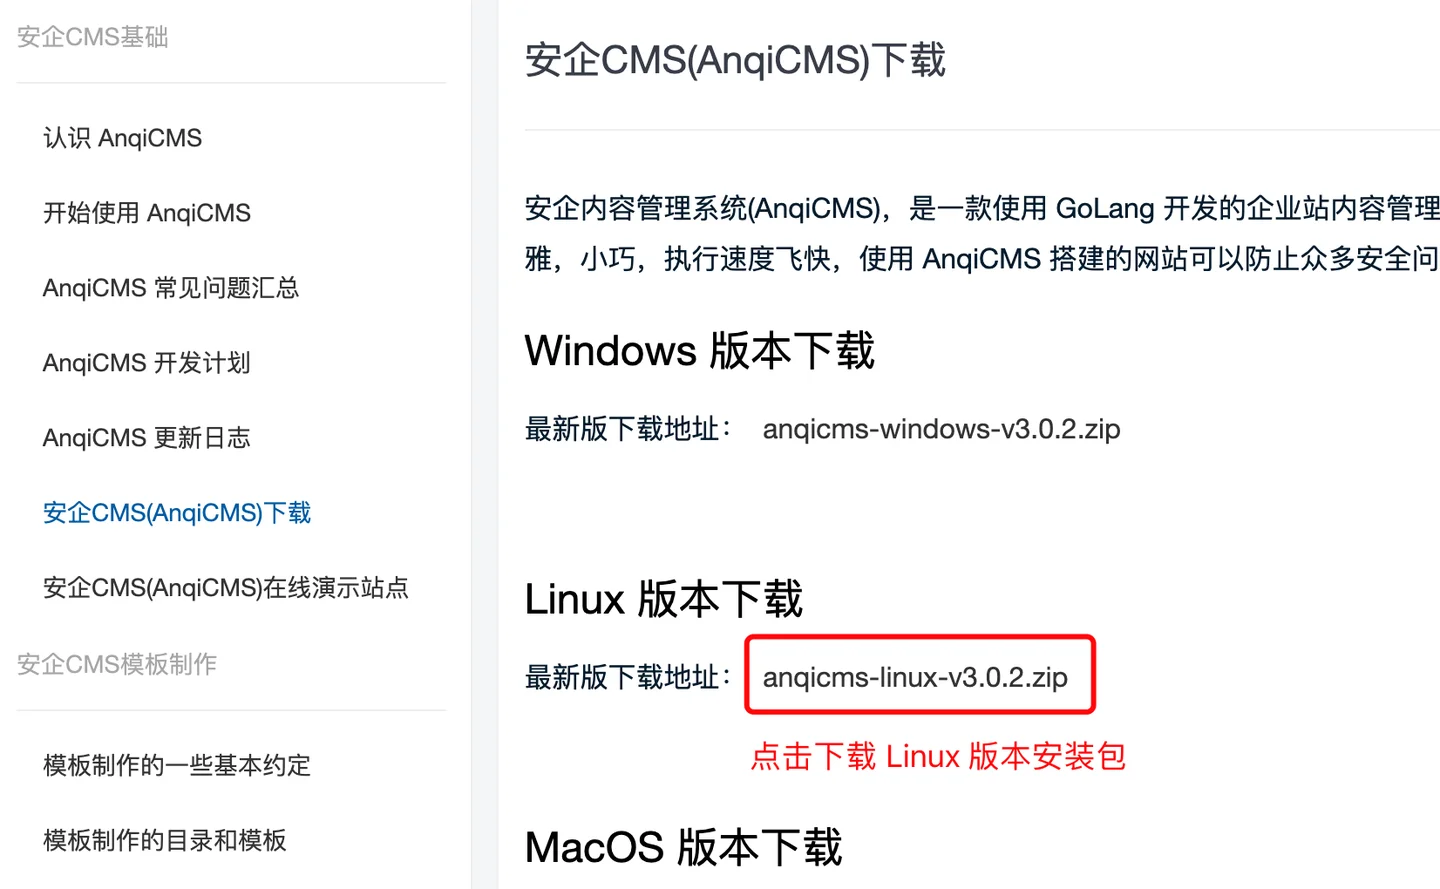
First from/downloadDownload AnQiCMS Linux installation package.
Method 1: Install multiple security CMS using the multi-site feature
AnQiCMS does not need to copy the AnQiCMS code multiple times when installing multiple sites on a single server. Please follow the operation process below to add multiple sites.
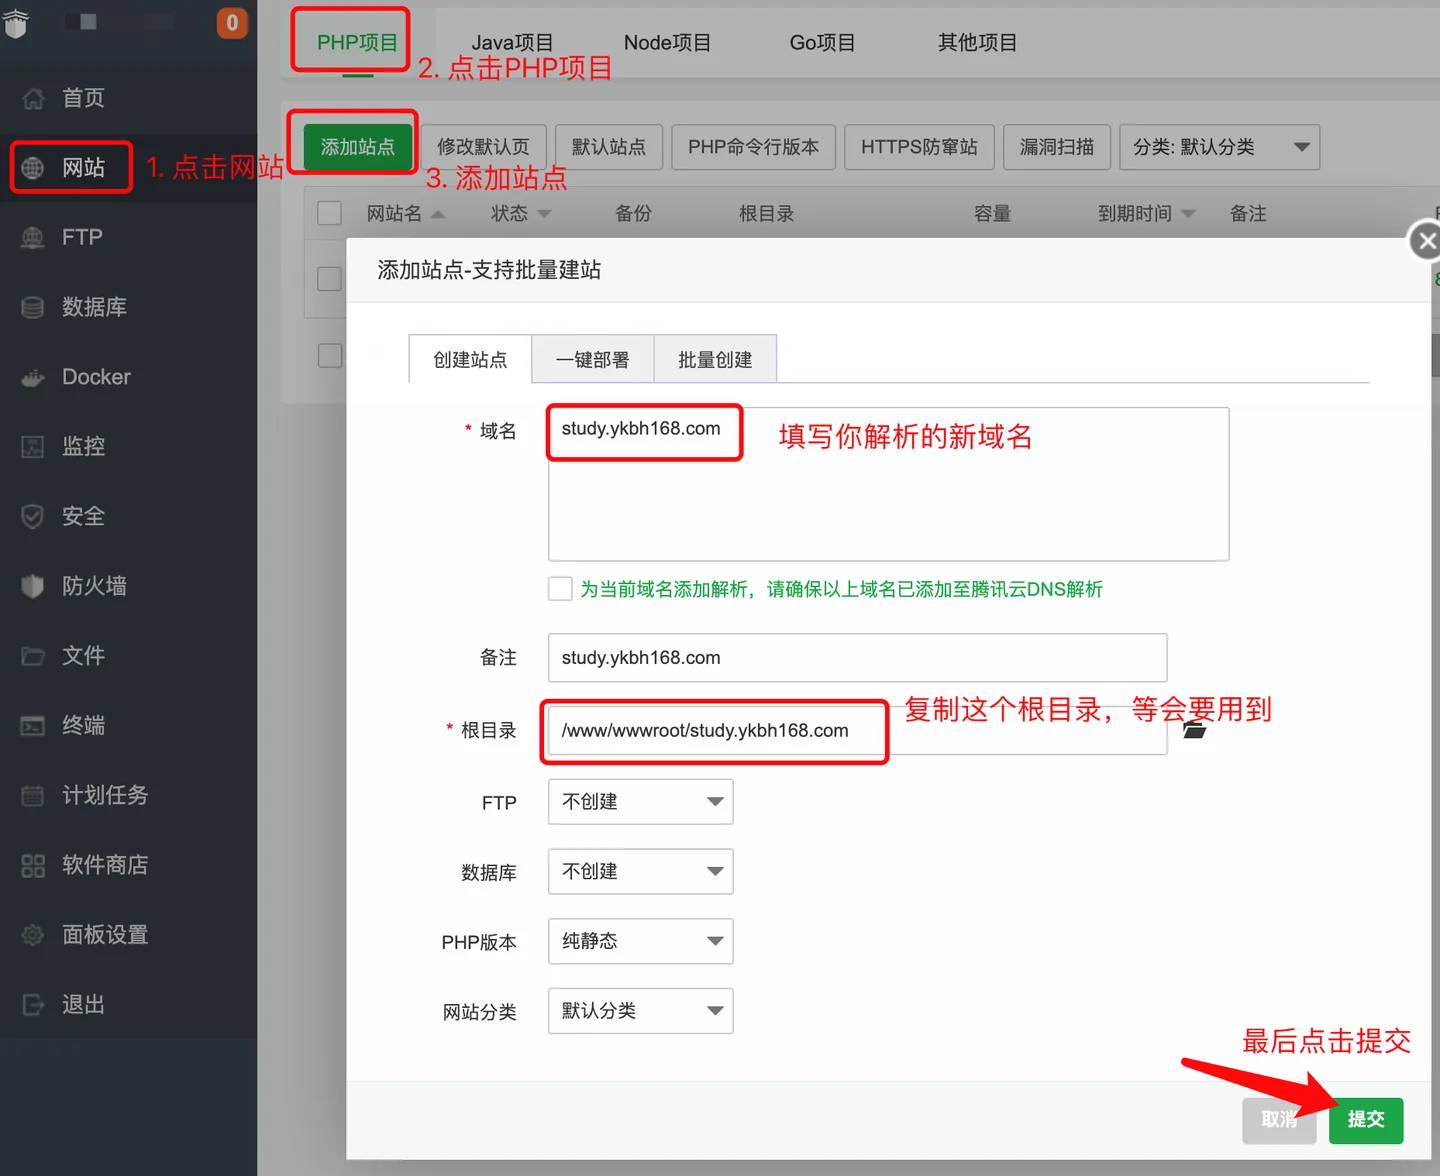
- Click in the left menu of the Baota panel
网站Menu, clickPHP项目Add a PHP site, fill in the domain name parsed to the server in the site creation, keep the root directory as default, copy the root directory address for later use, do not create FTP and database, and choose a pure static PHP version.Click submit last.
- Click in the left menu of the site background login
多站点管理Menu (only sites with the default installation have multi-site management permissions).In the multi-site management interface, click the Add New Site button.In the pop-up window, fill in the form as per actual./www/wwwroot/study.ykbh168.comThe new directory needs to be created in advance on the server; enter the new website URL, and this URL also needs to be parsed in advance on the server.The administrator account and password are the same as the administrator account password of the new site; the database name needs to be a new database, do not fill in the database of an existing site, otherwise it will cause data overwrite. If the default installation uses the root account to install, you can choose to reuse the database account and omit filling in the account information.Click the OK button last to complete the creation of the new site.

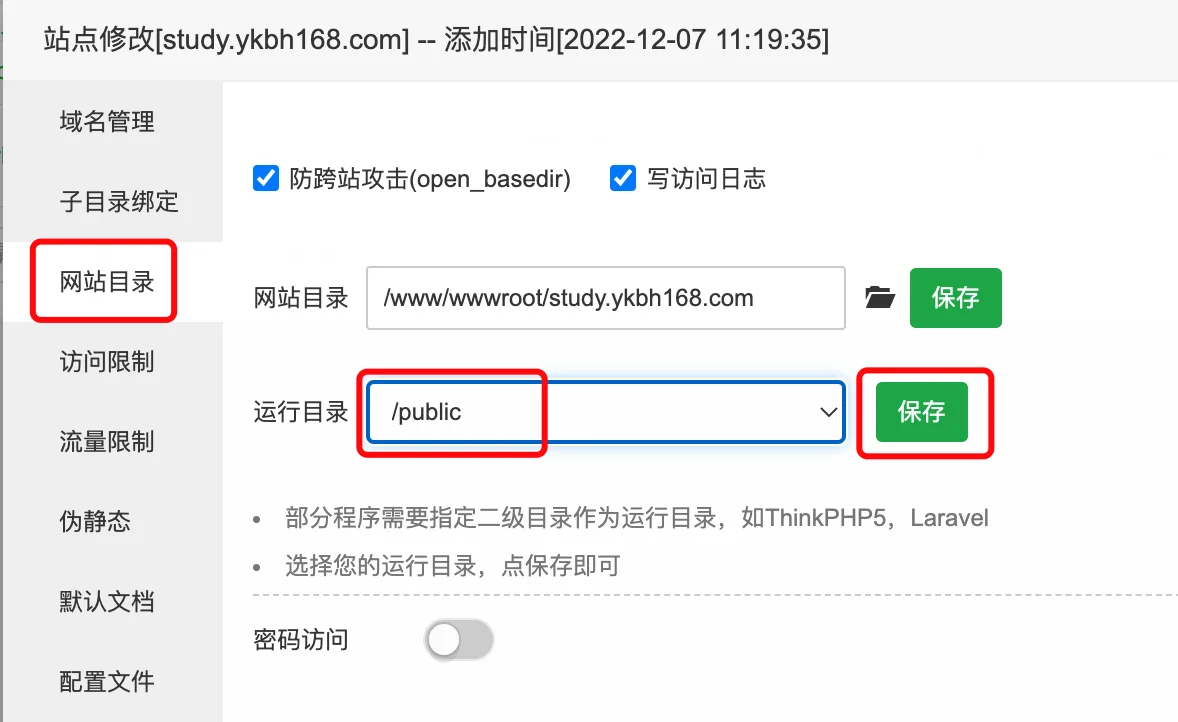
- In the Baota, click on the settings in the new website operation bar, select in the pop-up interface,
网站目录change the runtime directory to/publicclick Save. As shown in the figure:
- Static page setting
- Nginx static page setting
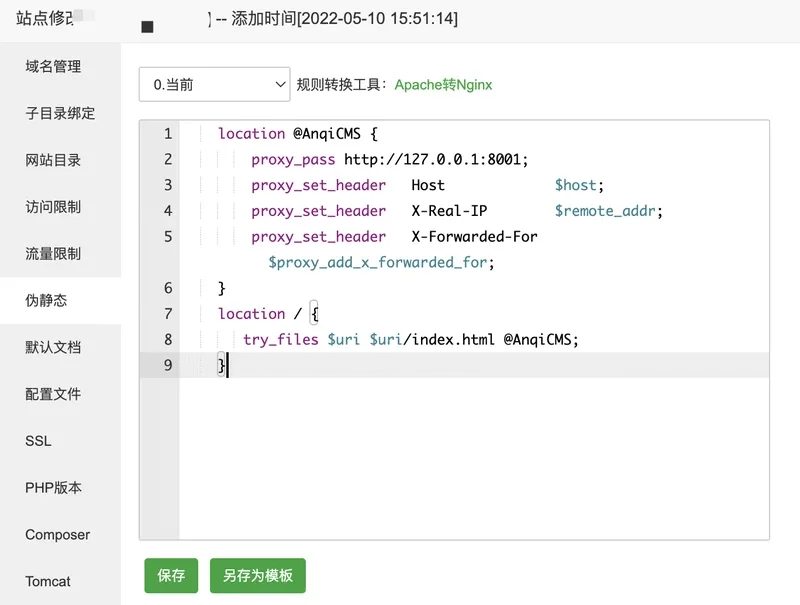
Select伪静态Menu, fill in the static page rules and click Save. You can click Save as template for convenience to use next time:
    location @AnqiCMS {
        proxy_pass https://en.anqicms.com;
        proxy_set_header   Host             $host;
        proxy_set_header   X-Real-IP        $remote_addr;
        proxy_set_header   X-Forwarded-For  $proxy_add_x_forwarded_for;
    }
    error_page 404 =200  @AnqiCMS;
    location / {
       try_files $uri $uri/index.html @AnqiCMS;
    }
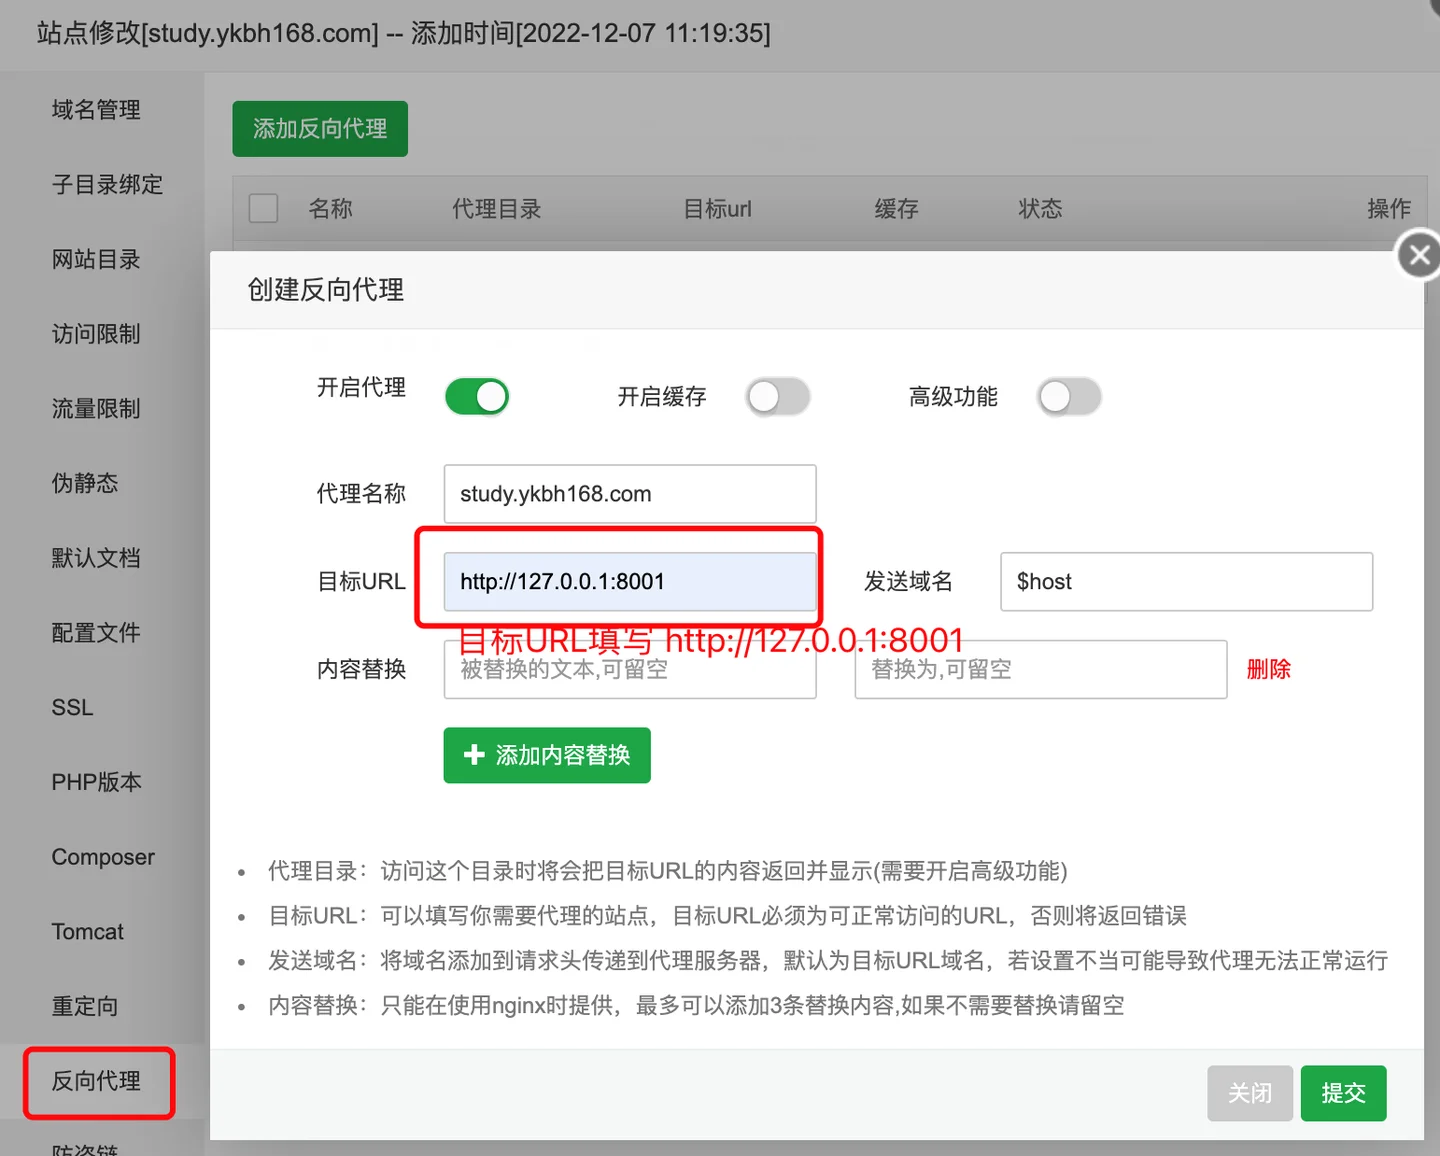
- Apache configuration for pseudo-static pages
If you use Apache software, the pseudo-static rules will be inconsistent. Leave the pseudo-static field blank, select reverse proxy, and fill in the target URL.https://en.anqicms.comAs shown in the figure:
This new site has been added.
Method two: Install multiple secure CMS using source code
The Baota panel version 7.9.3 and above supports faster deployment and it is recommended to upgrade Baota panel to version 7.9.3 or above.
Create directories and upload installation packages
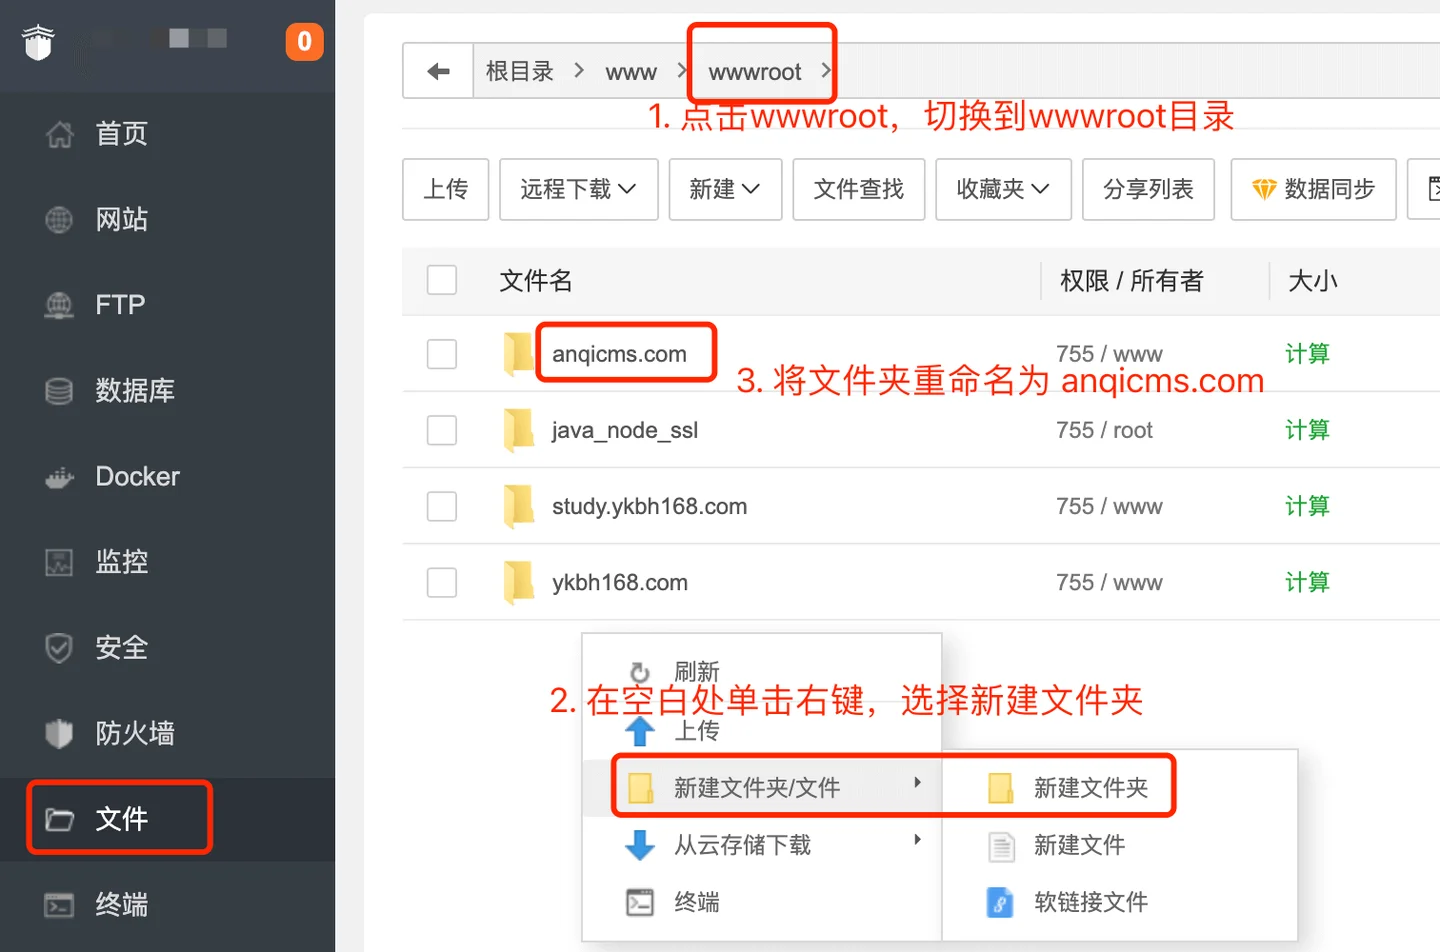
- Click the menu on the left.
文件Menu, switch to directory to/www/wwwroot/Directory, inwwwrootCreate a new directory under the directory, the directory is usually named after the domain name, such asanqidemo.com. As shown in the figure:
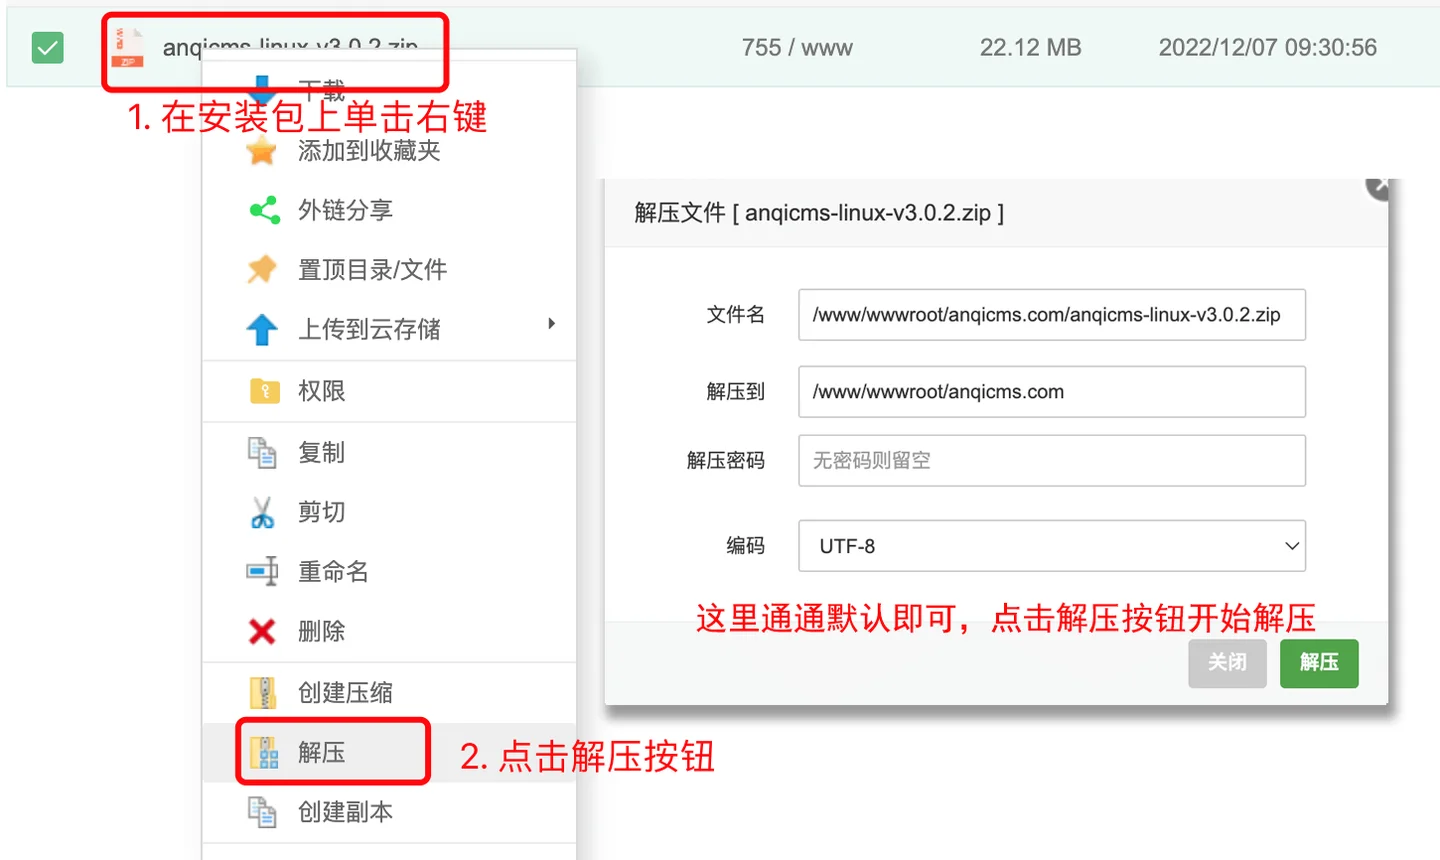
- Click
anqidemo.comEnteranqidemo.comFolder, install the Linux installation packageanqicms-linux-v3.x.x.zipUpload it to the current directory. In the packageanqicms-linux-v3.x.x.zipClick the right mouse button, select Extract, and extract the package to the current folder. As shown in the figure:
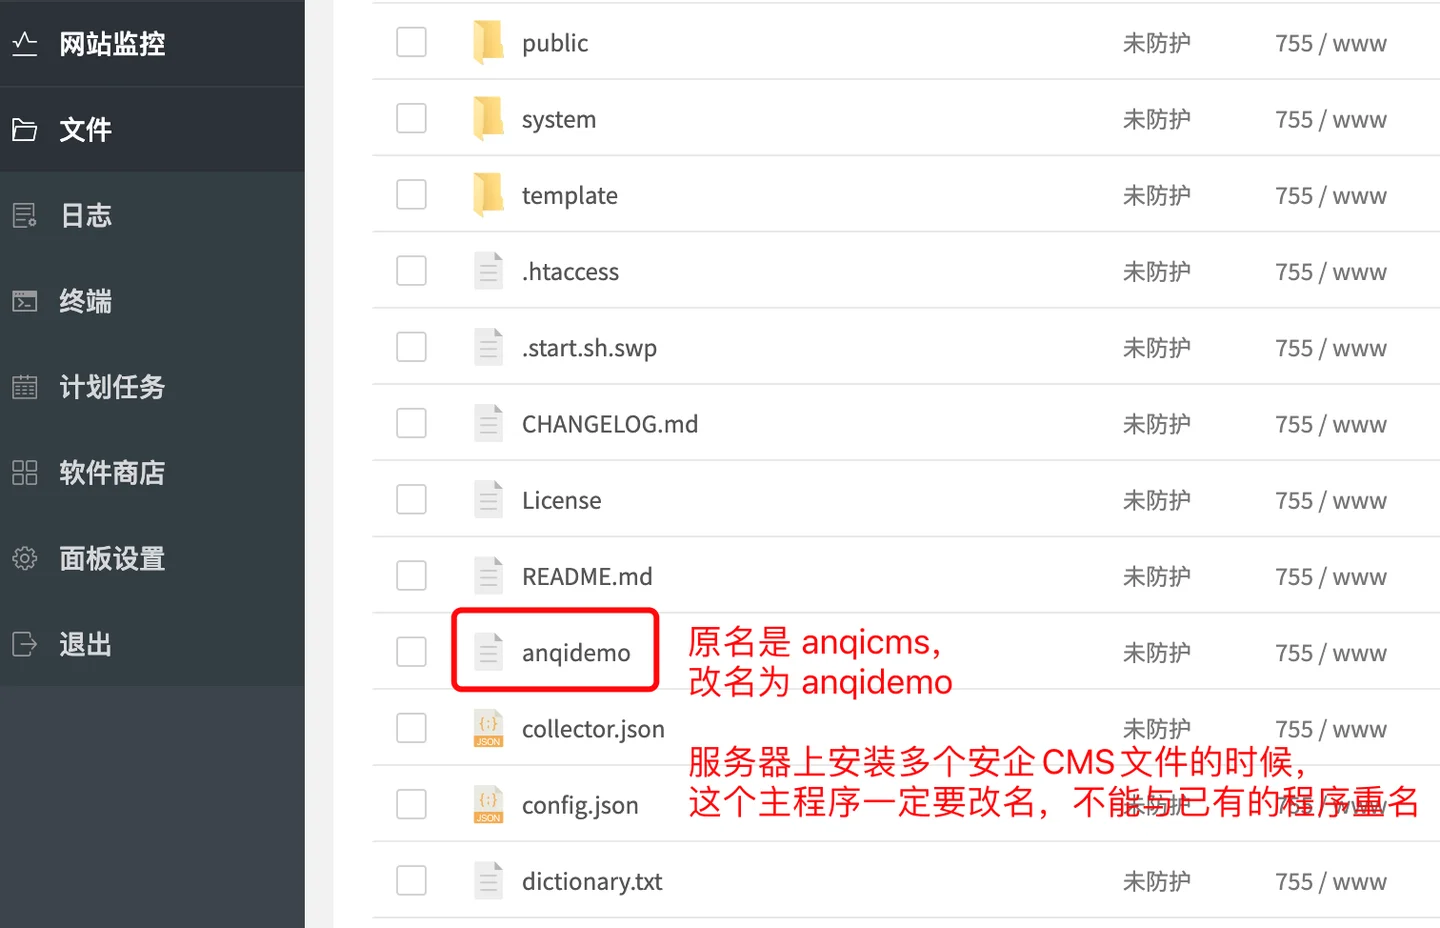
After unzipping, rename the directory under the rootanqicmsWithanqidemo. Note: In the case of installing multiple copies of the security CMS source code on the server, the main program name must not be duplicated, otherwise it may not be possible to start it.
Configure config.
When installing multiple copies of the Anqi CMS source code, you need to manually add config. to make it use a different port. Each program will occupy a port, and ports cannot be reused.For example, we install the second AnQi CMS, the port is8002Then we create a config. in the root directory of the website, and fill in the content as follows:
{
	"server": {
		"site_name": "安企内容管理系统(AnqiCMS)",
		"env": "release",
		"port": 8002,
		"log_level": "info",
		"token_secret": ""
	}
}
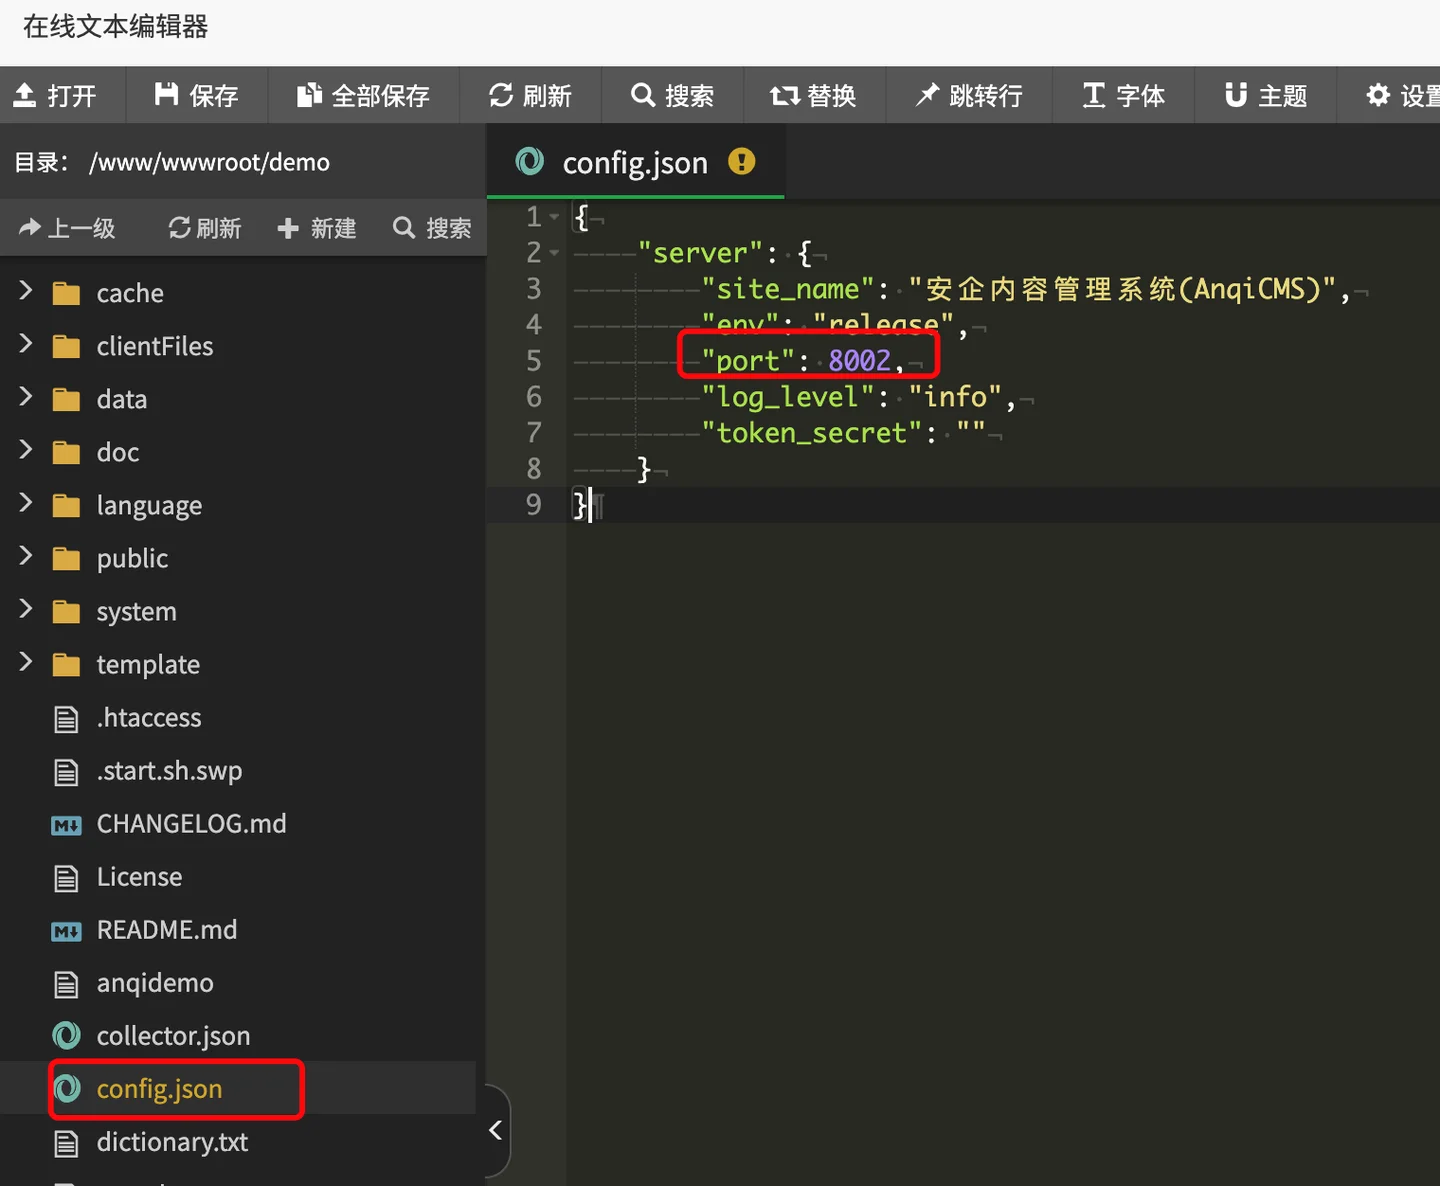
This step can be skipped, and then add the corresponding port to the execute command in the Baota panel.
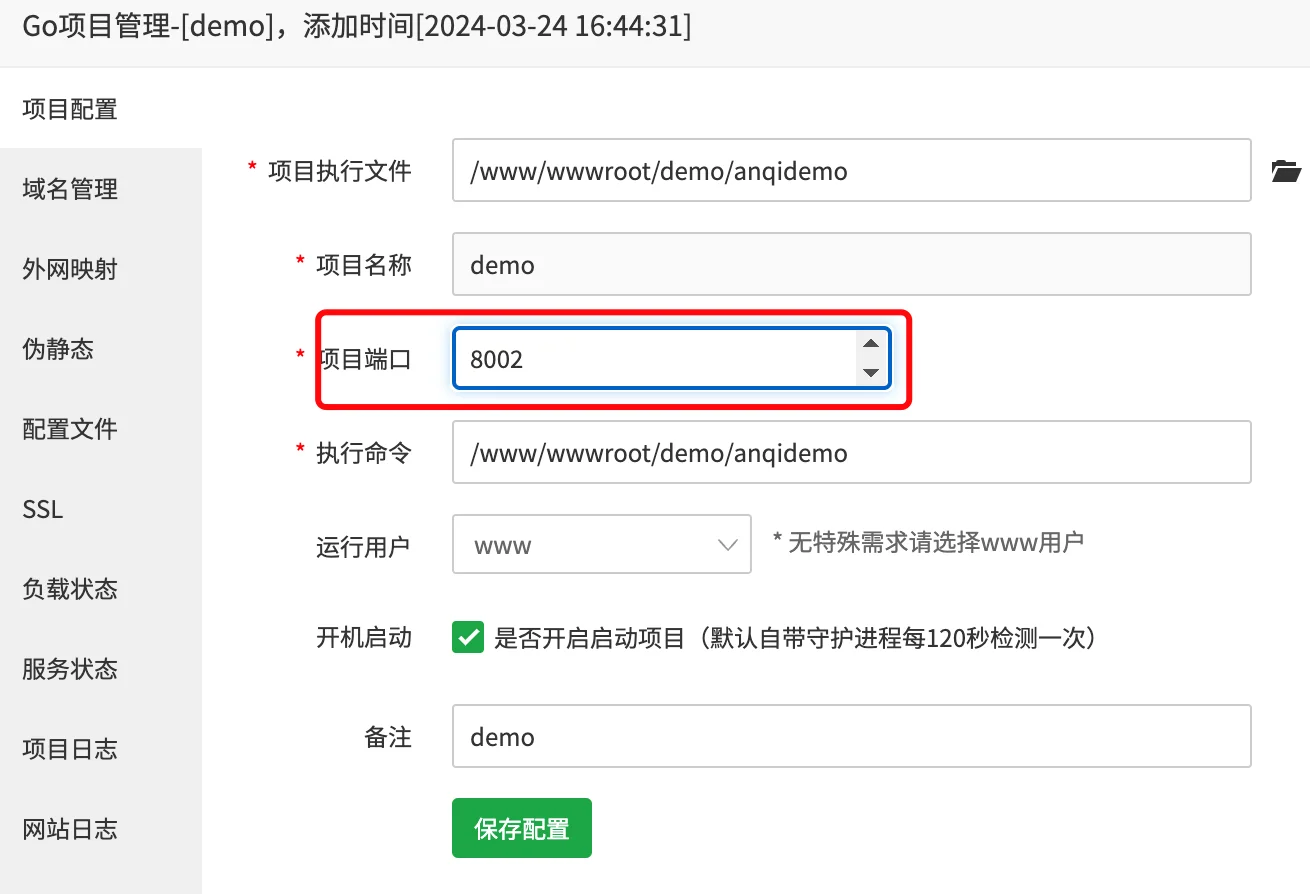
Deployment of Baota Panel 7.9.3 or above:
Click the menu on the left.网站Menu, clickGo项目to the Go project website creation page, click添加Go项目Button, configure in the pop-up window. Project execution file selection/www/wwwroot/anqidemo.com/anqidemo; Fill in the project nameAnQICMS; Fill in the project port8002; This is the port set in the previous step. Fill in the execute command./www/wwwroot/anqidemo.com/anqidemo; Select the running userwww; Check the option to start on boot, the remarks can be filled as needed, the default is fine; enter the domain name you have resolved to the server.Complete the entry and click the submit button to add.
If you did not manually configure config. in the previous step, you can also specify the port in the command, the format is-port {端口号}:
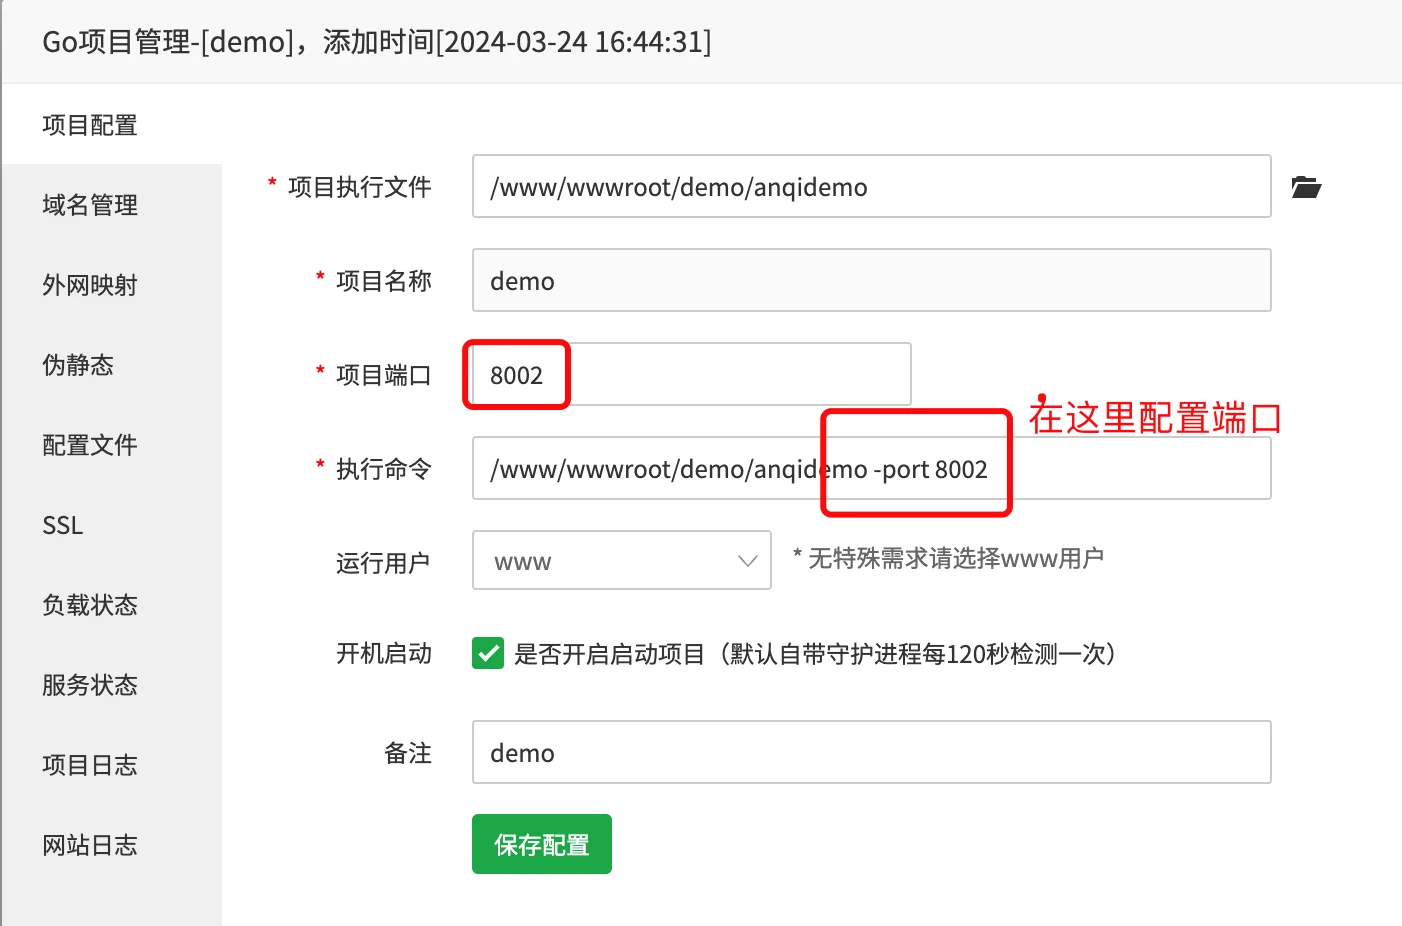
Pay attention to the port number filled here. For example, if the project port is filled with 8002, then the port number of the execution command must also be 8002.
For example, the original command is:/www/wwwroot/anqidemo.com/anqidemoThen the execution command changes to:/www/wwwroot/anqidemo.com/anqidemo -port 8002.
Initialize installation website
In your browser, visit the domain you have bound, go to the AnQICMS initialization installation interface, fill in the database information, background account password information, and website address. As shown in the figure:

If the installation fails, the following situations may occur: 1, the database account password is incorrect, please check the database account password again.2.The database account does not have sufficient permissions to create a database. Please create the database in advance or use an account with higher permissions.3.The administrator password is too short, please set a more complex password.
After installation, visit the front desk and back office, check if everything is normal.