
AnQICMS Installation Tutorial
Supported systems
Supports Windows 10, Windows 11, Windows Server 2016 and above versions.Not supported on Windows 7 and below, Windows Server 2012 and below versions.Supports Ubuntu, Centos, Red Hat, Debian, and other Linux versions based on X86.Supports MacOS.
Deploy AnQiCMS on a Linux server
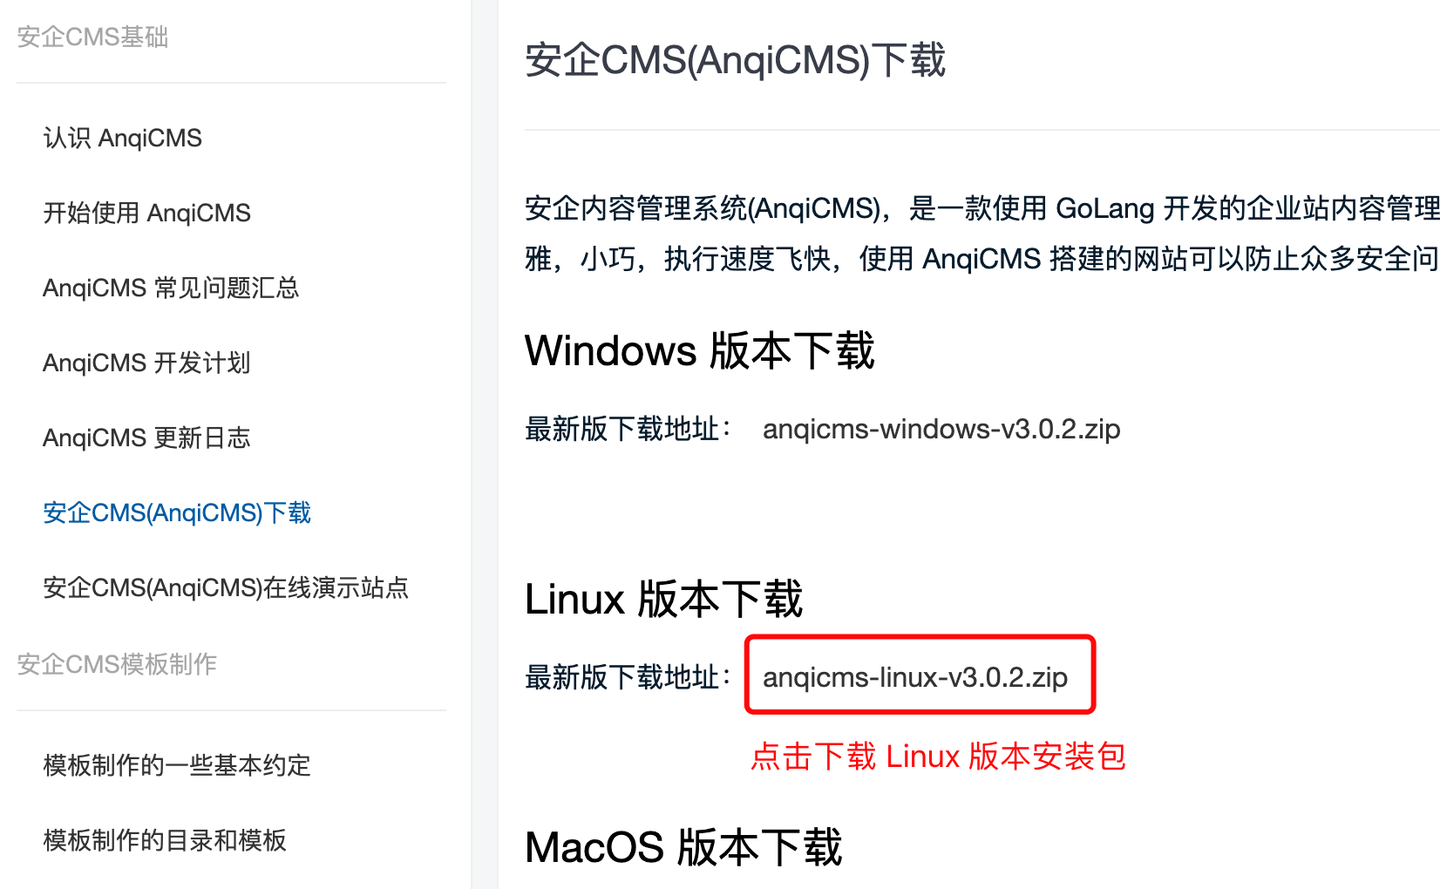
First fromhttps://en.anqicms.com/downloadDownload AnQiCMS Linux installation package.
Deploy on Baota.
First installation:
The Baota panel version 7.9.3 and above supports faster deployment and it is recommended to upgrade Baota panel to version 7.9.3 or above.
Create directories and upload installation packages
- Click the menu on the left.
文件Menu, switch to directory to/www/wwwroot/Directory, inwwwrootCreate a new directory under the directory, the directory is usually named after the domain name, such asanqicms.com. As shown in the figure:
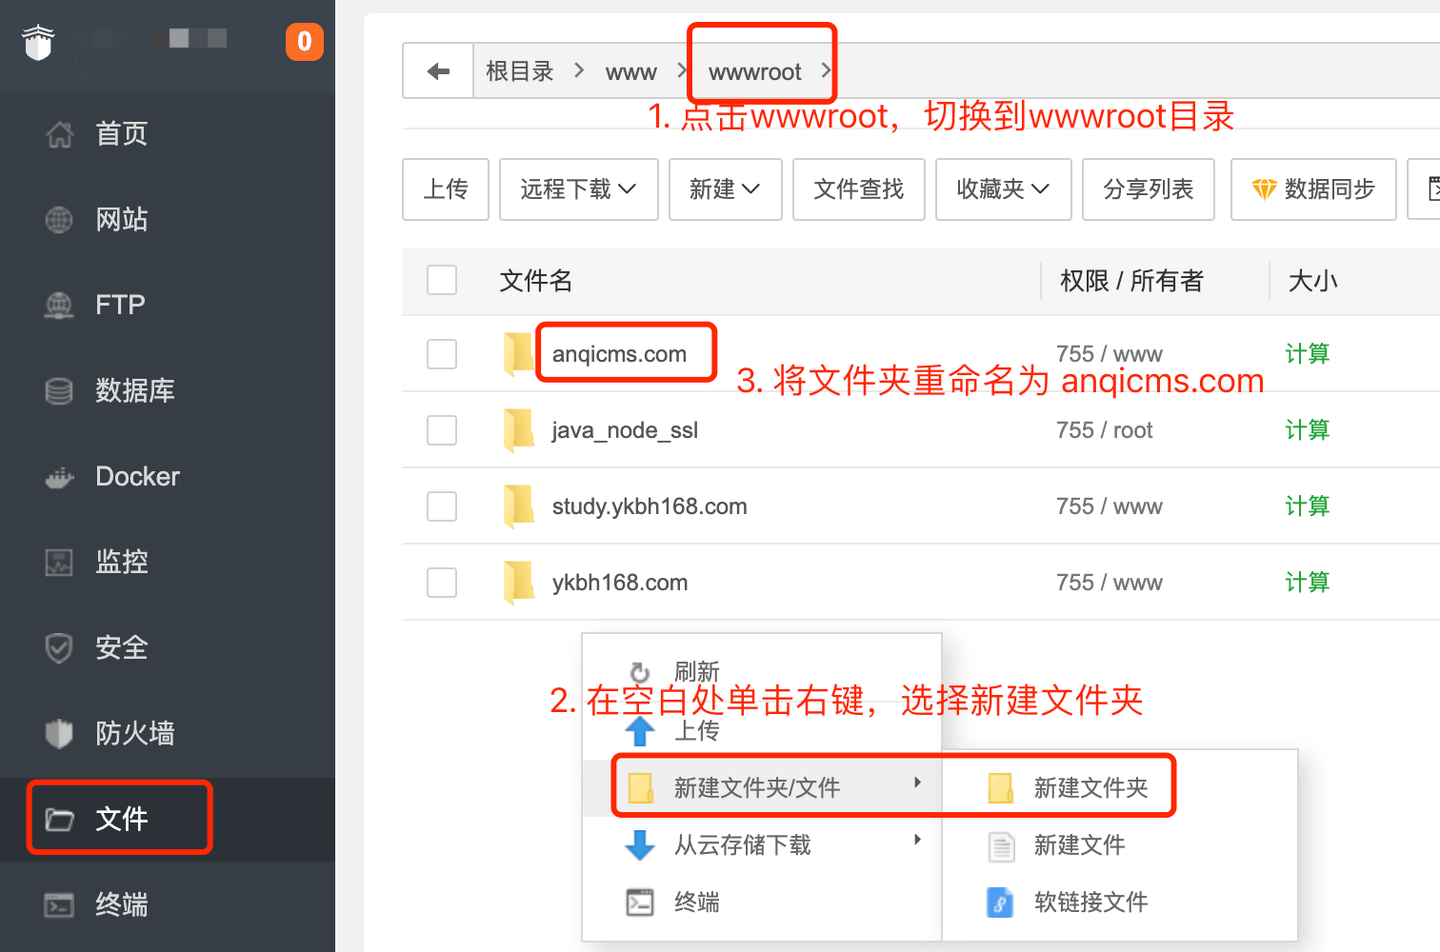
- Click
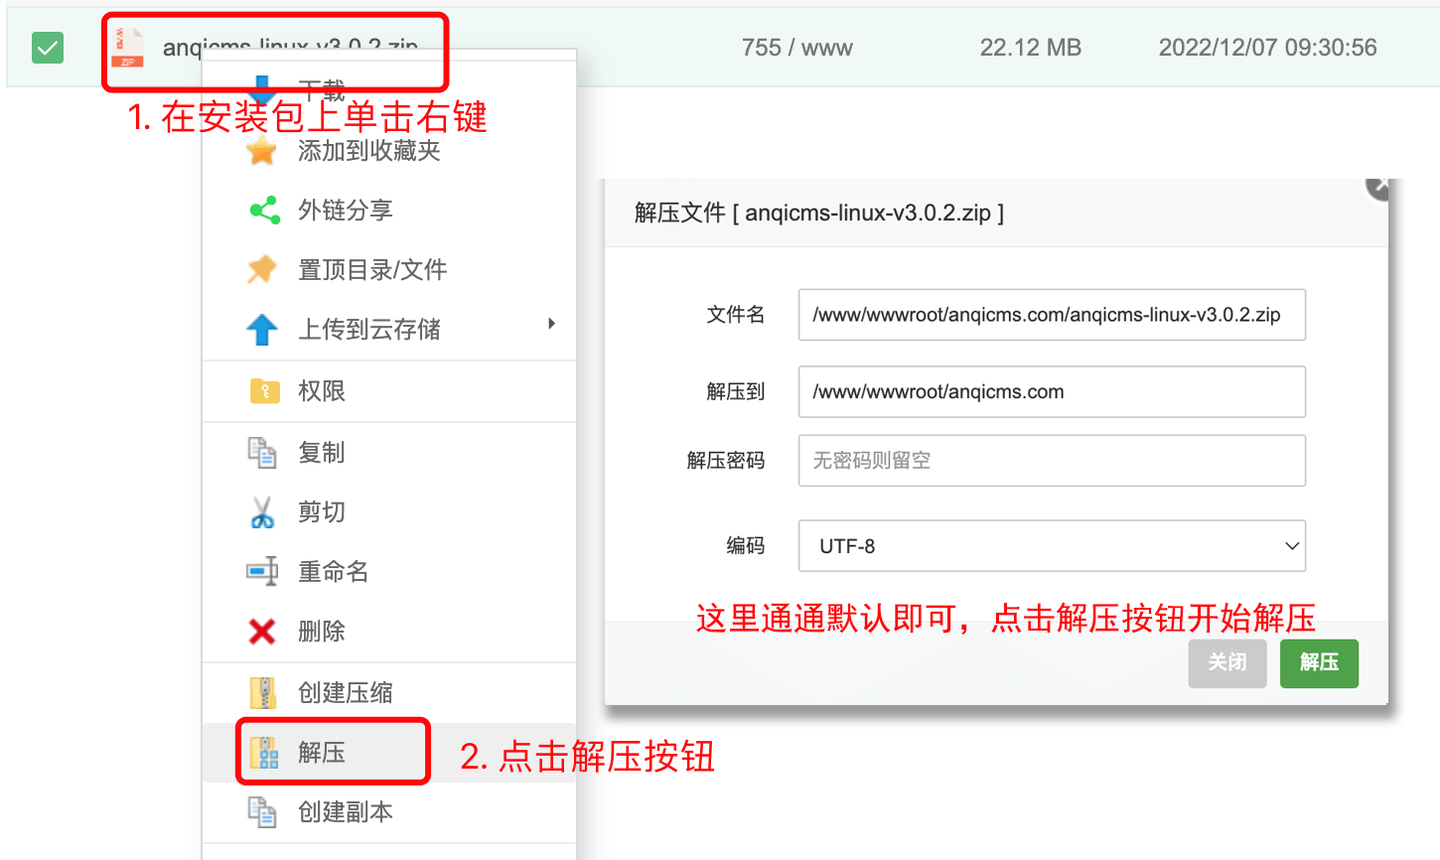
anqicms.comEnteranqicms.comFolder, install the Linux installation packageanqicms-linux-v3.x.x.zipUpload it to the current directory. In the packageanqicms-linux-v3.x.x.zipClick the right mouse button, select Extract, and extract the package to the current folder. As shown in the figure:
Deployment of Baota Panel 7.9.3 or above:
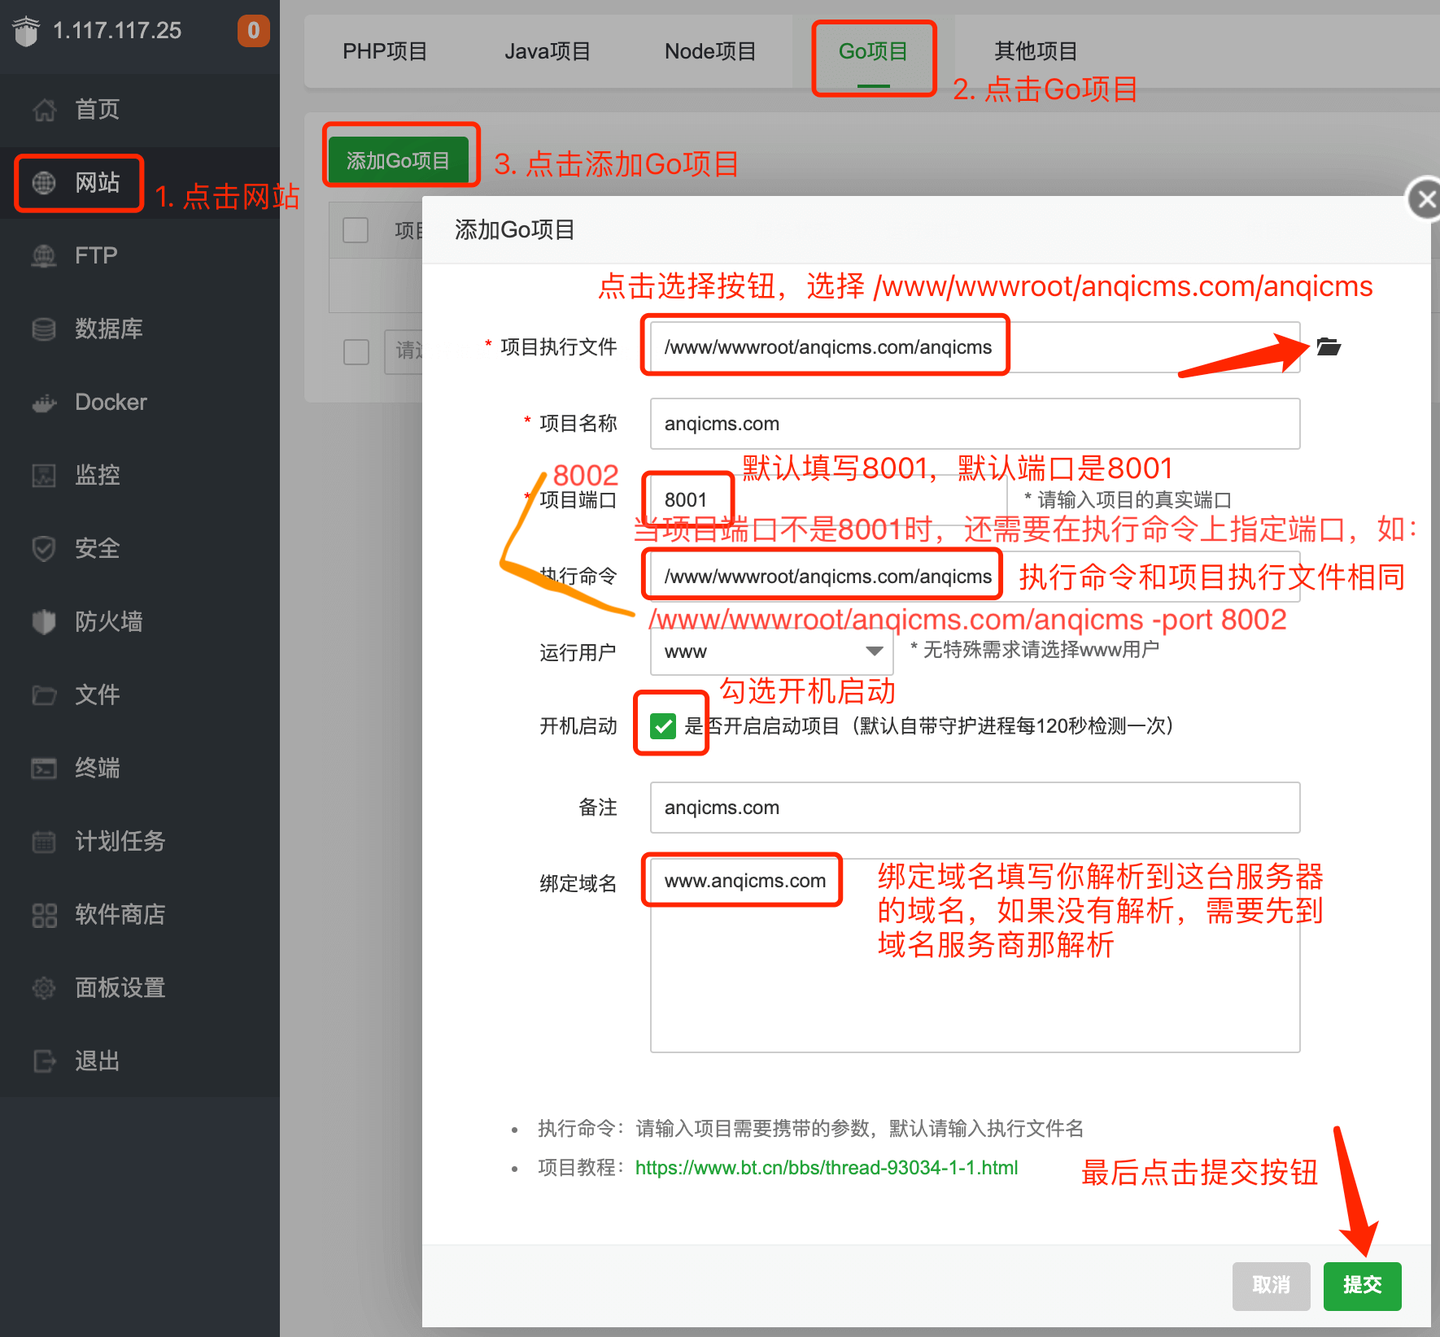
Click the menu on the left.网站Menu, clickGo项目to the Go project website creation page, click添加Go项目Button, configure in the pop-up window. Project execution file selection/www/wwwroot/anqicms.com/anqicms; Fill in the project nameAnQICMS; Fill in the project port8001; Fill in the execution command/www/wwwroot/anqicms.com/anqicms; Select the running userwww; Check the option to start on boot, the remarks can be filled as needed, the default is fine; enter the domain name you have resolved to the server.Complete the entry and click the submit button to add.
Deploy on the old Baota version:
The old version did not use Go project deployment, then choose other project deployment.
Click the menu on the left.网站Menu, click其他项目Come to the other project website, create a page, click添加通用项目Button, configure in the pop-up window, the configuration items are consistent with the Baota 7.9.3 version and above. Project execution file selection/www/wwwroot/anqicms.com/anqicms; Fill in the project nameAnQICMS; Fill in the project port8001; Fill in the execution command/www/wwwroot/anqicms.com/anqicms; Select the running userwww; Check the option to start on boot, notes can be filled in as needed, default is fine; enter the domain name resolved to the server. Click the submit button after filling in, complete the addition.
Initialize installation website
In your browser, visit the domain you have bound, go to the AnQICMS initialization installation interface, fill in the database information, background account password information, and website address. As shown in the figure:
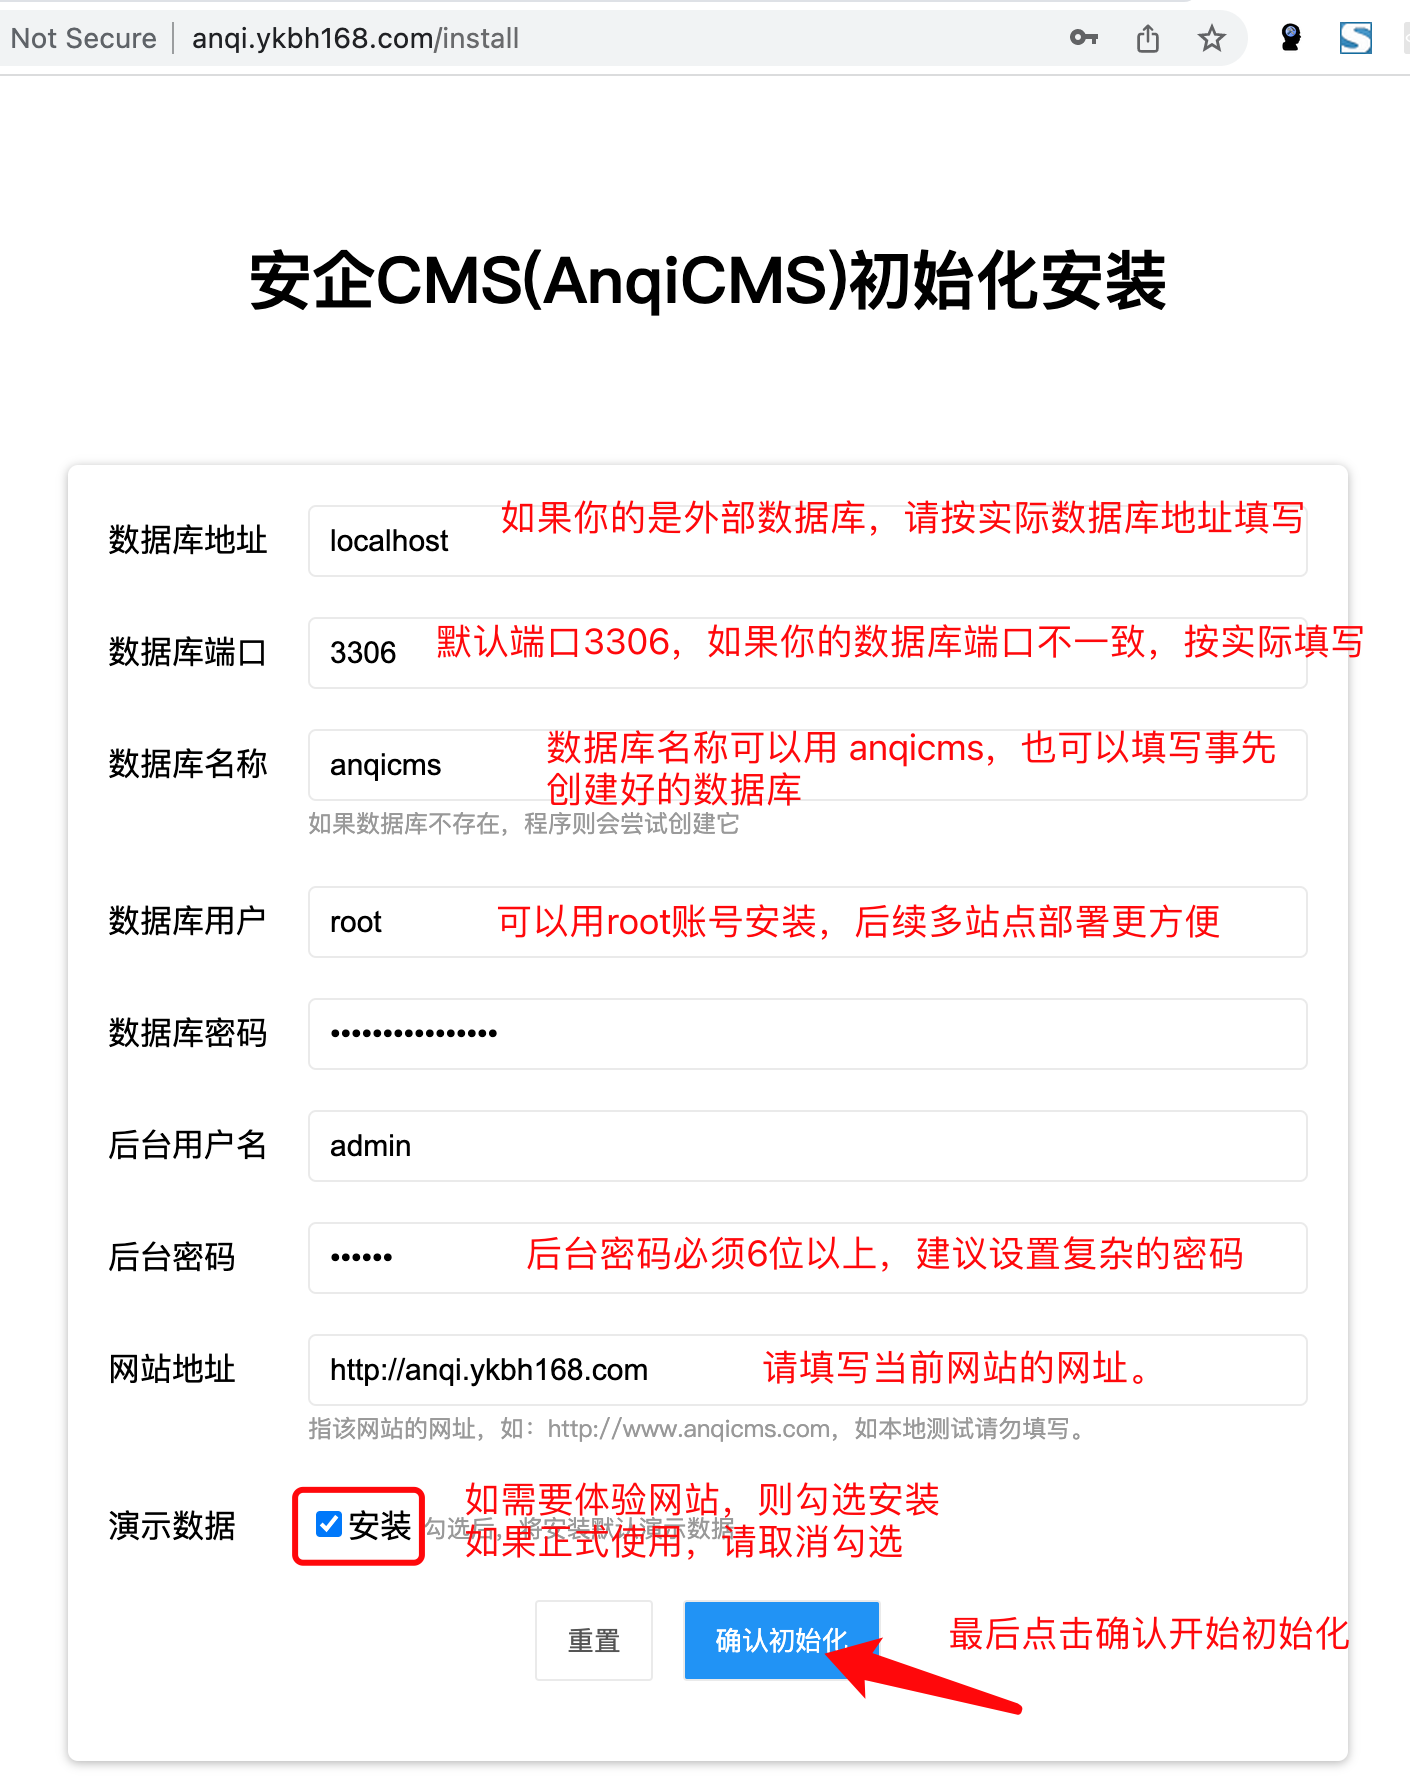
If the installation fails, the following situations may occur: 1, the database account password is incorrect, please check the database account password again.2.The database account does not have sufficient permissions to create a database. Please create the database in advance or use an account with higher permissions.3.The administrator password is too short, please set a more complex password.
After installation, visit the front desk and back office, check if everything is normal.
Install multiple sites on a single server:
AnQiCMS does not need to copy the AnQiCMS code multiple times when installing multiple sites on a single server. Please follow the operation process below to add multiple sites.
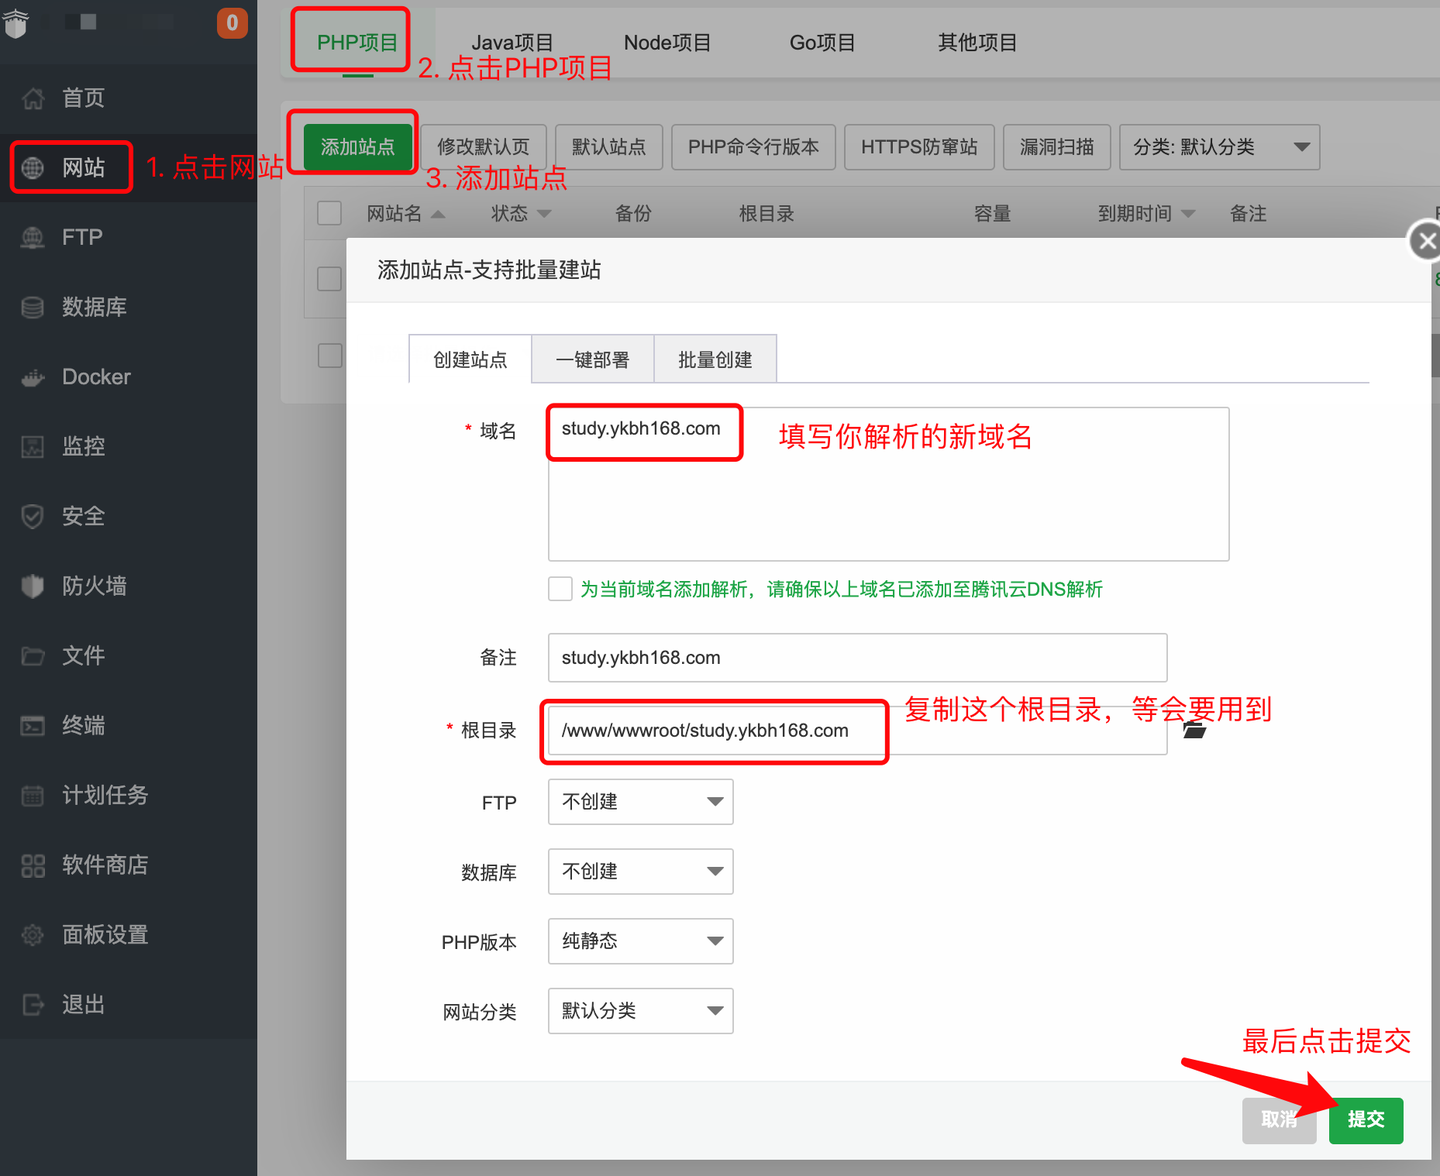
- Click in the left menu of the Baota panel
网站Menu, clickPHP项目Add a PHP site, fill in the domain name parsed to the server in the site creation, keep the root directory as default, copy the root directory address for later use, do not create FTP and database, and choose a pure static PHP version.Click submit last.
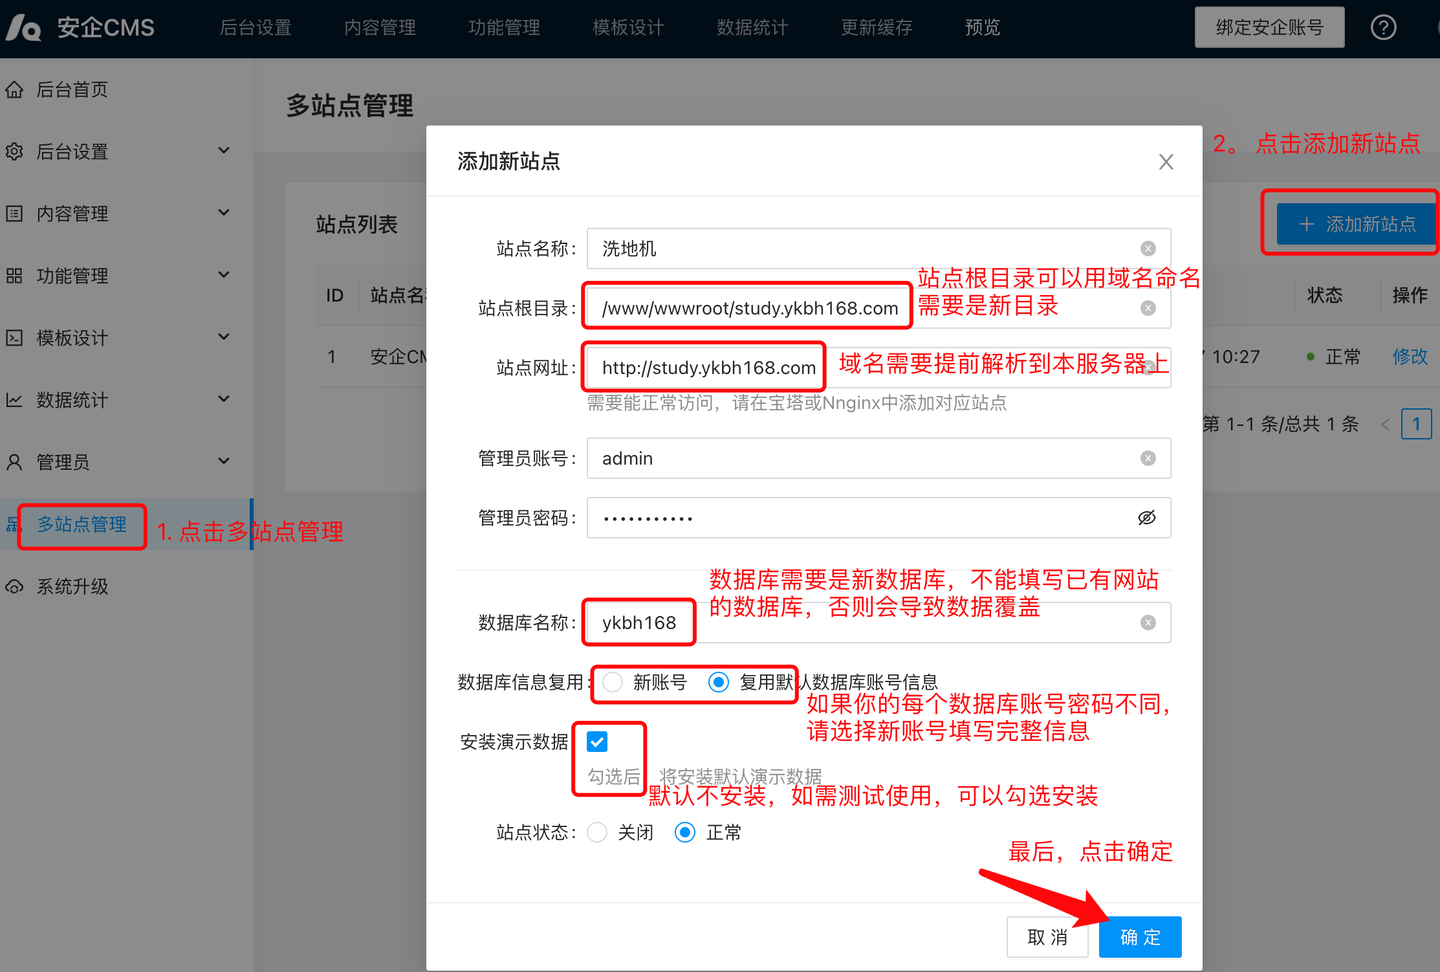
- Click in the left menu of the site background login
多站点管理Menu (only sites with the default installation have multi-site management permissions).In the multi-site management interface, click the Add New Site button.In the pop-up window, fill in the form as per actual./www/wwwroot/study.ykbh168.comThe new directory needs to be created in advance on the server; enter the new website URL, and this URL also needs to be parsed in advance on the server.The administrator account and password are the same as the administrator account password of the new site; the database name needs to be a new database, do not fill in the database of an existing site, otherwise it will cause data overwrite. If the default installation uses the root account to install, you can choose to reuse the database account and omit filling in the account information.Click the OK button last to complete the creation of the new site.
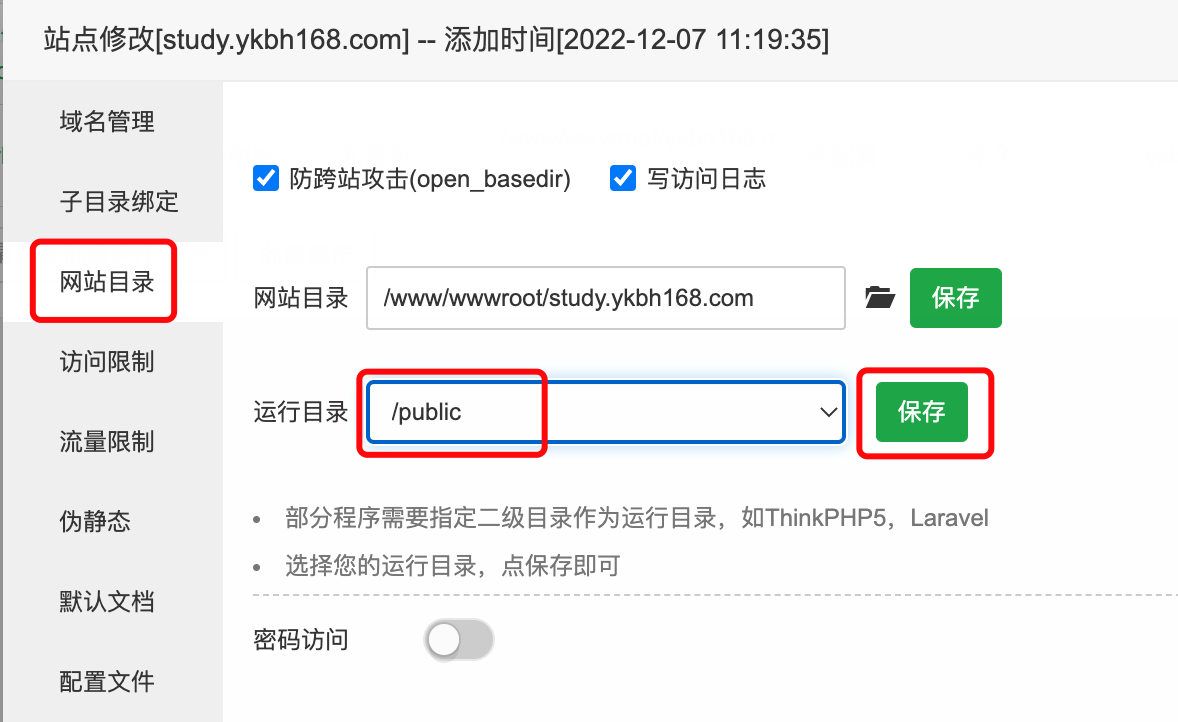
- In the Baota, click on the settings in the new website operation bar, select in the pop-up interface,
网站目录change the runtime directory to/publicclick Save. As shown in the figure:
- Static page setting
- Nginx static page setting
Select
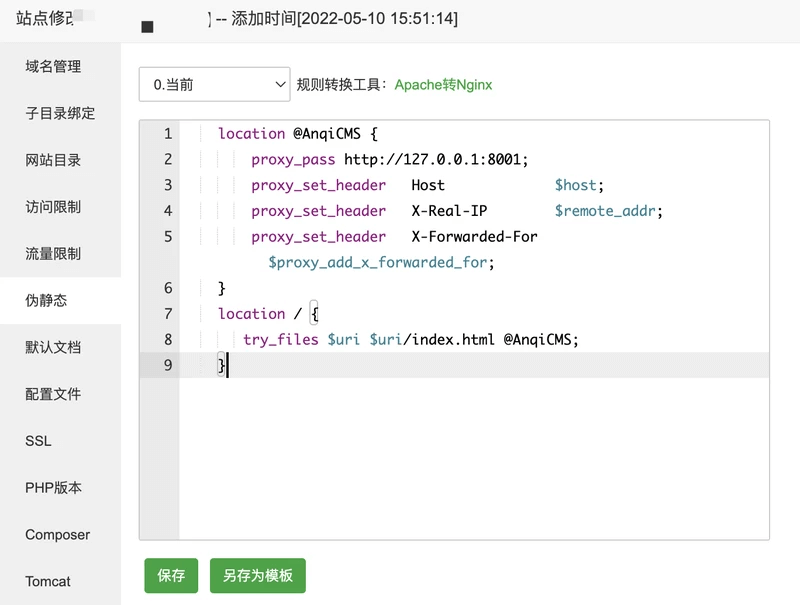
伪静态Menu, fill in the static page rules and click Save. You can click Save as template for convenience to use next time:
    location @AnqiCMS {
        proxy_pass http://127.0.0.1:8001;
        proxy_set_header   Host             $host;
        proxy_set_header   X-Real-IP        $remote_addr;
        proxy_set_header   X-Forwarded-For  $proxy_add_x_forwarded_for;
    }
    error_page 404 =200  @AnqiCMS;
    location / {
       try_files $uri $uri/index.html @AnqiCMS;
    }
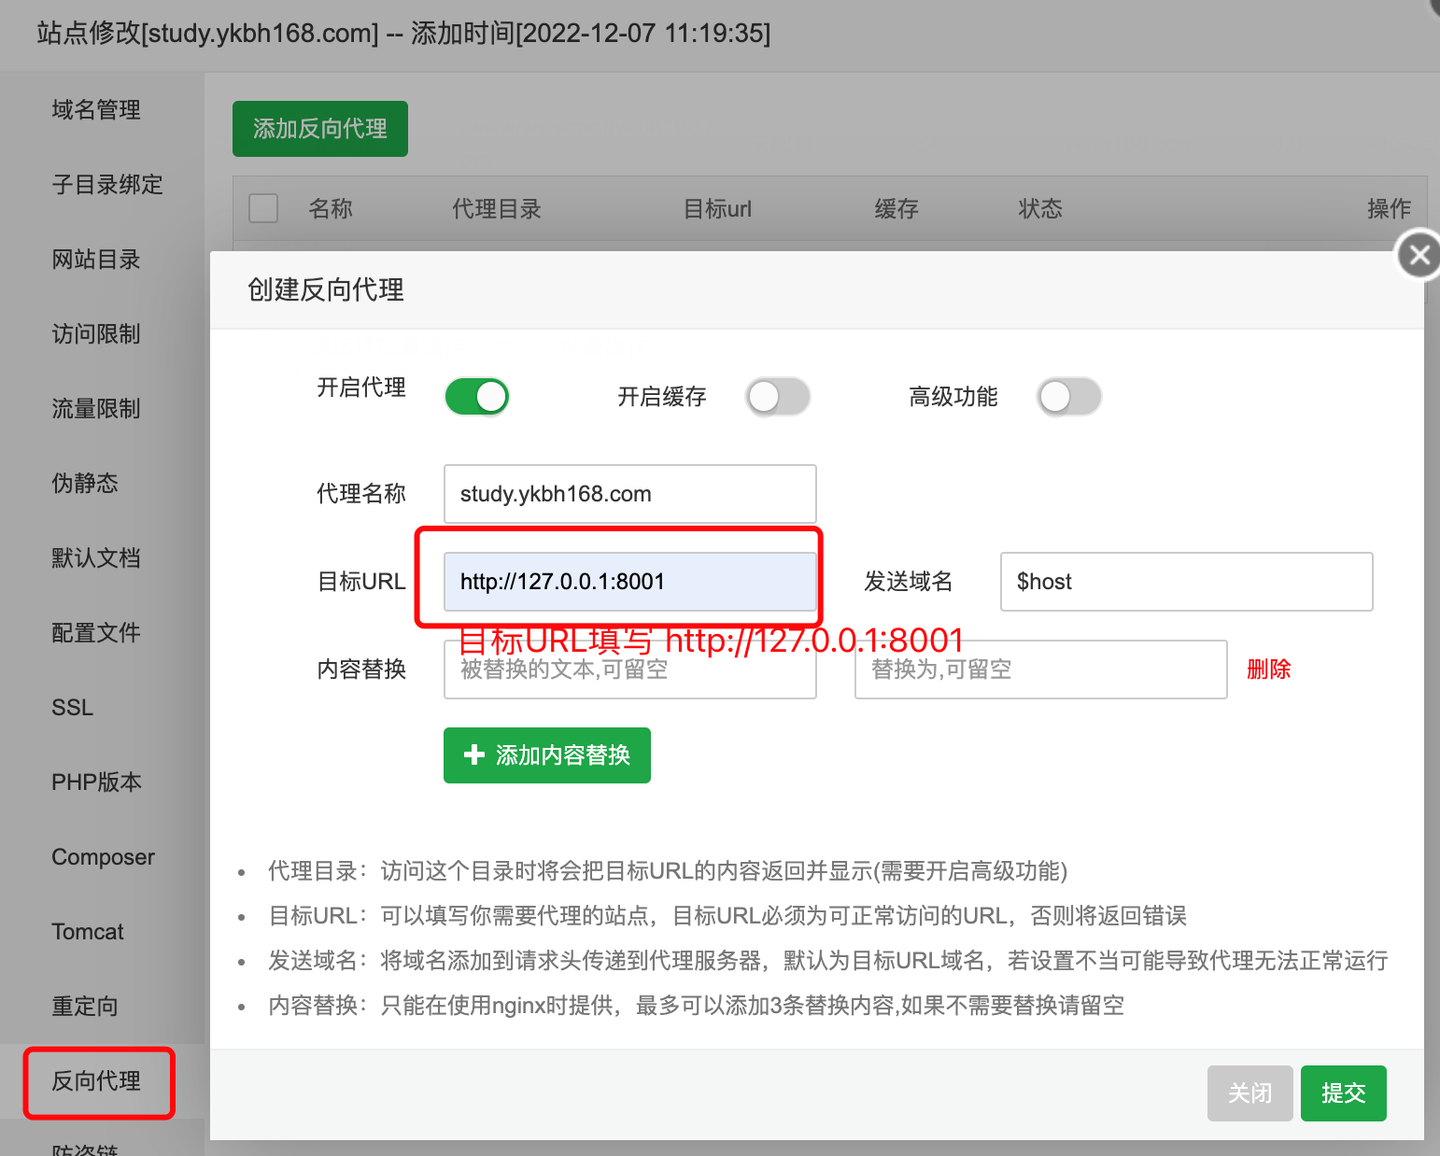
- Apache configuration for pseudo-static pages
If you use Apache software, the pseudo-static rules will be inconsistent. Leave the pseudo-static field blank, select reverse proxy, and fill in the target URL.http://127.0.0.1:8001As shown in the figure:
This new site has been added.
Deploy and install AnQiCMS under the command line.
If your server is not installed with a visual environment management software, it useslnmp.orgThe LNMP one-click installation package environment, or a self-compiled server environment, including local Linux desktop versions such as Ubuntu, CentOS desktop versions, etc., can be deployed using commands.The following operation assumes that you have already installed the LNMP environment.
Download the Linux version of the AnQiCMS installation package from the official website and unzip the package to the specified location. Assume it is unzipped to
/www/wwwroot/anqicms.comDirectory.Add a startup scheduled task:
crontab -e
In the opened editing interface, add a command
*/1 * * * * /www/wwwroot/anqicms.com/start.sh
# ws 保存并退出。
Note that if you manually modify the executable filename of anqicms, you need to manually open start.sh to edit it and change anqicms to the corresponding new filename.
After adding the scheduled task, execute it by hand:
./start.sh
- Configure the Nginx site
Generally, it is also necessary to configure the nginx proxy to use the 80 port or https port.
We need to configure the running directory of the website, that is, the nginx root directory, to the public directory under the site directory.
Set up reverse proxy, target URL:http://127.0.0.1:8001
Here is the nginx proxy code:
    location @AnqiCMS {
        proxy_pass http://127.0.0.1:8001;
        proxy_set_header   Host             $host;
        proxy_set_header   X-Real-IP        $remote_addr;
        proxy_set_header   X-Forwarded-For  $proxy_add_x_forwarded_for;
    }
    error_page 404 =200  @AnqiCMS;
    location / {
       try_files $uri $uri/index.html @AnqiCMS;
    }
Complete nginx configuration:
server
{
    listen       80;
    server_name www.anqicms.com m.anqicms.com;
    root /www/wwwroot/anqicms.com/public;

    location @AnqiCMS {
        proxy_pass http://127.0.0.1:8001;
        proxy_set_header   Host             $host;
        proxy_set_header   X-Real-IP        $remote_addr;
        proxy_set_header   X-Forwarded-For  $proxy_add_x_forwarded_for;
    }
    error_page 404 =200  @AnqiCMS;
    location / {
       try_files $uri $uri/index.html @AnqiCMS;
    }
    access_log access.log;
}
The nginx configuration is complete, restart nginx to make the configuration take effect.
- Configuration of multiple sites
Just repeat the above third step, there are only 2 changes needed, namely server_name and root, fill in the new domain for server_name, and fill in the new site root directory for root.After adding the Nginx site, go to the AnQiCMS backend multi-site management to add the corresponding site.
Upgrade from AnQiCMS 2.x version to 3.x version
Due to the complexity of the AnQiCMS 2.x server installation and deployment tutorial, some problems may occur, and ordinary users are unable to troubleshoot and solve them themselves. Moreover, the 2.x version does not support background restart functionality, therefore, it is recommended to upgrade to the 3.x version.
Select the first installed site as the default site, log in to the website backend, and upgrade to the latest version from the backend.After the upgrade is completed, the site restart is performed through the original scheduled task.If trying to restart and the background version has not been updated to the new version, you can solve it by using the common problems method at the end.
Stop the project using the task scheduler first, then delete the task scheduler.
PressDeployment of Baota Panel version 7.9.3 and above.The method starts by adding to the Go project.When adding a project, the executable file selected is the executable file of the first site's anqicms, and the port is the port of the first site.After the project is added, the website access can be restored.Will not enter the initialization step.
If multiple sets of AnQiCMS have already been installed on the server, they all need to be stopped in the scheduled tasks, and then the scheduled tasks need to be deleted. Next,Install multiple sites on a single serverThe method to deploy to a new site.Note that when adding a new site, the site root directory entered is relative to the original site root directory, and the database information is relative to the original site's database and account information. This will automatically inherit the data of the original site and will not enter the initialization installation steps.
The above method can merge multiple sites into a single AnQiCMS deployment management. Not making these changes will not affect actual use.
Test using AnQiCMS on Windows
You can test and develop locally using AnQiCMS on Windows.On Windows, it is also recommended to install and use Baota software to manage the environment, or install and use Xiaopi (phpStudy) software development environment.
Download the Windows version installation package from the official website, it can be placed in any directory.Extract to the specified folder, for example, extract to the anqicms folder, enter the folder, double-click to run the anqicms.exe file, and you can test it.You need to run multiple sites locally, and you need to cooperate with Baota software or Xiaopi (phpStudy) software, add multiple sites through the website menu of its management interface, and add rewrite rules in the pseudo-static rules.Static page settingAdd the setting method. The local test domain needs to be written tohosts.
How to stop or close AnQiCMS on Windows
To close AnQiCMS on Windows, you need to use the Windows Task Manager.
Press the Win key + R, open the Run window, and entertaskmgrOpen Task Manager, or right-click on the taskbar, select Task Manager. In Task Manager, findanqicms.exeThen click the End Task button to close it.
Test using AnQiCMS on MacOS
You can test and use AnQiCMS on MacOS for local development and debugging.On MacOS, you need to install MySQL and Nginx environments manually.
Download the MacOS version package from the official website, place it in any directory, unzip it, and double-click the anqicms file in the directory to test it. For testing on multiple sites, you can followDeploy and install AnQiCMS under the command line.The process method, the domain name needs to be written to first/etc/hosts.
Common errors during installation
- Port is occupied.
When installing repeatedly on the server or installing multiple anqicms, it may occur that the port is occupied.If set but the website cannot be accessed, it may be due to this reason.lsof -i:{端口号}Check the port status. To check if port 8001 is occupied:
lsof -i:8001

After finding the occupied PID, throughkill -9 {PID}to end it.
kill -9 7621

- The static rule setting is incorrect.