
Docker deployment of AnQi CMS
Docker deployment is the fastest installation method for AnQiCMS, suitable for quick experience and testing environments.
Docker image address:https://hub.docker.com/r/anqicms/anqicms
Method one: Docker command line deployment
Suitable for environments where Docker is already installed (any operating system).
Quick start
# 拉取最新镜像
docker pull anqicms/anqicms:latest

# 运行容器
docker run -d --name anqicms -p 8001:8001 anqicms/anqicms:latest
Parameter description
# -d          后台运行
# --name      容器名称(可自定义)
# -p 8001:8001 映射端口:宿主机端口:容器端口
Operation after startup
- Browser access
http://服务器IP:8001 - Enter the initialization installation interface (if the container does not come with a database, you need to connect to MySQL separately)
- Access after installation is complete
http://服务器IP:8001/system/Enter the backend
Prompt: MySQL in Docker containers needs to be deployed separately. It is recommended to create a MySQL container in the same Docker network and fill in the internal network address of the MySQL container during initialization.
Use Docker Compose (recommended)
Createdocker-compose.ymlFile:
version: '3'

services:
  mysql:
    image: mysql:5.7
    container_name: anqicms-mysql
    environment:
      MYSQL_ROOT_PASSWORD: your_root_password
      MYSQL_DATABASE: anqicms
      MYSQL_CHARACTER_SET_SERVER: utf8mb4
      MYSQL_COLLATION_SERVER: utf8mb4_unicode_ci
    volumes:
      - ./mysql-data:/var/lib/mysql
    restart: always

  anqicms:
    image: anqicms/anqicms:latest
    container_name: anqicms
    ports:
      - "8001:8001"
    depends_on:
      - mysql
    restart: always
Start:
docker-compose up -d
Fill in the database host during the initial installation.anqicms-mysql(Container name), usernameroot, and the password isyour_root_password.
Management commands
# 查看容器状态
docker ps | grep anqicms

# 查看容器日志
docker logs anqicms

# 停止容器
docker stop anqicms

# 启动容器
docker start anqicms

# 重启容器
docker restart anqicms

# 删除容器
docker rm -f anqicms
Method two: Baidu Panel Docker One-click Deployment
Applicable version: Baidu Panel 9.2.0+ (versions released after September 5, 2024)
The demonstration is based on Baota Panel version 9.5.0.
Step 1: Install Docker
- Log in to Baota Panel
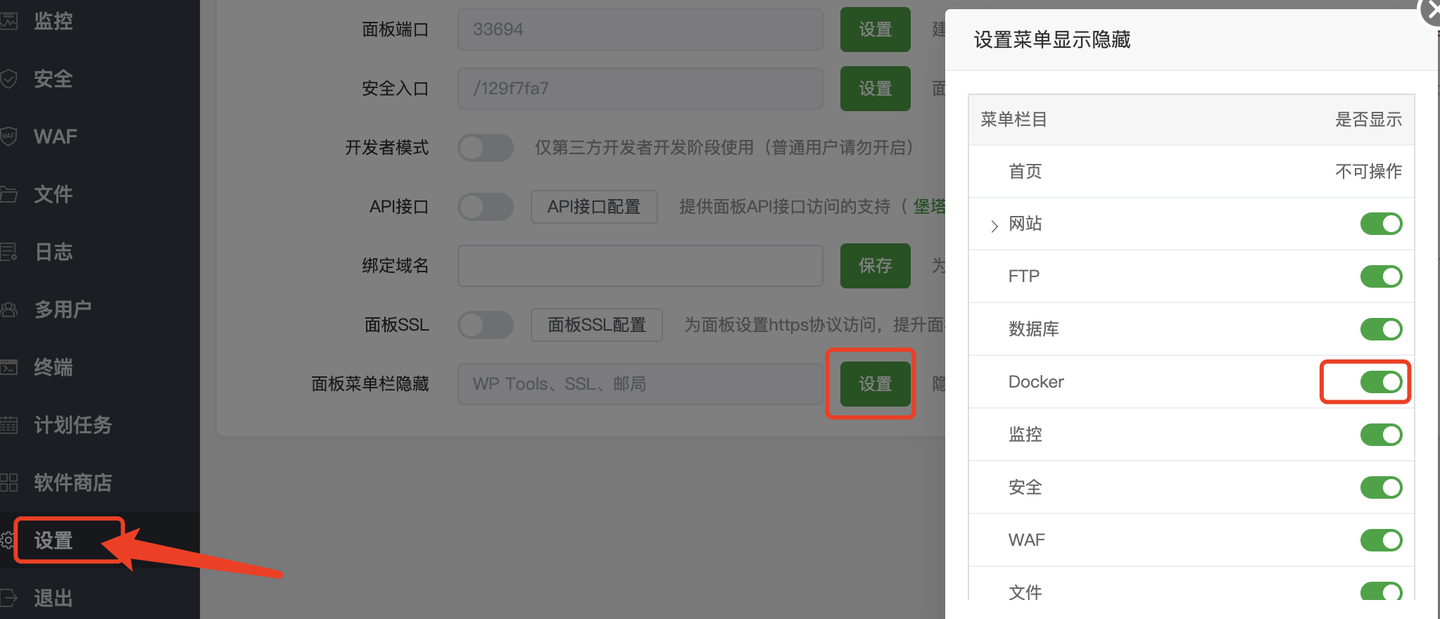
- → Click the menu on the leftDocker(If not found, go to)panel settings→panel menu hidden→ Enable Docker display
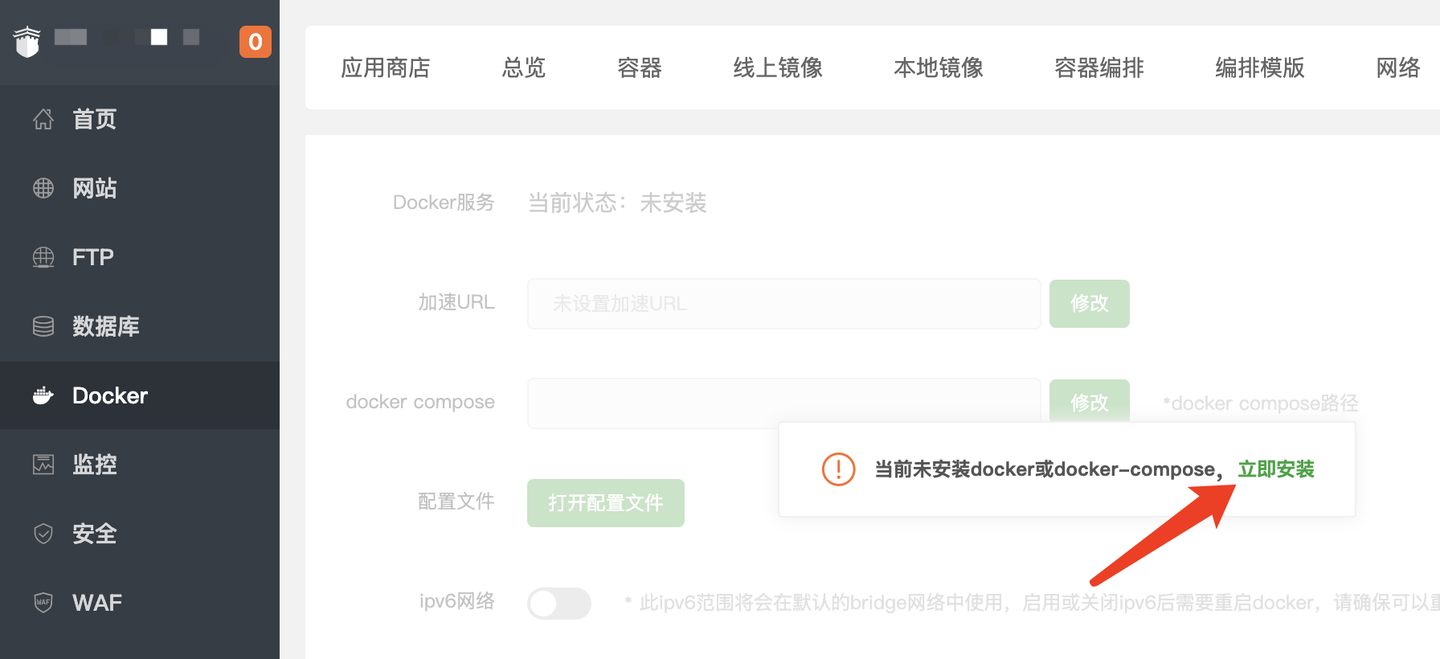
- When entering for the first time, it will prompt to install Docker, clickInstall immediately
- After installation is complete, dependency installation is also required
Step 2: Install Docker version MySQL
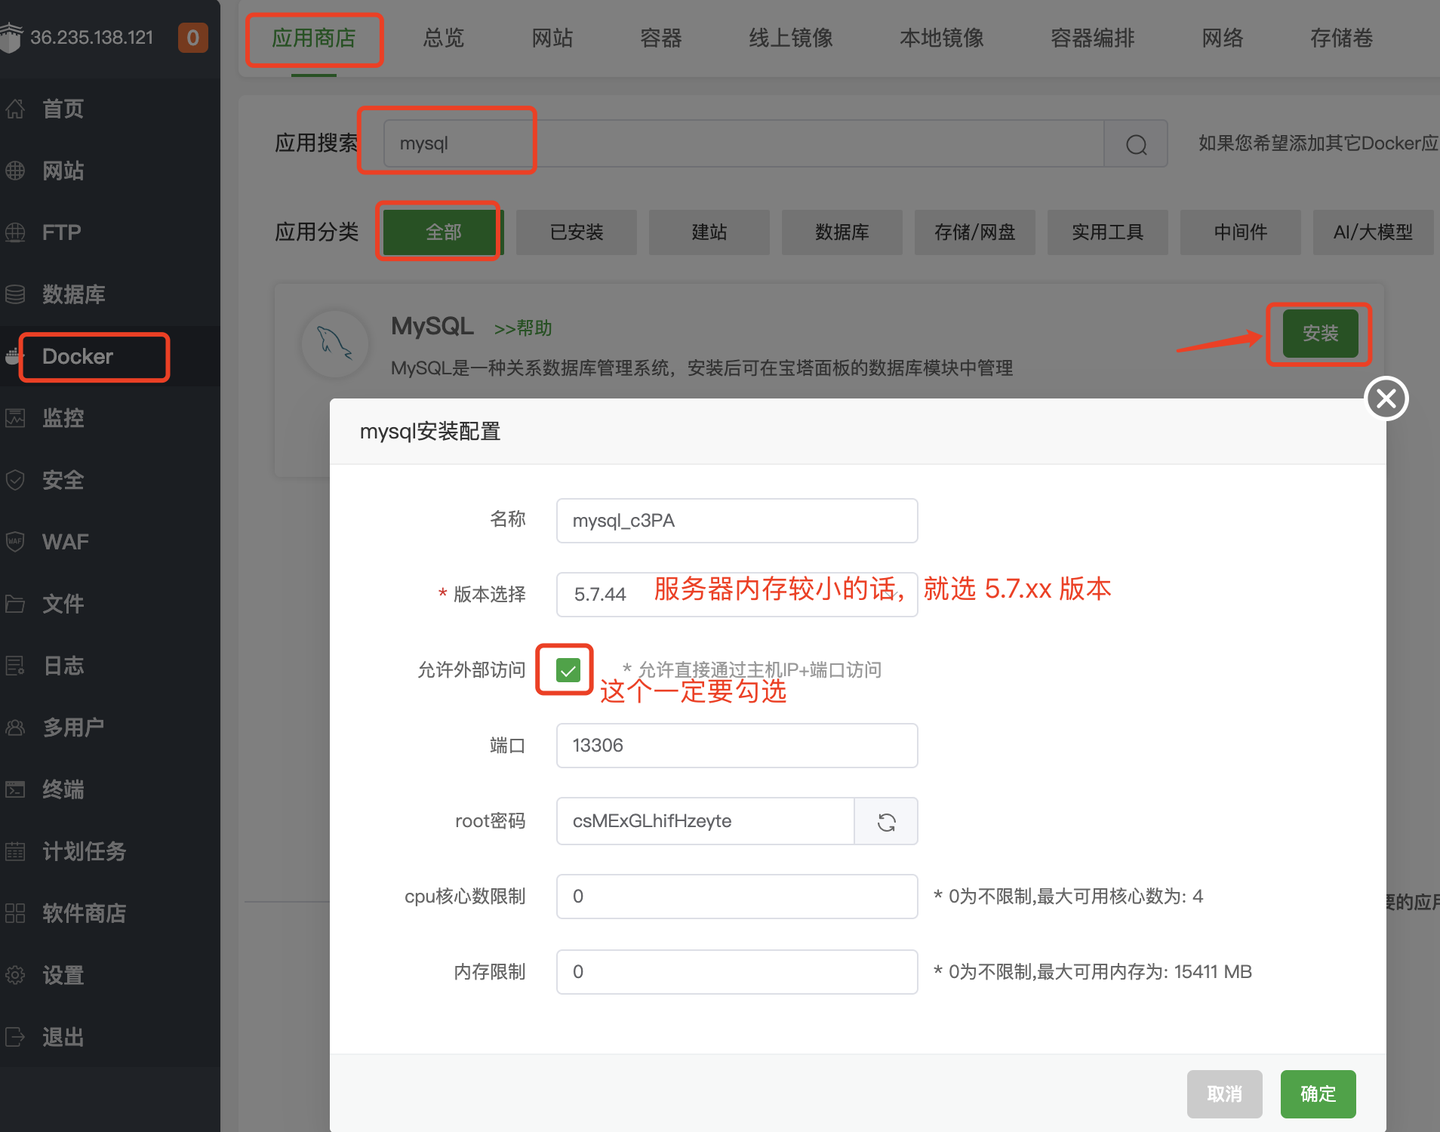
- In DockerApp StoreSearch
mysql - ClickInstall
- If the server memory is less than 2GB, select5.6version, otherwise default5.7
- TickAllow external access(Default ticked)
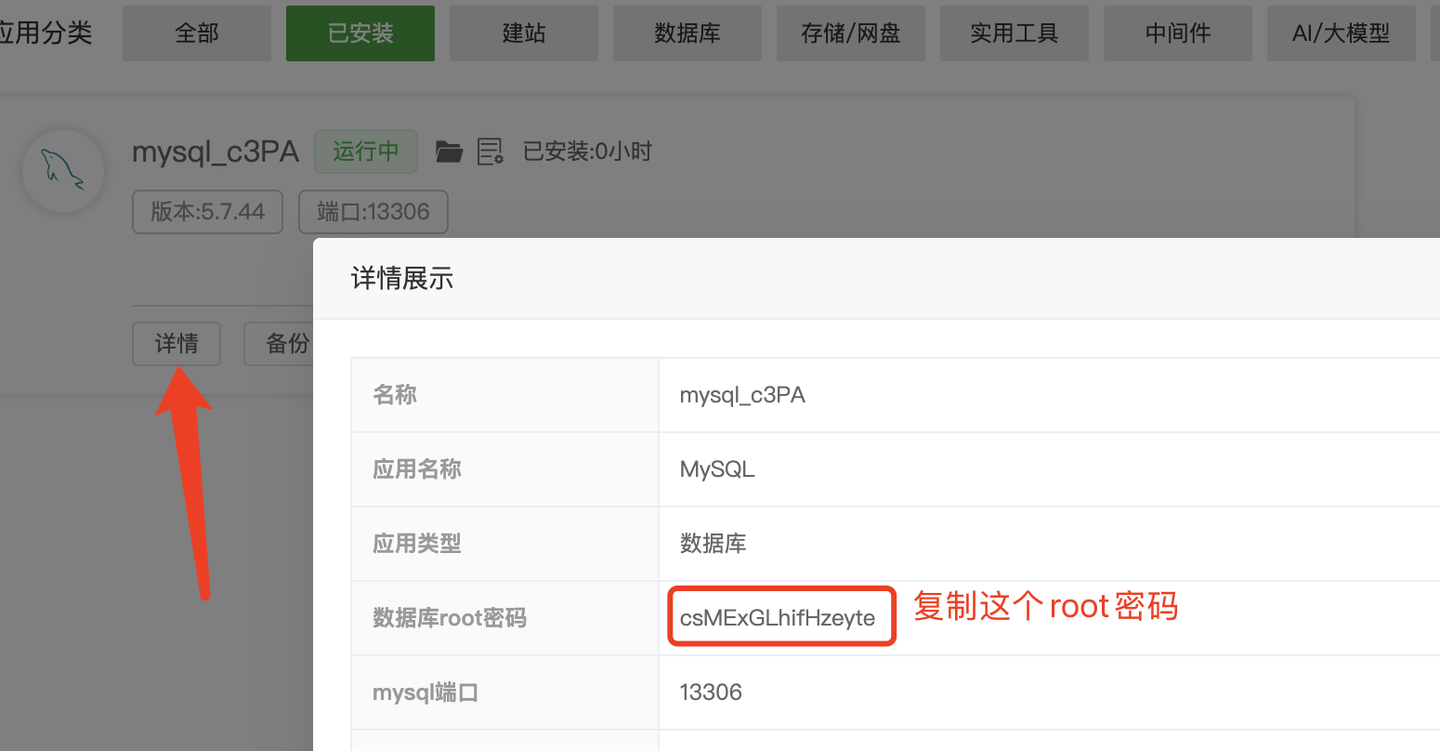
- Click after installation is completeDetailsCopy root password
Step 3: Install AnQiCMS
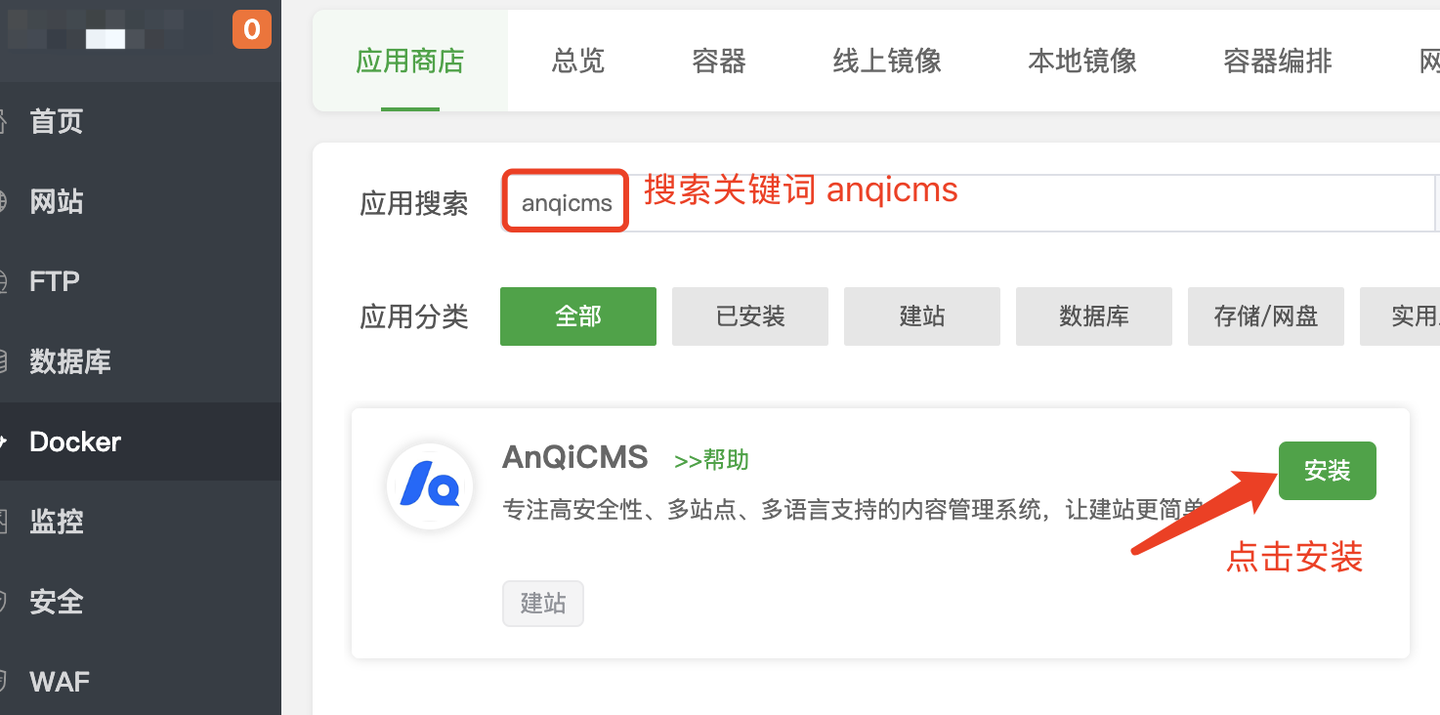
- In DockerApp StoreSearch
anqicms - ClickInstall
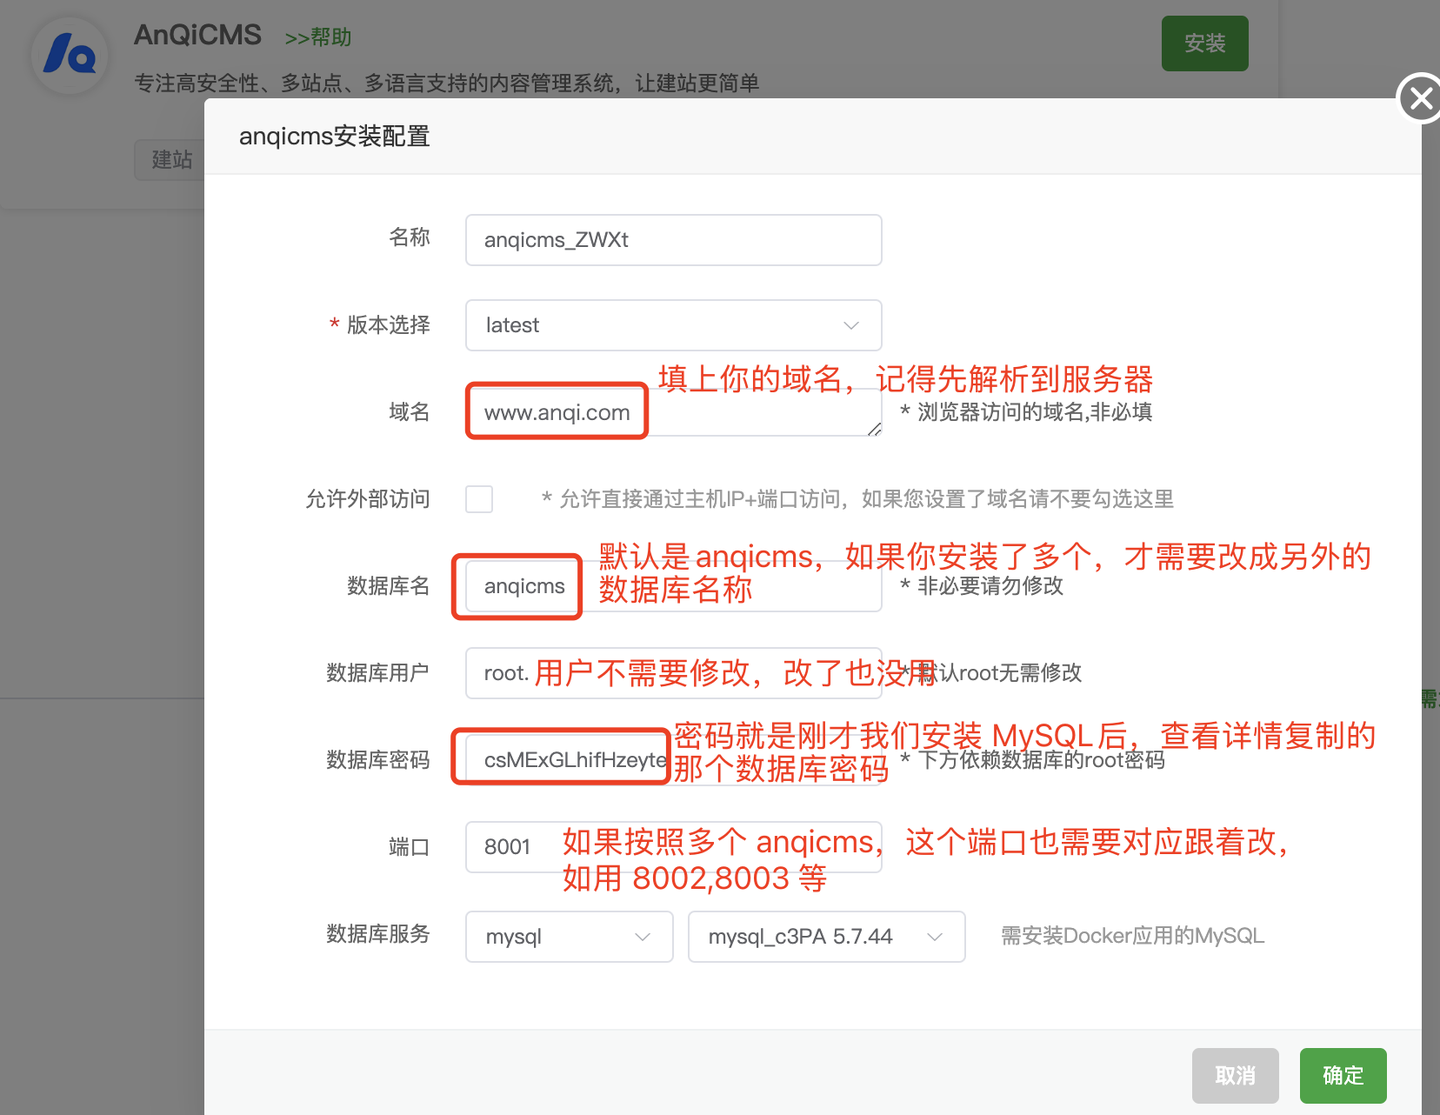
- Enter configuration information:
| Configuration item | Description |
|---|---|
| Website domain | The domain name parsed to the server (such aswww.anqicms.com) |
| Database name | DefaultanqicmsNeed to be modified when installing multiple sites |
| Database password | MySQL root password copied in the previous step |
| Port | Default8001Need to be modified to when installing multiple sites8002/8003etc.) |
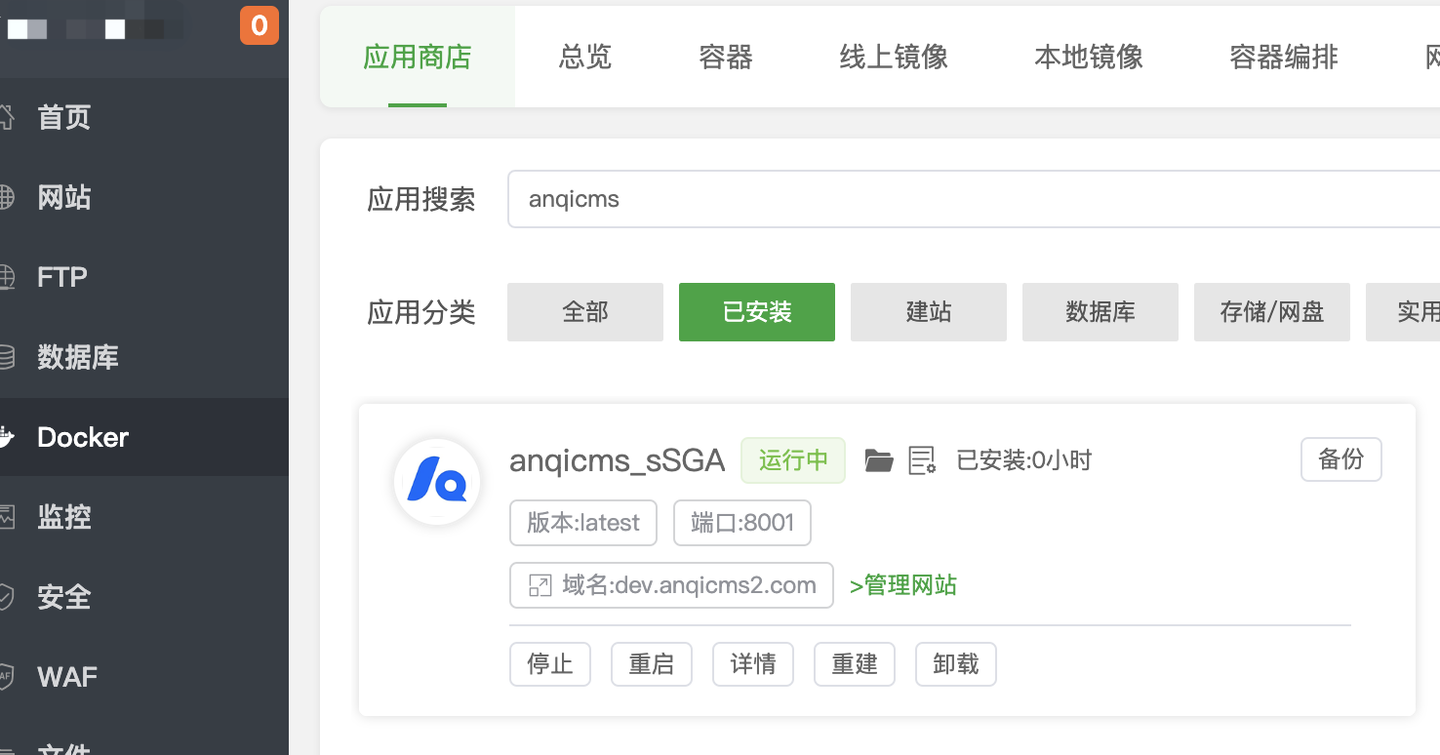
- ClickConfirmWaiting for 1-5 minutes to complete installation
Step 4: Start using
Default account password after installation:
| Project | content |
|---|---|
| Default account | admin |
| Default password | 123456 |
| Back-end address | http://你的域名/system/ |
Second method of expansion: Add multiple sites through Baota reverse proxy
If you have already deployed AnQiCMS through Baota Docker and want to add more sites on the same server, you can use Baota'sreverse proxy sitefunction to implement, no need to create a new container.
Step 1: Add reverse proxy site
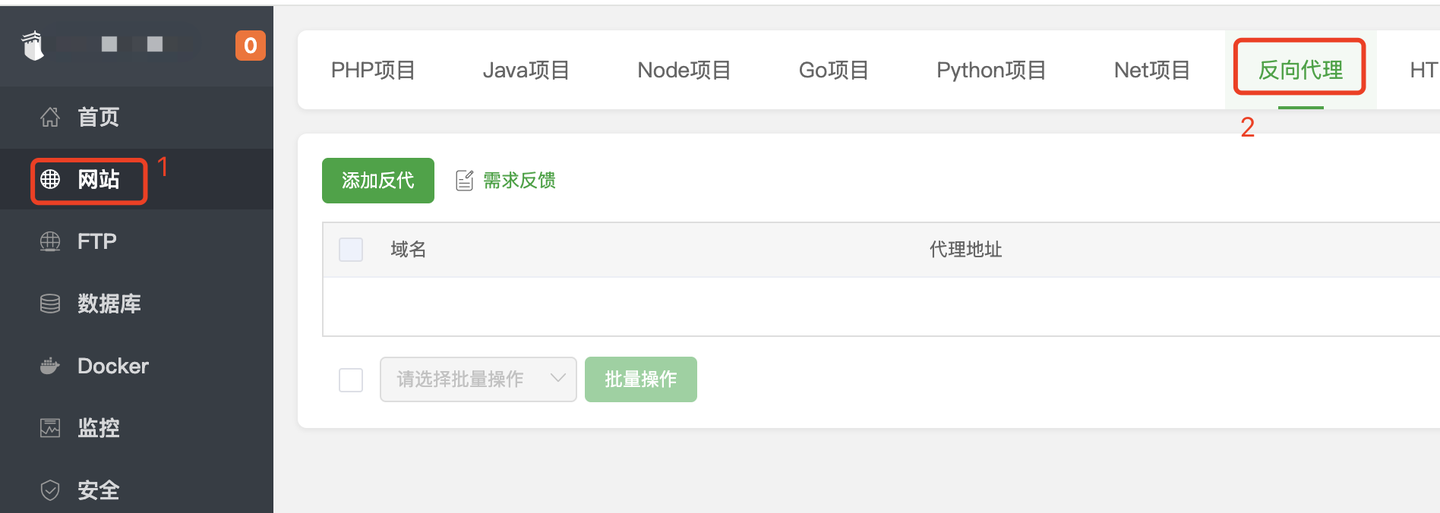
- Baota panel →website→Reverse Proxy→Add Reverse Proxy
- Fill in the following configuration:
| Configuration item | Fill in the content |
|---|---|
| Domain | New site domain (such asdev.anqicms.com) |
| Target URL | http://127.0.0.1:8001(Default port, if multiple containers are installed, fill in the corresponding port) |
- ClickConfirmComplete creation
Step 2: Add a new site in the AnQiCMS backend
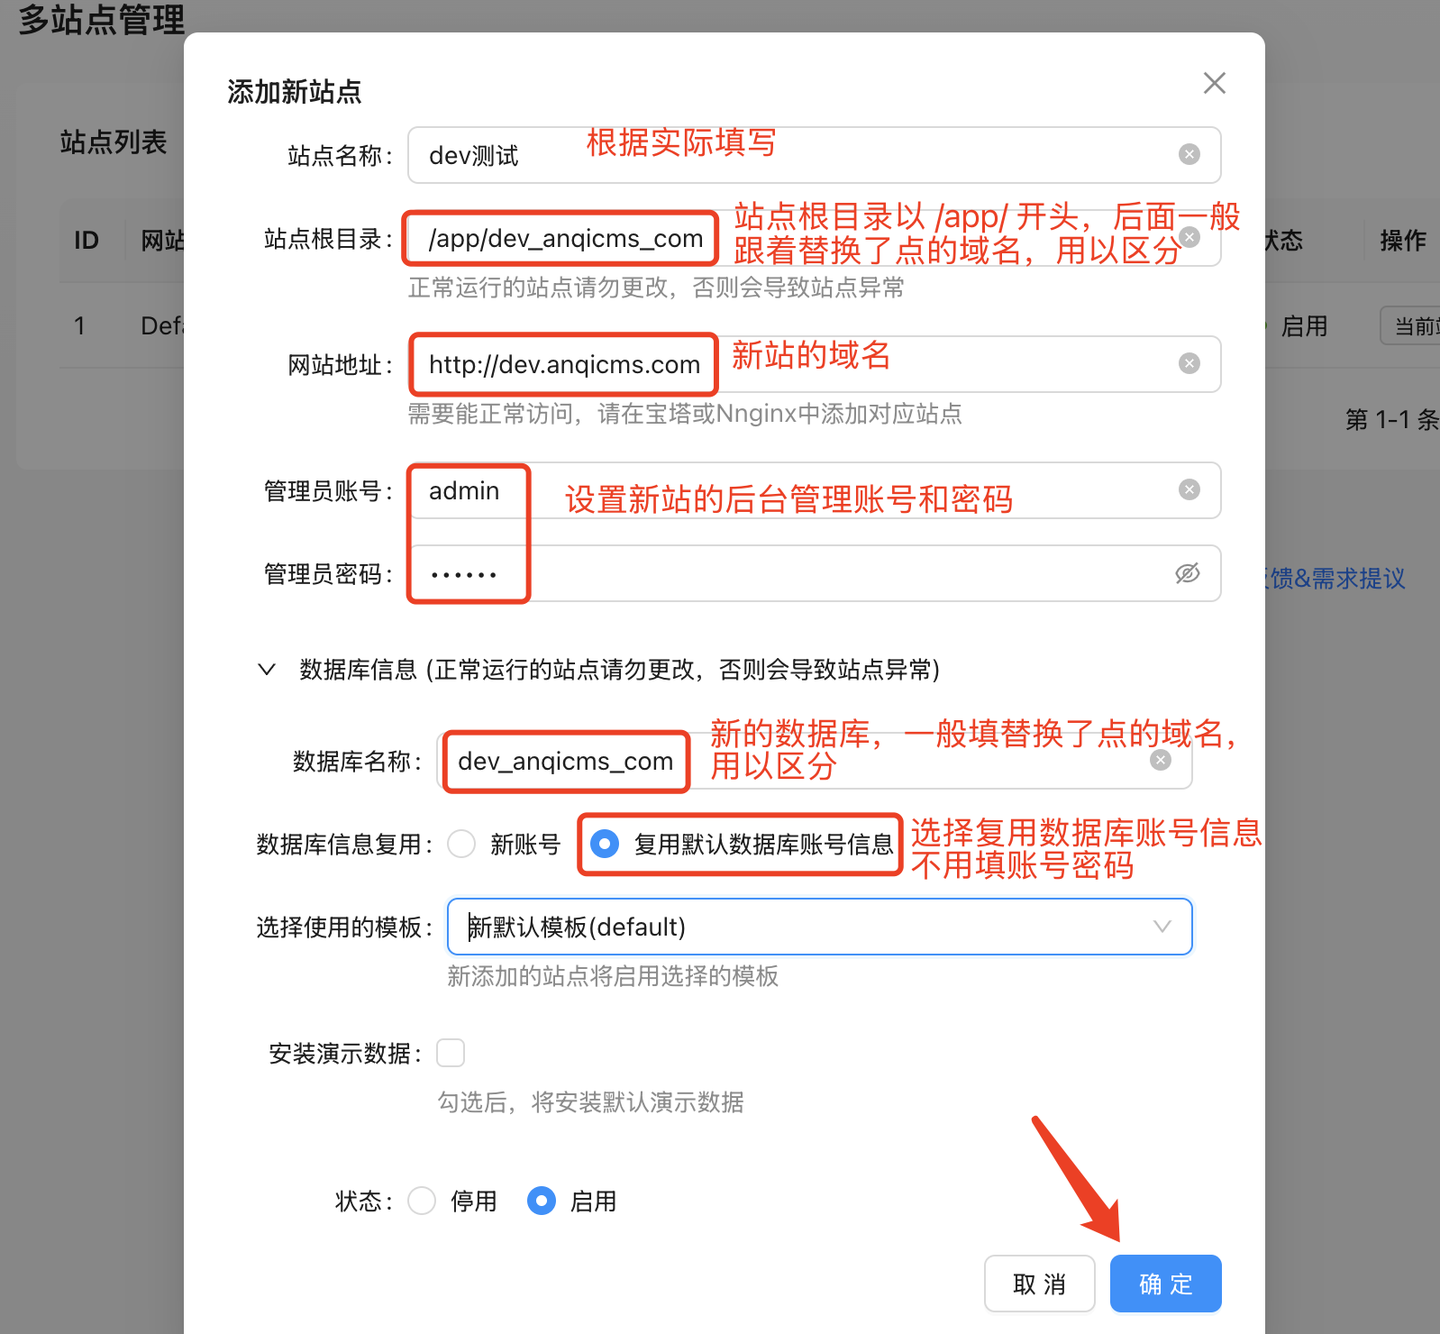
- Log in to the main site backend →Multi-site management→Add a new site
- Enter the following information:
| field | Description |
|---|---|
| Site name | Fill in according to the actual situation |
| Site root directory | Start with/app/Start with, such as/app/dev_anqicms.com(Root directory of Docker container) |
| website address | New site domain name, such ashttp://dev.anqicms.com |
| Administrator account | Administrator account for the new site |
| Administrator password | The administrator password of the new site |
| Database name | New database name, such asdev_anqicms_com(Do not duplicate existing libraries) |
| Duplicate database information | SelectReuse the default database account information(Docker environment has complete database permissions) |
| Select the template to use | Select According to Requirement |
- ClickConfirmComplete creation
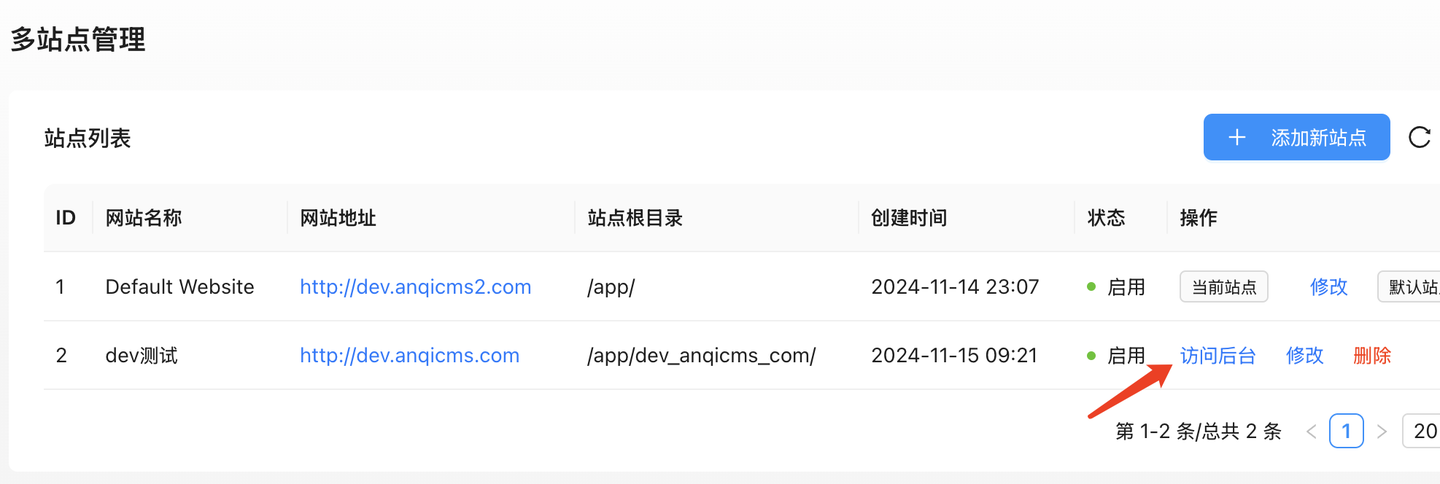
Step 3: Use the new site
After creation, the new site can be accessed directly. The back-end address ishttp://新域名/system/.
Method three: 1Panel Docker Deployment
Step 1: Install MySQL and OpenResty
In 1PanelApp StoreInstall the following software:
- OpenResty(As a reverse proxy instead of Nginx)
- MySQL5.7+ or 8.0
Step 2: Create AnQiCMS container
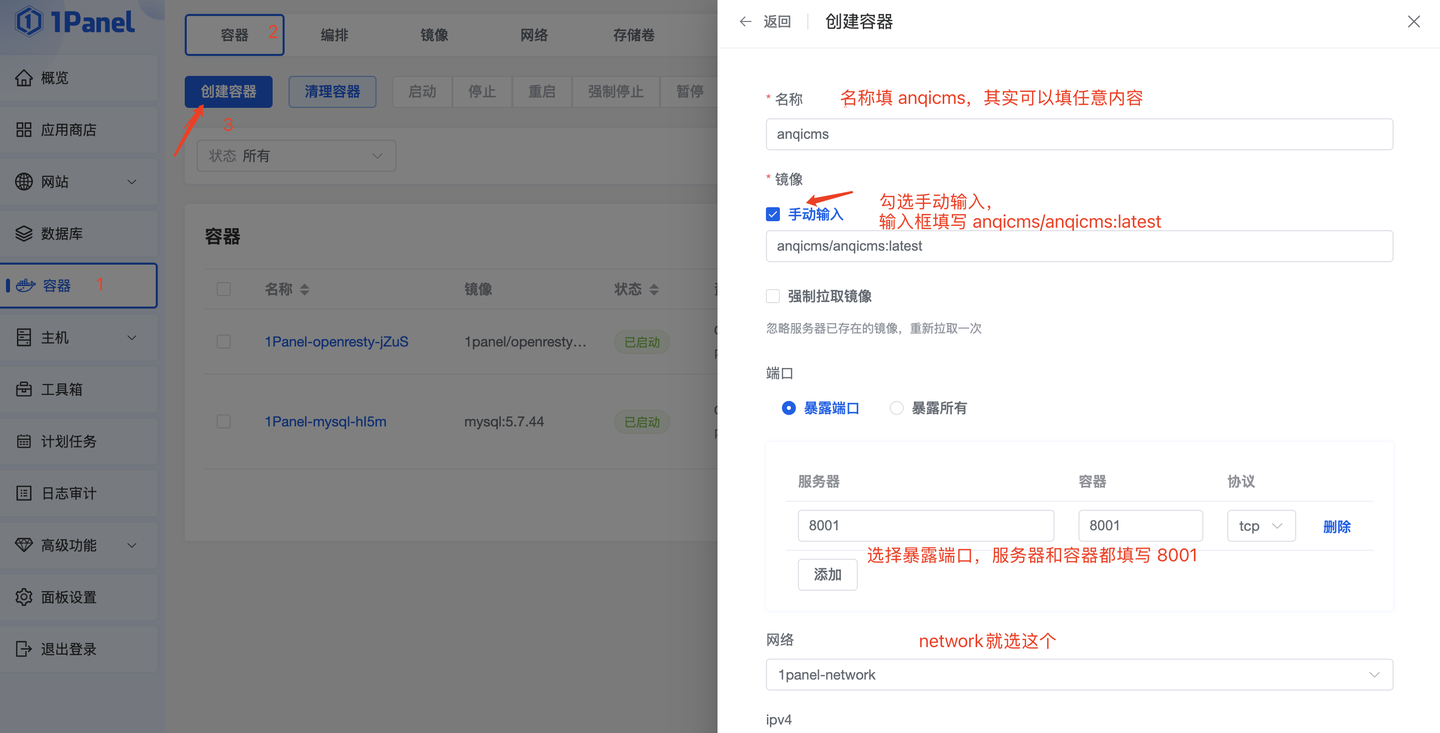
- → Click the menu on the leftcontainer→containerTab →Create container
- Fill in the following configuration:
| Project | Fill in the content |
|---|---|
| name | anqicms |
| Mirror | Manual inputanqicms/anqicms:latest |
| Port (server) | 8001(Change to when installing multiple sites)8002/8003etc.) |
| Port (container) | 8001 |
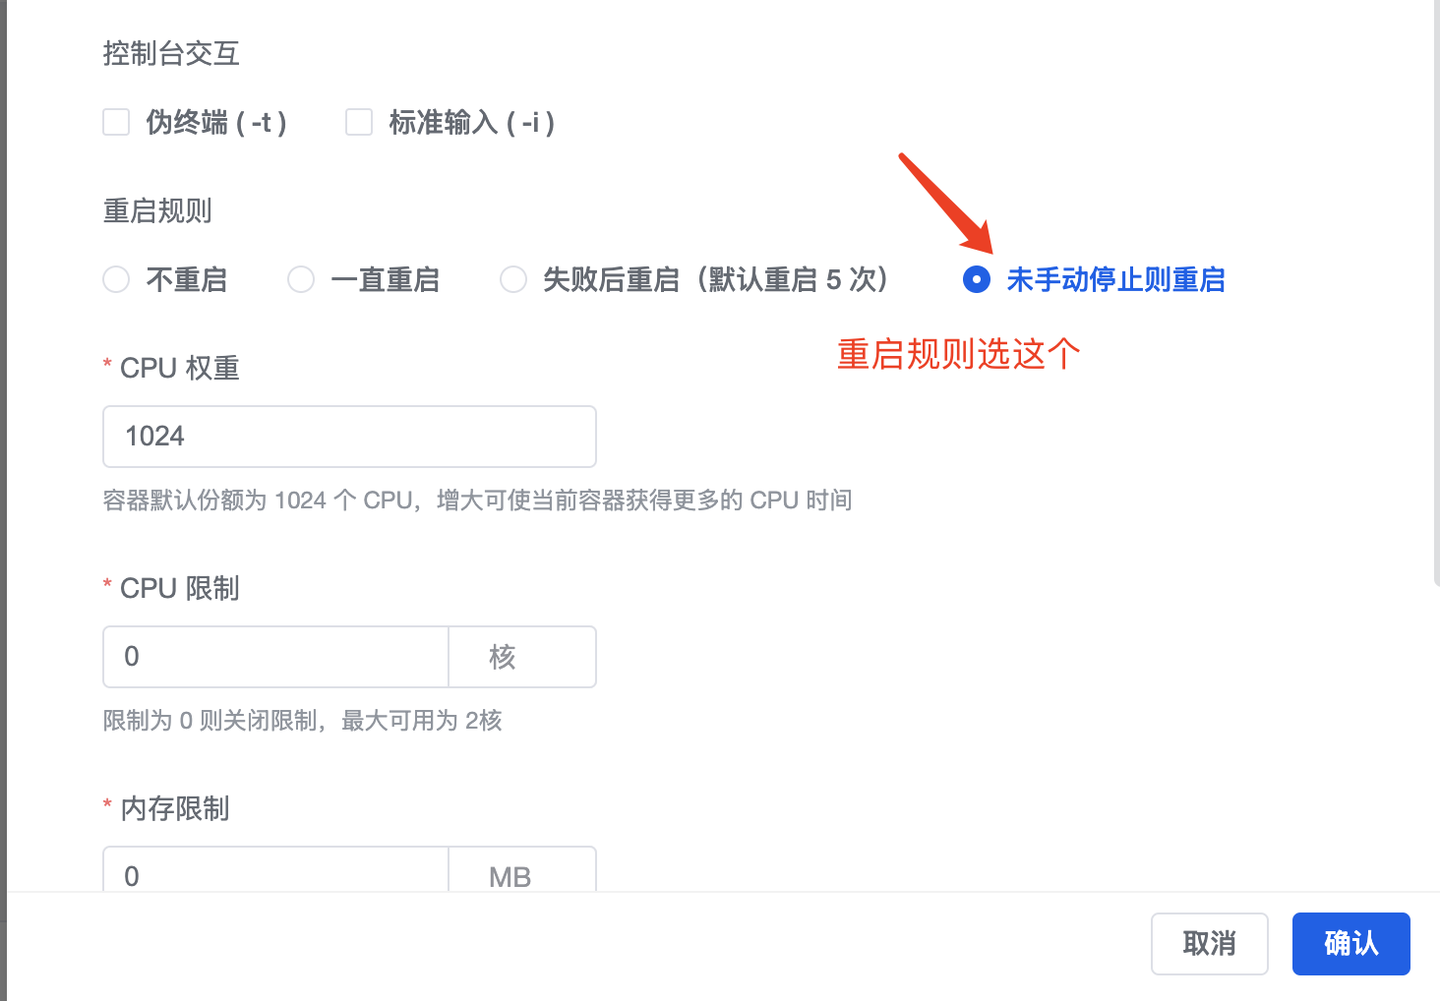
| Restart rules | Restart after failure |
- ClickConfirm
Step 3: Set reverse proxy
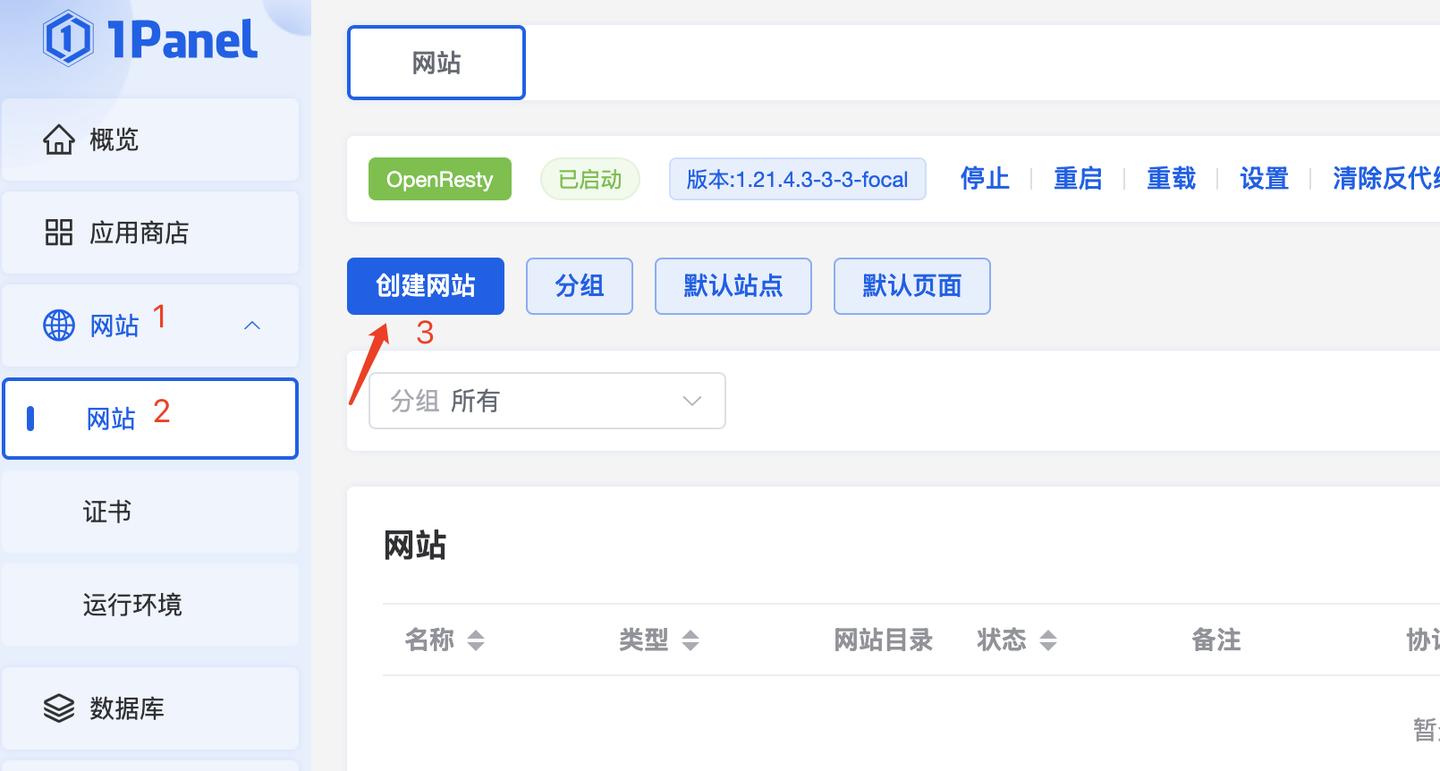
- → Click the menu on the leftwebsite→Create a website
- SelectReverse Proxy
- Fill in the configuration:
| Project | Fill in the content |
|---|---|
| Main domain | Parsed domain name, such astest.anqicms.com |
| Proxy address | 127.0.0.1:8001 |
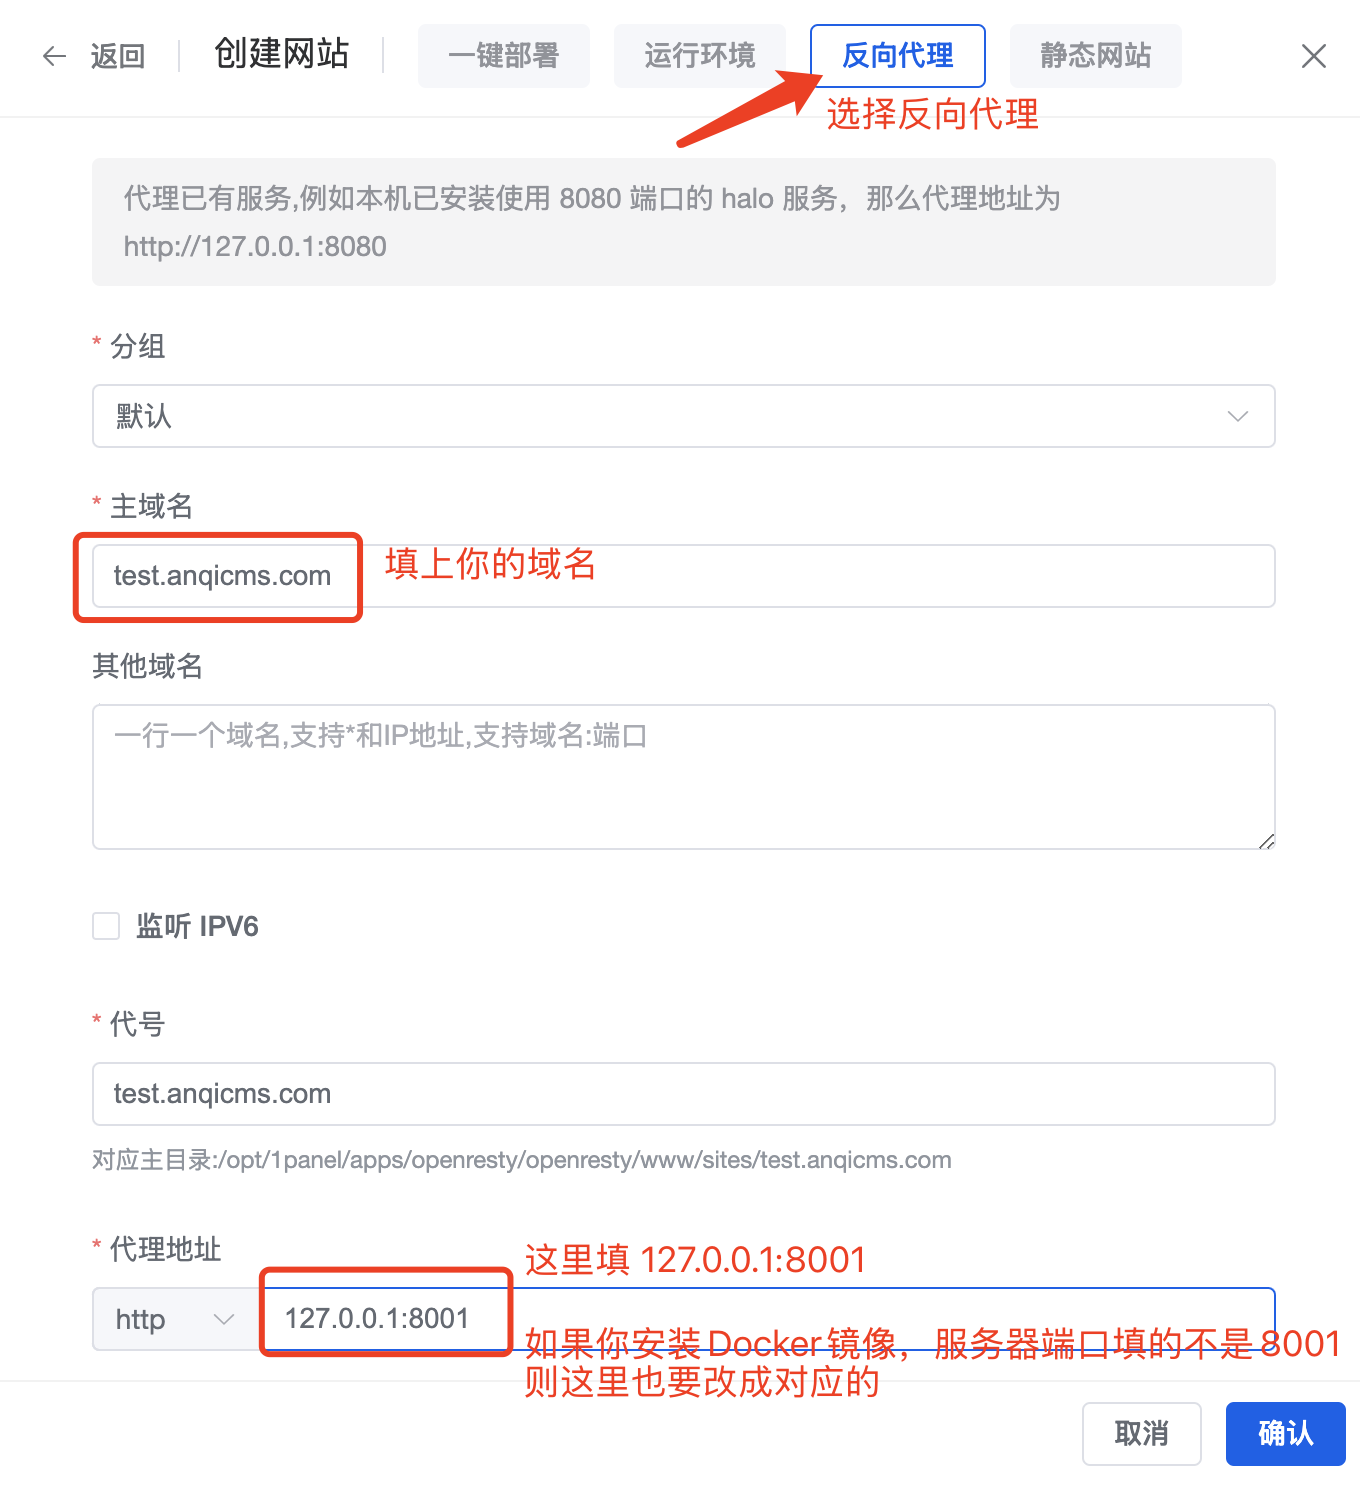
- ClickConfirm
Step 4: Initialize installation
- Browser access
http://test.anqicms.com - Enter the initial installation interface
- Enter database information (Database host should be filled with MySQL container name or internal IP address)
- After installation is complete, visit
http://test.anqicms.com/system/Enter the backend
Method 4: aaPanel (Baota International Edition) Docker Deployment
Step 1: Install aaPanel
aaPanel Download Address:https://www.aaPanel.com/new/download.html
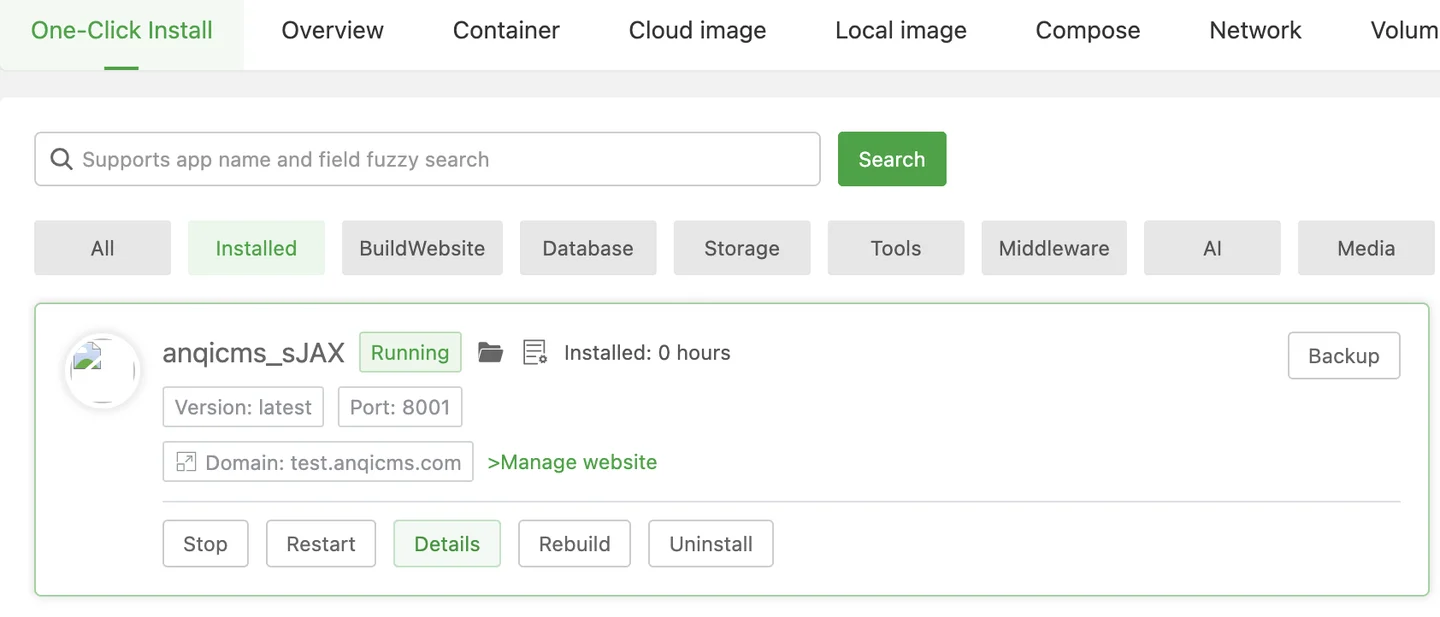
Step 2: Install Docker and AnQiCMS
- Log in to aaPanel
- Enter the Docker interface, install Docker (if not installed)
- InApp Storesearch in
anqicms
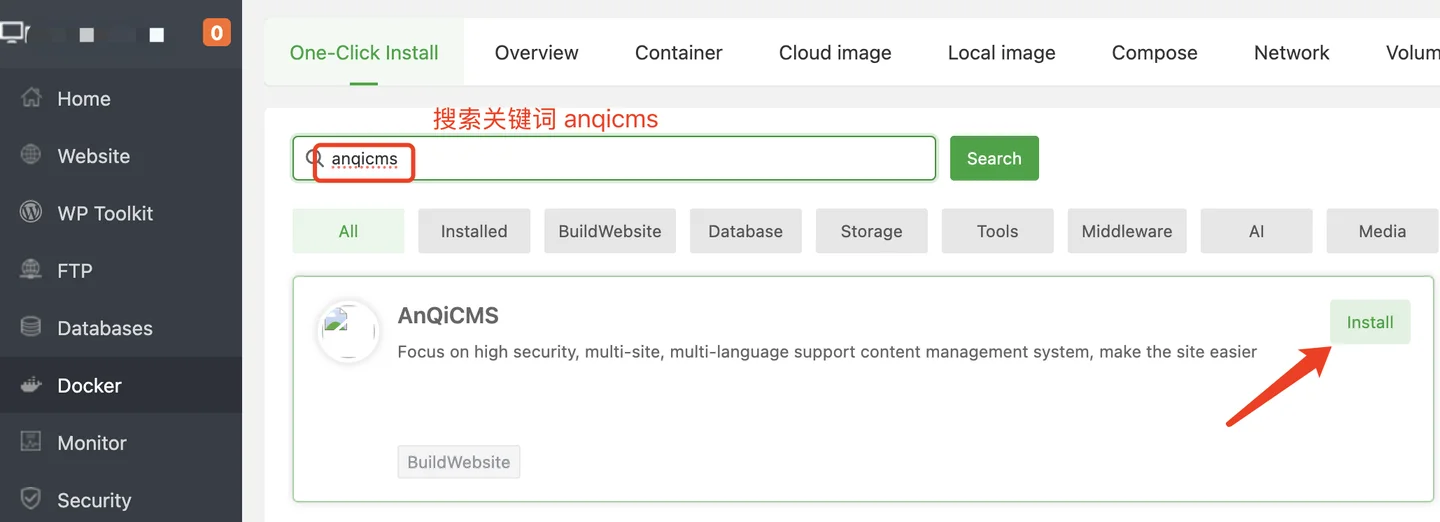
- ClickInstall
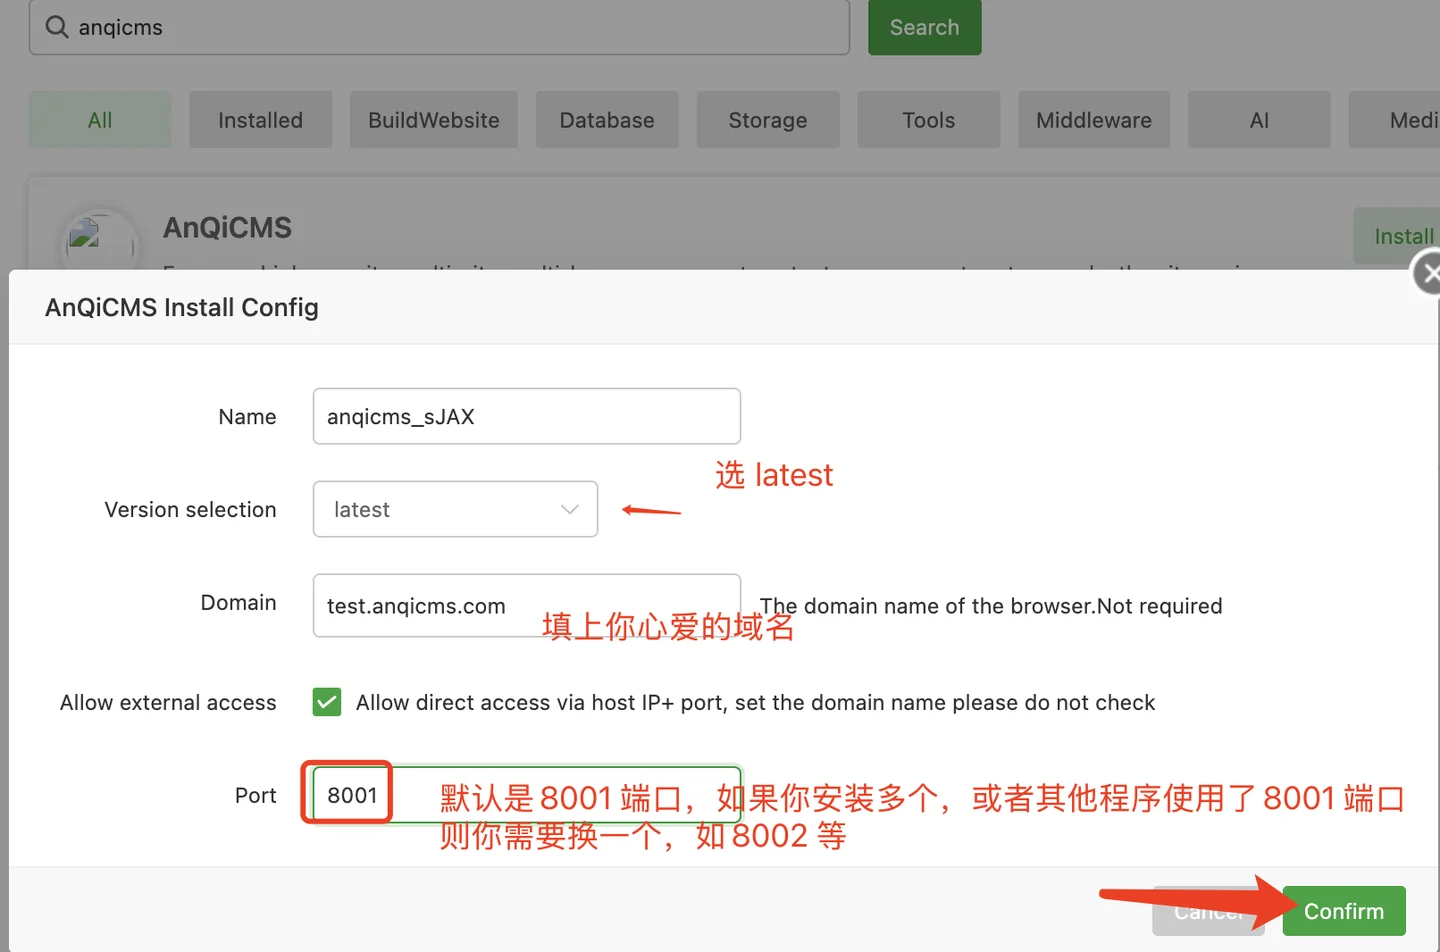
- Enter domain and port (default
8001) - ClickConfirmWait for 1-5 minutes
Step 3: Start using
The default account password is the same as Baota Docker deployment:
| Project | content |
|---|---|
| Default account | admin |
| Default password | 123456 |
| Back-end address | http://你的域名/system/ |
Docker deployment comparison summary
| Deployment method | Difficulty | Applicable scenarios | Do you need additional configuration |
|---|---|---|---|
| Docker command line | ★★ | Familiar with Docker developers | Need to deploy MySQL separately |
| Docker Compose | ★★ | Development and Test Environment | One-time configuration, one-click startup subsequent |
| Baota Docker | ⭐ | Novice, quick experience | Automatically handle MySQL and reverse proxy |
| 1Panel Docker | ★★ | 1Panel User | Need to manually configure reverse proxy |
| aaPanel Docker | ⭐ | Users with overseas servers | Automatically Process |
❓ Can I deploy MySQL without Docker? Can I use the MySQL on the host machine?
Absolutely.You don't have to deploy MySQL with Docker. You can use the existing MySQL on the host machine or a remote MySQL service.
When initializing the installation, enter one of the following addresses for the database host:
| MySQL Location | Database Host Address | Description |
|---|---|---|
| Host Machine (same server) | host.docker.internal |
Special address for Docker to access the host machine internally |
| Host Machine (same server) | 172.17.0.1 |
Host machine address of Docker's default bridge |
| Remote MySQL Server | 公网IP或域名 |
Enter the accessible remote address |
| On the same Docker network | 容器名称 |
Asanqicms-mysql(Must be on the same Docker network) |
❓ Will data be lost if the Docker container is restarted or deleted? How to persistently save?
By default, the container's data will be lost.Because MySQL's data files are stored inside the container, the data will be lost after the container is deleted. The solution is to useData volume mount.
Using Docker Compose (the recommended method) has already automatically done data volume mount (./mysql-data:/var/lib/mysql), and the data will be stored inmysql-data/In the directory, the data is still retained after the container is restarted/deleted.
If usingdocker runStart with the command line, you can add it.-vParameter mounting data volume:
docker run -d --name anqicms-mysql \
  -e MYSQL_ROOT_PASSWORD=yourpassword \
  -v ./mysql-data:/var/lib/mysql \    # ← 这行就是数据持久化
  mysql:5.7
The AnQiCMS container itself (anqicms/anqicmsis a pure program, there is no persistent data, restarting will not lose the configuration.
❓ How to upgrade AnQiCMS in the Docker version?
Upgrade steps:
# 1. 拉取最新镜像
docker pull anqicms/anqicms:latest

# 2. 删除旧容器(数据不会丢失,因为 MySQL 在另一个容器中或使用数据卷挂载)
docker rm -f anqicms

# 3. 重新创建容器(使用同样的启动命令)
docker run -d --name anqicms -p 8001:8001 anqicms/anqicms:latest

# 4. 进入后台 → 工具 → 更新缓存 → 点击"更新数据库表结构"
If you are using Docker Compose:
docker compose pull     # 拉取最新镜像
docker compose up -d    # 重新创建容器
❓ After Docker deployment, are the templates and attachments stored in the container or the host machine? Can I directly modify the template file?
By default, the template and attachments are stored inside the container. Deleting the container will cause them to be lost, and the template files cannot be edited directly on the host machine.
Suggestion:If you plan to modify the template file, it is recommended to mount the template directory to the host machine:
# docker-compose.yml 中为 anqicms 服务添加
volumes:
  - ./template:/app/template    # 模板目录挂载到宿主机
  - ./public:/app/public        # 静态资源目录挂载到宿主机
  - ./data:/app/data            # 数据目录挂载到宿主机