
Installation guide and initialization of AnQi CMS
When starting AnQiCMS for the first time, you need to complete the initialization installation, including configuring database connection information, setting the administrator account password, specifying the site name, and other key steps, which is a necessary link before the formal use of the system.
When is initialization needed
The following situations require initialization installation:
| Scene | Description |
|---|---|
| First deployment | New installation of AnQiCMS |
| Restore factory settings | Reinstall after clearing data |
If it passesBaota DockeroraaPanel DockerInstall, the system will automatically complete the initialization (default account admin / password 123456), no manual initialization process is required.
Initialization steps
Step 1: Start AnQiCMS
Ensure that AnQiCMS has started normally (see related deployment instructions from section 2.2 to 2.5).
Step 2: Visit the installation page
Access the domain name of the site in the browser:
http://你的域名
When visiting for the first time, the system detects that it has not been initialized and will automatically jump to the installation interface.
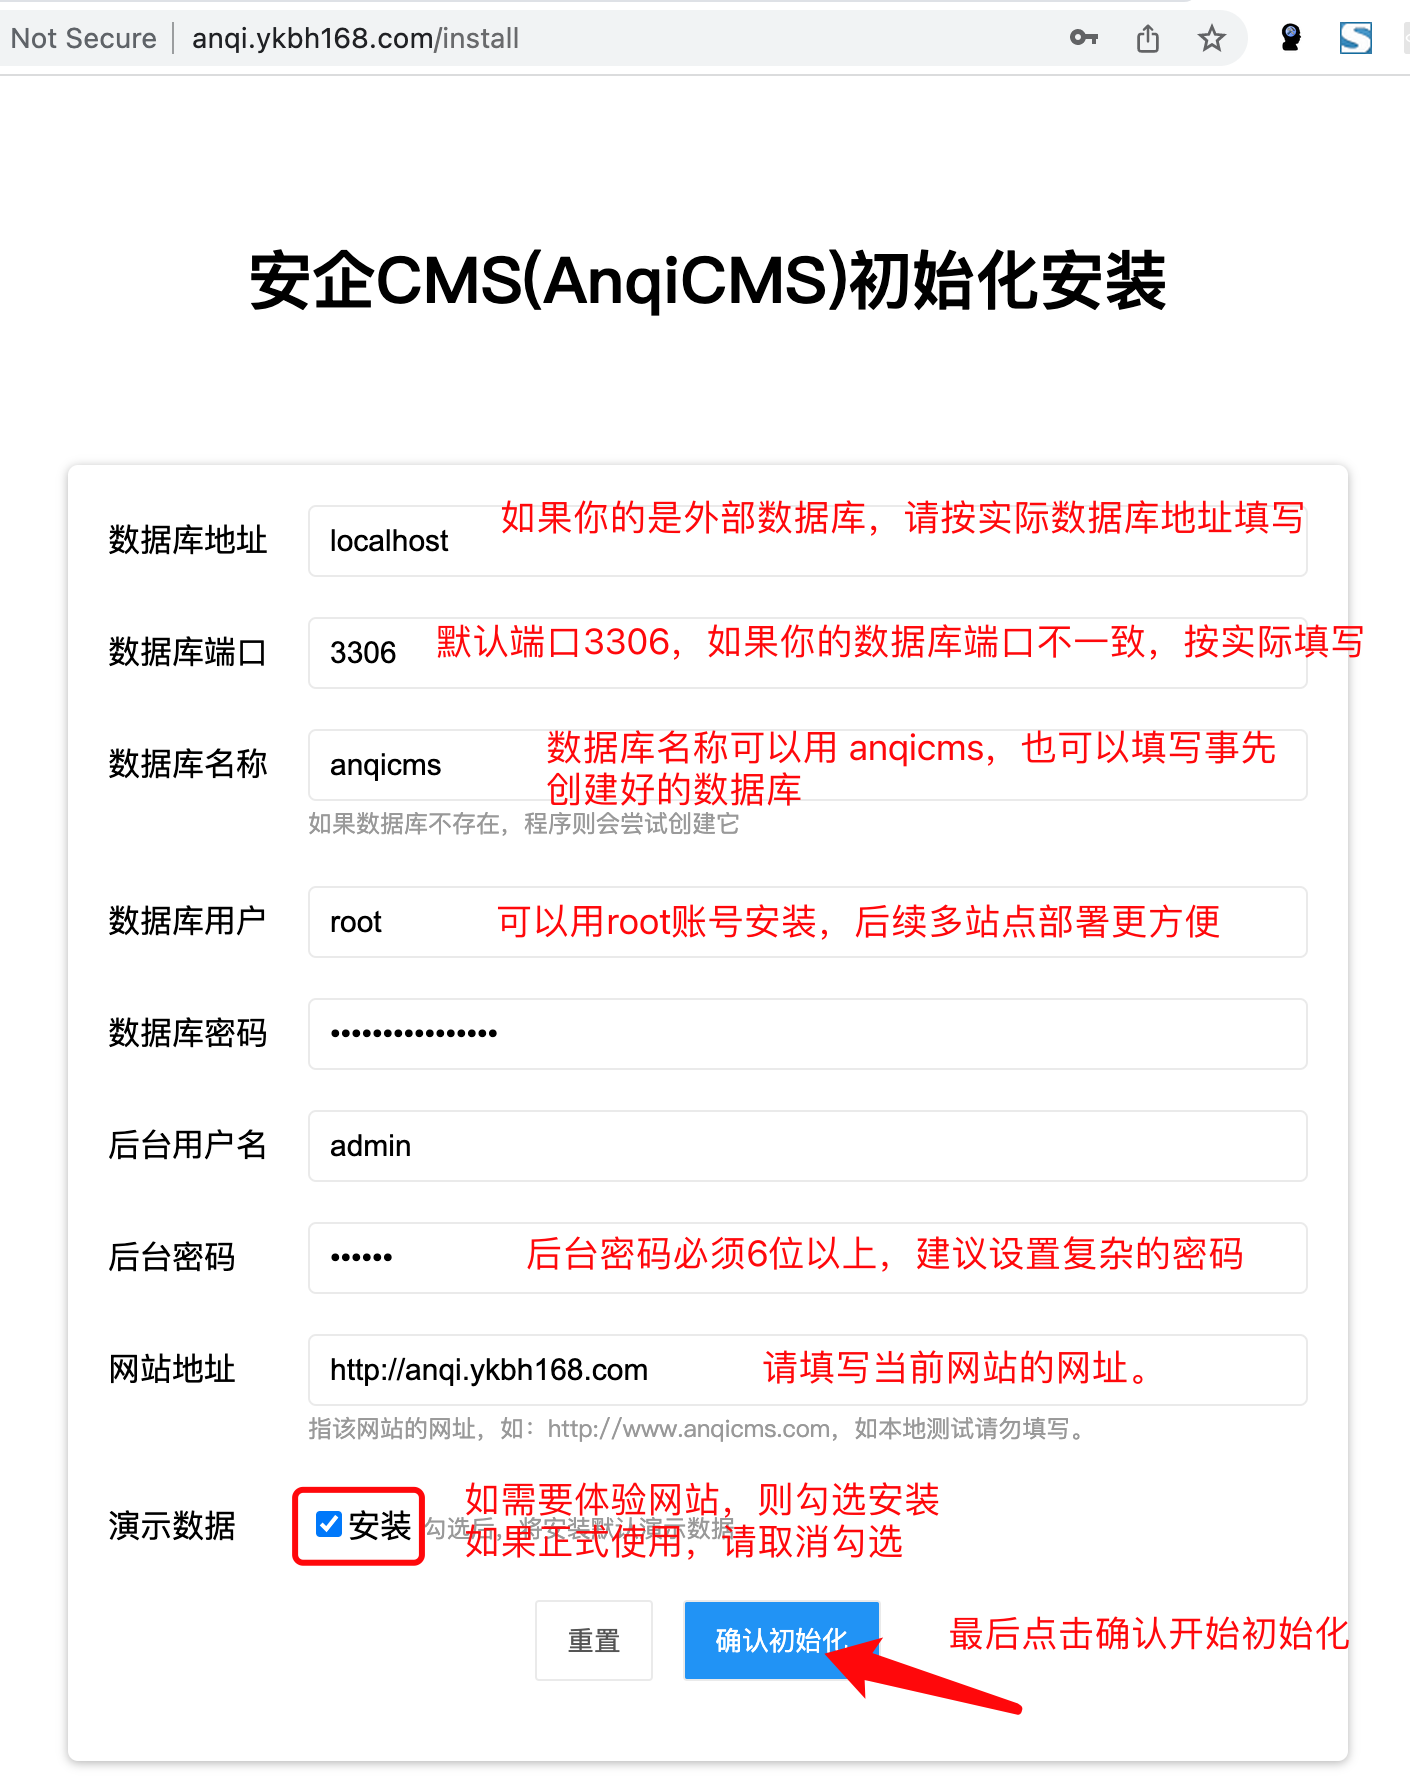
Step 3: Fill in the configuration information
The installation interface requires the following information:
Database information
| field | it must | Description |
|---|---|---|
| Database host | ✅ | The MySQL server address is usually127.0.0.1(Local machine) or Docker container name |
| Database port | ✅ | MySQL port, default3306 |
| Database username | ✅ | MySQL username. Recommended to userootor a user with the permission to create a database |
| Database password | ✅ | The corresponding MySQL password |
| Database name | ✅ | The system will automatically create the database with the specified name, such asanqicmsDo not name it the same as the existing database |
Administrator information
| field | it must | Description |
|---|---|---|
| Administrator account | ✅ | Backend login username |
| Administrator password | ✅ | Backend login password (recommended to be 8 characters or more, including letters and numbers) |
Website information
| field | it must | Description |
|---|---|---|
| website address | ✅ | Website domain, such ashttps://en.anqicms.com(with protocol prefix) |
Step 4: Submit installation
ClickSubmitorStart installationButton, the system will:
- Check if the database connection is normal
- Automatically create the database and table
- Write initial configuration data
- Create an administrator account
- Write default site settings
The installation process usually takes only a few seconds. After the installation is complete, a successful installation prompt will be displayed on the page.
Installation verification
Verify the front
When the browser accesses the home page of the website, the home page content should be displayed normally.
Verify the backend
http://你的域名/system/
Display the backend login page.
Default backend path
http://你的域名/system/
SuggestionAfter installation, promptly in the background:Global SettingsModify the default backend entry path to enhance security.
Default administrator account
账号:安装时设置的管理员账号
密码:安装时设置的管理员密码
Installation failure handling
If an error occurs during installation, common causes and solutions:
| Error phenomenon | Possible cause | Solution |
|---|---|---|
| Database connection failed | Database host/port/username/password error | Check MySQL connection information for correctness |
| Unable to create database | Insufficient database user privileges | Use an account with higher privileges (such as root) or manually create the database in advance |
| Administrator password is invalid | Password length or complexity is insufficient | Set a password of 8 characters or more, including letters and numbers |
| port occupied | Another program is using port 8001 | modifyconfig.jsonofportRestart after setting to other values |
Reset installation
If you need to reinitialize (clear all data):
# 1. 停止 AnQiCMS(Linux)
./stop.sh

# 2. 删除数据库(通过 MySQL 命令行或管理工具)
# 3. 删除 data/ 目录下的缓存文件(如有)
rm -rf data/*

# 4. 重新启动 AnQiCMS
./start.sh

# 5. 浏览器访问域名,重新进入安装界面
⚠️Warning: Resetting the installation will delete all data (documents, categories, users, settings, etc.), please back up the database before performing the operation.
❓ After filling in the information on the installation interface and clicking submit, it prompts 'Database connection failed', but my MySQL is indeed running, why?
There are 4 common causes for this problem, please check them one by one:
| Reason | Verification method | Solution |
|---|---|---|
| MySQL port is not 3306 | On the servermysql -P 3306 -u root -p, if it cannot be connected, it means the port is incorrect |
Modify the port number on the installation interface or throughnetstat -tlnp \| grep mysqlCheck the actual port |
| MySQL is only bound to 127.0.0.1 | cat /etc/mysql/mysql.conf.d/mysqld.cnf \| grep bind-address |
It is usually a cloud server issue, but fill in127.0.0.1to solve it |
| The database user has no permission to create a database | Common when connecting with a user other than root | Fill in the installation interfacerootaccount, or create the database manually with root in advance |
| Incorrectly filled in the "Database Host" under Docker environment | Cannot use directly inside the container127.0.0.1Access the host machine MySQL |
changed tohost.docker.internal(or the host's internal network IP) |
The simplest method: Manually create an empty database on the server using the root account, then enter the name of this existing database on the installation interface. The installation program will no longer attempt to create a database, thus bypassing the permission issue.
❓ After installation, the page keeps showing loading or a blank screen and cannot be accessed, what should I do?
This situation is usuallyBrowser cacheorNginx configurationissue.
# 第一步:检查程序是否正常运行
curl -I http://127.0.0.1:8001
# 如果返回 200/302,说明 AnQiCMS 正常

# 第二步:检查 Nginx 配置
# 确保 root 指向了 public 目录
# 确保 try_files 规则存在

# 第三步:清除浏览器缓存(一般按 Ctrl+F5 强制刷新)

# 第四步:检查浏览器控制台(F12 → Console)是否有 JS 报错
Also possibleWait a few seconds after installationLet the database write complete, refresh slightly.
❓ Did you fill in the website address incorrectly during installation (such as forgetting to add https://), can it be changed after installation?
It can be changed, no need to reinstall.You can modify it in the background after installation:
- Login to the background →setting→Global Settings(
/setting/system) - Find the "Website Address" field and change it to the correct address (such as
https://en.anqicms.com) - Click Save
- Background →Tool→Update Cache(
/tool/cache)
Entering the wrong website address does not affect the operation of the website, but it may cause the generation of incorrect link addresses for Sitemap, friendship links, etc., so it is recommended to check and correct it immediately after installation.
❓ Is there a strength requirement for the administrator password during initial installation?
| Requirements | Description |
|---|---|
| Minimum length | At least 6 digits (recommended to be more than 8 digits) |
| Character combination | Recommended to use letters + numbers combination, pure numeric passwords are easy to be cracked by brute force |
| Special characters | Can include special characters (!@#$% etc.) |
| Common passwords | Do not useadmin123/123456/passwordAnd weak passwords |
Recommended practiceUse a password manager (such as 1Password, Bitwarden) to generate random passwords and save them in the background. If you forget your password, you can use the "Forgot Password" function on the background login page to reset it through file verification or DNS verification.