
Deployment of multiple sites on the same server for AnQi CMS
AnQiCMS supports running multiple independent sites on the same server, each with its own domain name, database, template, and administrator. This chapter thoroughly describes the complete steps and precautions for multi-site configuration.
Plan 1: Multi-site management (recommended)
Applicable conditions: There is already an installed and running AnQiCMS main site.
This plan uses the built-in features of AnQiCMSMulti-site managementFunction, all sites share the same AnQiCMS program but run independently. No need to copy multiple copies of the code.
Preparation
- An AnQiCMS main site has been deployed and is running normally (port 8001).
- The main site hasMulti-site managementMenu permissions (default installed sites have them).
- The new site's domain has been resolved to the server
- Prepare the database information for the new site (can be automatically created during installation).
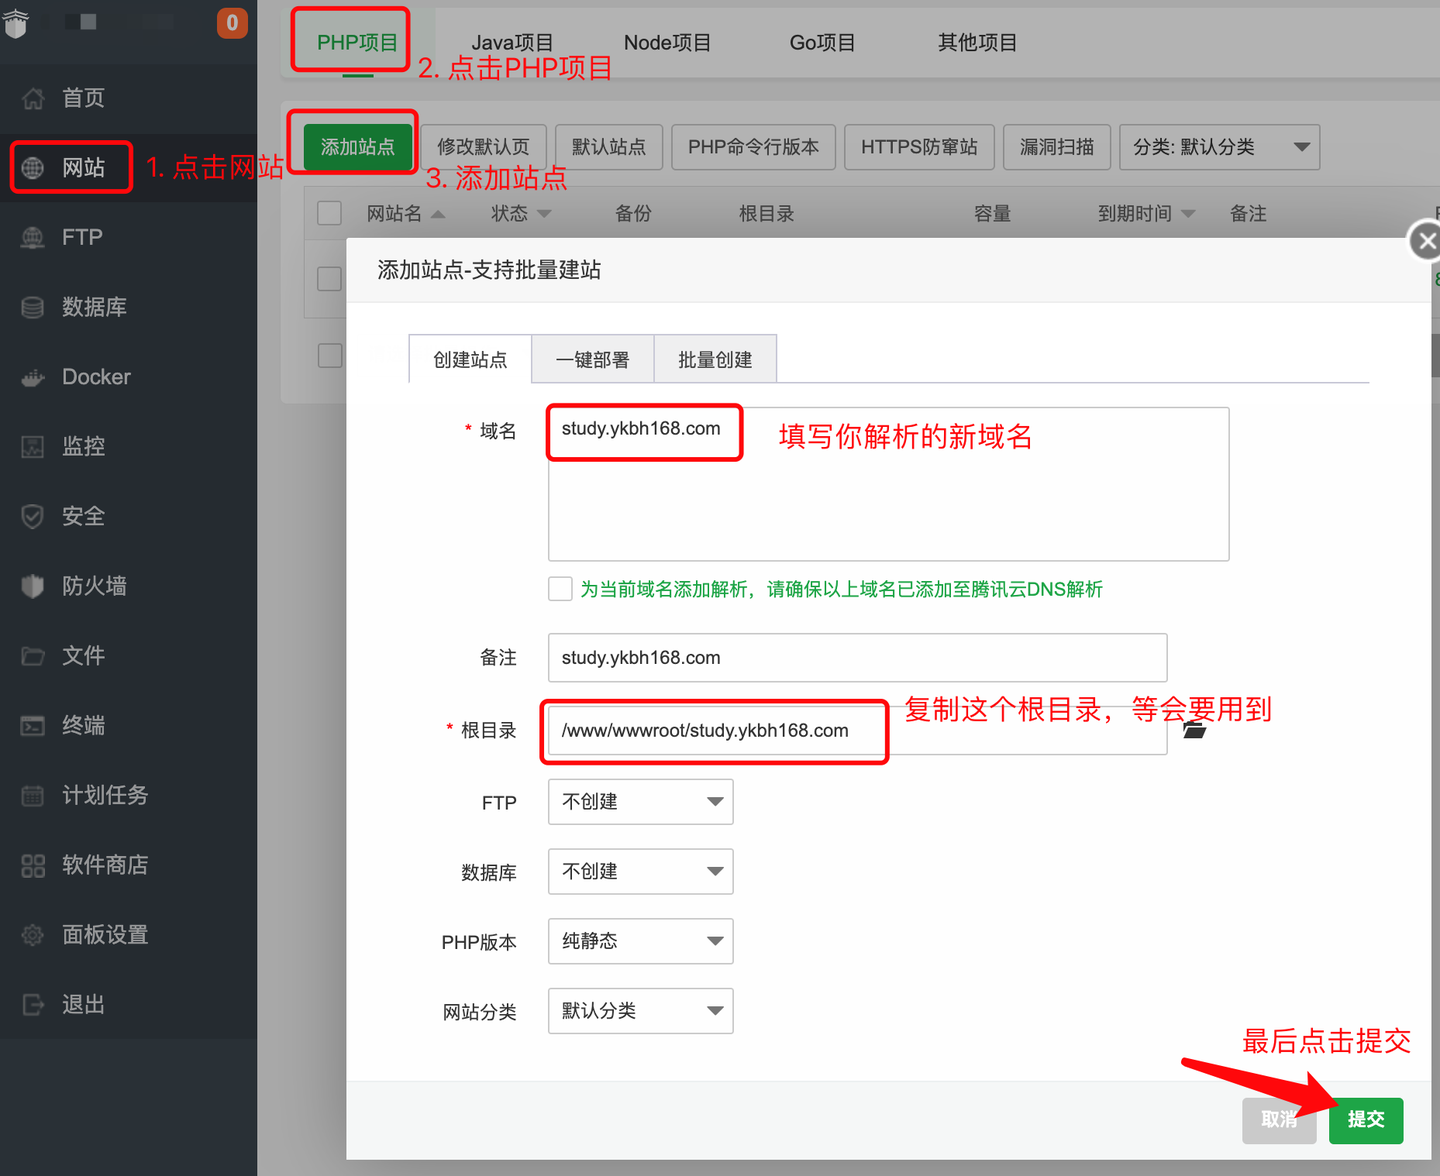
Create a new site entry in the Baota panel
- Baota panel →website→Add Site
- PHP versionSelectstatic
- FTPandDatabaseSelect allDo not create
- Enter the domain name of the new site (such as
study.ykbh168.com) - Record the root directory of the site (such as
/www/wwwroot/study.ykbh168.com) - ClickSubmit
Add a new site in AnQiCMS backend
- Login to the main site backend
- → Click the menu on the leftMulti-site management(
/website) - ClickAdd a new site
- Enter the following information:
| field | Description |
|---|---|
| Site name | A name that is easy to distinguish, such as "Study Blog" |
| website address | The domain name of the new site,https://study.ykbh168.com |
| Site root directory | The directory recorded in the previous step, such as/www/wwwroot/study.ykbh168.com |
| Administrator account | The administrator username of the new site |
| Administrator password | The administrator password of the new site |
| Database name | The new database name (do not repeat with existing databases) |
| Reuse database account | f the main site uses the root account, it is recommended to check it to avoid repeated entry |
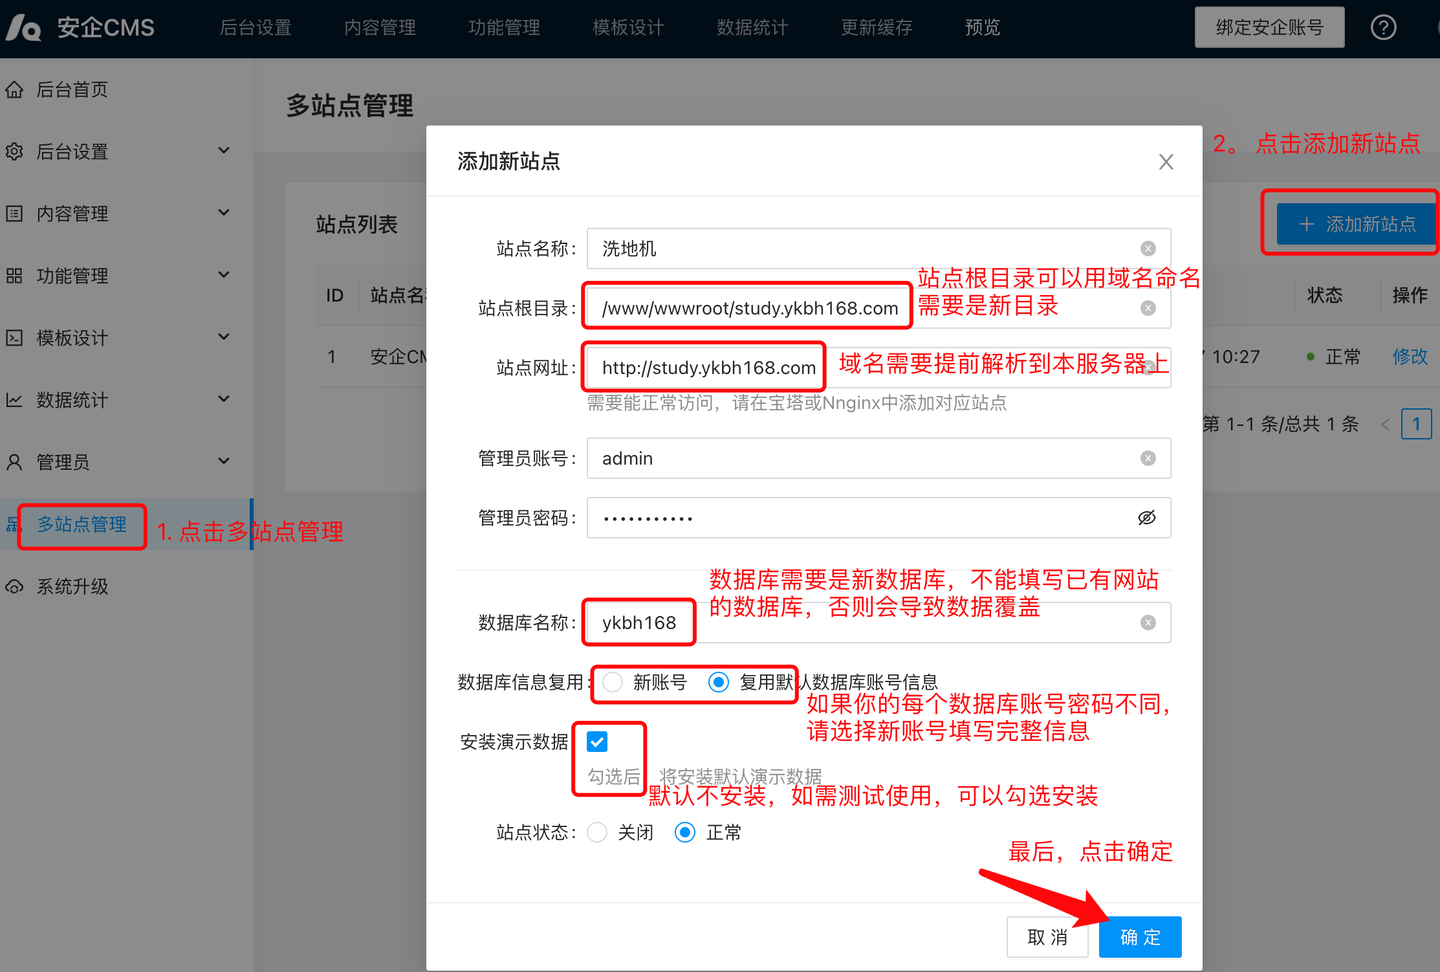
- ClickConfirm
Configure Nginx for the new site
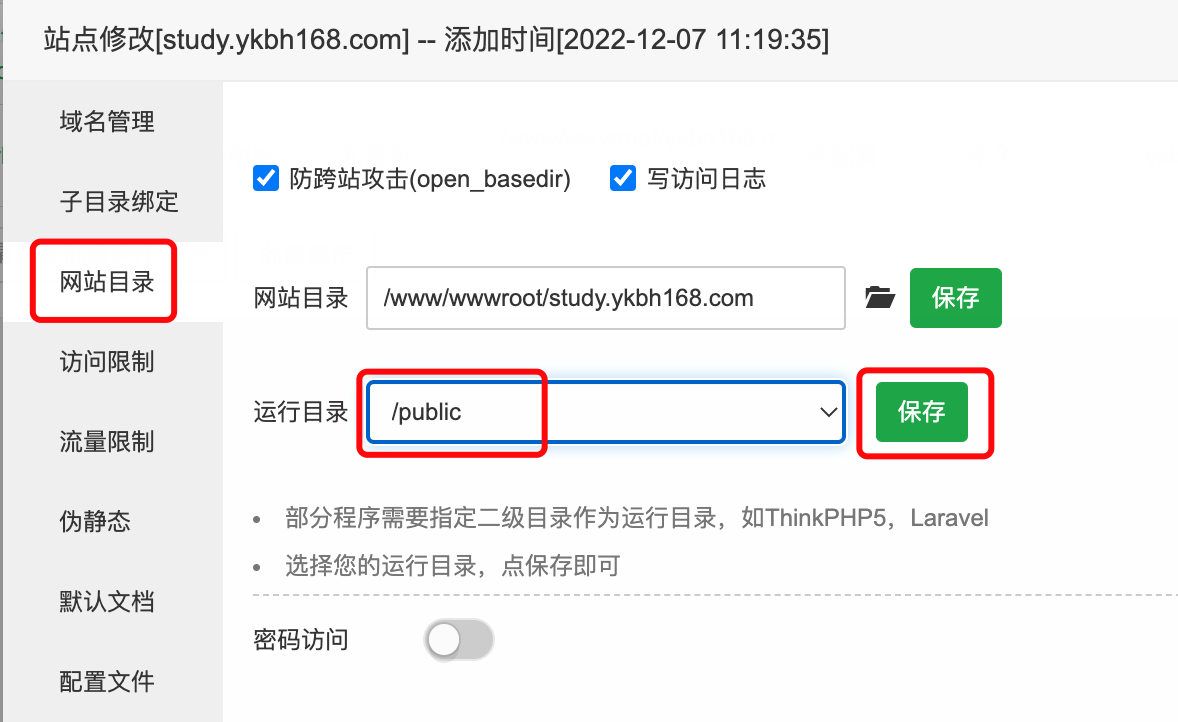
- Baota panel → New site →setting
- site directory→ Set the run directory to
/public→ Save
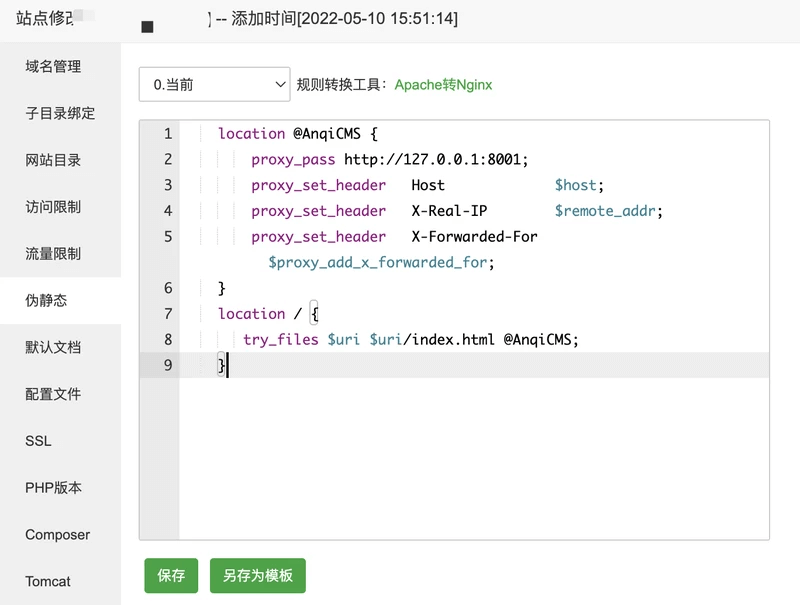
- Static→ Enter reverse proxy rules:
location @AnqiCMS {
    proxy_pass http://127.0.0.1:8001;
    proxy_set_header   Host             $host;
    proxy_set_header   X-Real-IP        $remote_addr;
    proxy_set_header   X-Forwarded-For  $proxy_add_x_forwarded_for;
}
error_page 404 =200  @AnqiCMS;
location / {
    try_files $uri $uri/index.html @AnqiCMS;
}
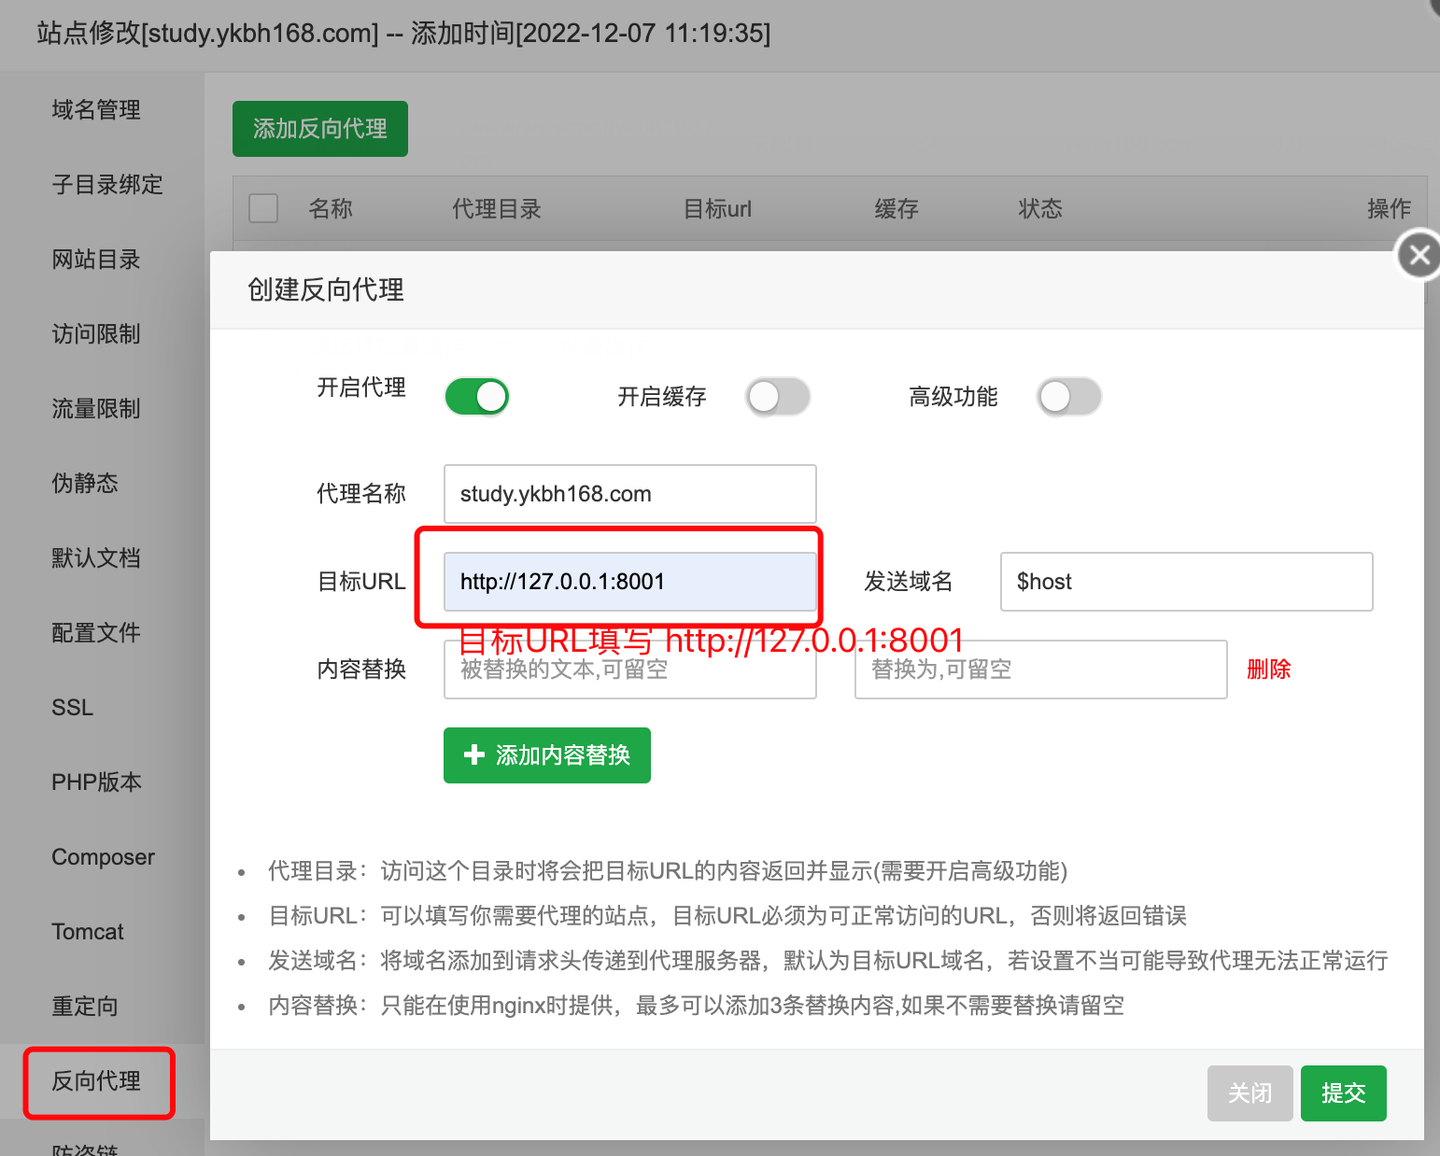
If using Apache, inReverse Proxyenter the target URLhttp://127.0.0.1:8001Just do it.
Apache configuration details of pseudo-static
If Nginx is not available, use Apache as the web server and configure it as follows:
- Baota panel → New site →setting→Static→ Clear pseudo-static rules
- SelectReverse ProxyTab
- Target URLFill in
http://127.0.0.1:8001 - ClickSave
Apache Virtual Host Configuration Example(Manually edit httpd-vhosts.conf):
<VirtualHost *:80>
    ServerName study.ykbh168.com
    DocumentRoot /www/wwwroot/study.ykbh168.com/public

    ProxyPass / http://127.0.0.1:8001/
    ProxyPassReverse / http://127.0.0.1:8001/

    <Directory /www/wwwroot/study.ykbh168.com/public>
        Options FollowSymLinks
        AllowOverride All
        Require all granted
    </Directory>

    ErrorLog /var/log/httpd/study-error.log
    CustomLog /var/log/httpd/study-access.log combined
</VirtualHost>
Note: To use Apache, you need to enable
mod_proxyandmod_proxy_httpModule:> a2enmod proxy proxy_http > systemctl restart apache2 > ``` ### 验证新站点 1. 浏览器访问新站点域名 2. 应正常显示网站首页 3. 访问 `新域名/system/` 进入后台 4. 使用新站点独立的管理员账号登录 --- ## 方案二:独立多进程部署 > **适用条件**:需要完全隔离运行环境(如不同客户、不同版本的 AnQiCMS)。 > > 此方案为每个站点运行一个独立的 AnQiCMS 进程,互不干扰。 ### Step 1:复制多份代码 将 AnQiCMS 程序复制到多个目录: ```bash # 站点 A cp -r /data/wwwroot/anqicms /data/wwwroot/site-a # 站点 B cp -r /data/wwwroot/anqicms /data/wwwroot/site-b
Step 2: Change port
Edit each site'sconfig.json, allocate different ports:
# 站点 A - config.json
{
    "server": {
        "port": 8001
    }
}

# 站点 B - config.json
{
    "server": {
        "port": 8002
    }
}

# 站点 C - config.json
{
    "server": {
        "port": 8003
    }
}
Step 3: Rename the executable file
Rename the executable file to a distinguishable name to avoid process name conflicts (it is recommended to use the middle letter of the domain name):
# 站点 A(域名为 taobaoke.com)
mv /data/wwwroot/site-a/anqicms /data/wwwroot/site-a/taobaoke

# 站点 B(域名为 jianshu.com)
mv /data/wwwroot/site-b/anqicms /data/wwwroot/site-b/jianshu
Step 4: Modify the startup script
Edit each site'sstart.sh, willBINNAMEChange to the corresponding new name,BINPATHChange to the corresponding directory:
# 站点 A start.sh
BINNAME=taobaoke
BINPATH=/data/wwwroot/site-a

# 站点 B start.sh
BINNAME=jianshu
BINPATH=/data/wwwroot/site-b
Modify at the same timegrep '\<anqicms\>'ofanqicmsFor the newBINNAME.
Step 5: Configure Nginx
Configure independent Nginx reverse proxy for each site,proxy_passPoint to their respective ports:
# 站点 A
server {
    server_name taobaoke.com;
    root /data/wwwroot/site-a/public;

    location @AnqiCMS {
        proxy_pass http://127.0.0.1:8001;  # 对应站点 A 的端口
        ...
    }
    ...
}

# 站点 B
server {
    server_name jianshu.com;
    root /data/wwwroot/site-b/public;

    location @AnqiCMS {
        proxy_pass http://127.0.0.1:8002;  # 对应站点 B 的端口
        ...
    }
    ...
}
Step 6: Add scheduled task
Add an independent crontab keep-alive task for each site:
# crontab 中添加
*/1 * * * * /data/wwwroot/site-a/start.sh
*/1 * * * * /data/wwwroot/site-b/start.sh
Plan 3: Multi-site environment in Docker
Applicable conditions: AnQiCMS has been deployed through Docker (Baota Docker / 1Panel / aaPanel are all available), and it is hoped that more sites can be added on the same server through reverse proxy without creating a new container.
This solution is suitable for AnQiCMS deployed on Docker, using the reverse proxy function of Baota (or 1Panel) to direct multiple domain names to the same 8001 port of a Docker container, and then differentiate different sites through the built-in multi-site management function of AnQiCMS.
Step 1: Add reverse proxy site
Baota panel operation:
- Baota panel →website→Reverse Proxy→Add Reverse Proxy
- Fill in the following configuration:
| Configuration item | Fill in the content |
|---|---|
| Domain | New site domain (such asdev.anqicms.com) |
| Target URL | http://127.0.0.1:8001(Port mapped by Docker container) |
- ClickConfirmComplete creation
1Panel operation:
- 1Panel →website→Create a website→ SelectReverse Proxy
- Enter the main domain name for the new site, fill in the proxy address
127.0.0.1:8001 - ClickConfirm
Step 2: Add a new site in the AnQiCMS backend
- Log in to the main site backend →Multi-site management→Add a new site
- Enter the following information (note the difference from normal deployment):
| field | Description |
|---|---|
| Site name | Fill in according to the actual situation |
| Site root directory | Start with/app/Start with, such as/app/dev_anqicms.com(Root directory of the Docker container,Do notUse the host machine path) |
| website address | New site domain name, such ashttp://dev.anqicms.com |
| Administrator account | Administrator account for the new site |
| Administrator password | The administrator password of the new site |
| Database name | New database name, such asdev_anqicms_com(Do not duplicate existing libraries) |
| Duplicate database information | SelectReuse the default database account information(Docker environment has complete database permissions) |
| Select the template to use | Select According to Requirement |
Key distinction: In the Docker environment, the site root directory is the container path (
/app/...), not the host path (such as)/www/wwwroot/...)
Step 3: Use the new site
After creation, the new site can be accessed directly. The back-end address ishttp://新域名/system/.
Plan comparison
| Comparison item | Multi-site management (Solution 1) | Independent multi-process (Solution 2) | Docker multi-site (Solution 3) |
|---|---|---|---|
| Management method | Unified background management | Independently managed | Unified background management |
| Resource utilization | Low (shared process) | High (independent process) | Low (shared process) |
| Configuration complexity | Simple | More complex | Simple |
| Isolation | Shared program code | Fully isolated | Shared Docker container |
| Version consistency | Unified Version | Independent versions | Unified Version |
| Applicable scenarios | Multiple sites for the same customer | Different customers, different projects | Docker deployment environment |
SuggestionRecommended in most cases:Plan one (multi-site management)Easy to manage, low resource consumption.
❓ Are the data between sites in Plan one completely isolated? Can administrators manage independently?
Data aspect:The database is completely isolated. Each site uses an independent database, and the articles, categories, users, and other data of one site will not leak to other sites.
Regarding administrators:Management permissions are independent. Each site's administrator can only manage their own site and cannot see or operate the content of other sites.
However, it should be noted that all sitesshare the same AnQiCMS program, so:
- Version upgrades will affect all sites simultaneously
- Template files are placed in the same
template/Under the directory - All background management entries are
域名/system/
If you want to isolate completely (different customer, different version requirements), please use plan two.
❓ In plan two, the startup script cannot detect the process (always shows 0), but the program is actually running, what should you do?
This isstart.shofgrepCaused by a mismatch in the mode. The default startup script is hardcoded.grep '\<anqicms\>'But if you rename the executable file to another name (such astaobaoke), you need to modify the startup script synchronously.
Modification method:
# 编辑对应站点的 start.sh
# 找到这行:
exists=`ps -ef | grep '\<anqicms\>' |grep -v grep |wc -l`
# 将 anqicms 改为新的进程名:
exists=`ps -ef | grep '\<taobaoke\>' |grep -v grep |wc -l`
Similarly,stop.shofkillThe command also needs to be modified accordingly.
The best way to avoid this problem:Rename it directly with a meaningful name, rather than making arbitrary changes, ensurestart.shThe process name withBINNAMEidentical.
❓ In multi-site mode, is the background entry of each site /system/? Can two sites with different domain names share the same /system/ address?
Yes, the background entry of each site ishttps://该站点域名/system/. Because Nginx reverse proxy distributes requests to the corresponding site based on the domain name, so:
- Access
https://site-a.com/system/→ Enter the background of site A - Access
https://site-b.com/system/→ Enter the background of site B
These are two completely different addresses, no conflict. Nginx distinguishes them throughserver_name.
❓ Question Answer ④: What should you do when prompted with 'The database name already exists' while adding a new site in Plan 1?
This means that there is already a database with the same name existing. Solution:
| method | Operation | Recommended |
|---|---|---|
| Change the name | When adding a site, enter a new, unused database name | ✅ Simplest |
| Delete the old database and start over | Delete the old database using the MySQL command line before installation | ⚠️ Old data will be lost |
| Use the existing database | Manually enter the existing database name in the background (make sure the table structure is compatible) | ❌ Not Recommended |