
Installation of Anqi CMS - Baota panel deployment
Applicable version: Baota panel 7.9.3+. Baota panel deployment is divided into two methods: traditional deployment (uploading the installation package, configuring reverse proxy) and Docker one-click deployment. This chapter introduces the traditional deployment method first.
Preparation
- A Linux server (CentOS / Ubuntu / Debian are all available) that has Baota panel installed
- A domain name that has been resolved to the server (such as
www.anqicms.com) - MySQL 5.6.35+ has been installed (recommended 5.7+ or 8.0)
- Download the AnQiCMS Linux installation package from the official website or GitHub
Method 1: Deploy Go project using Baota 7.9.3+
Step 1: Upload the installation package
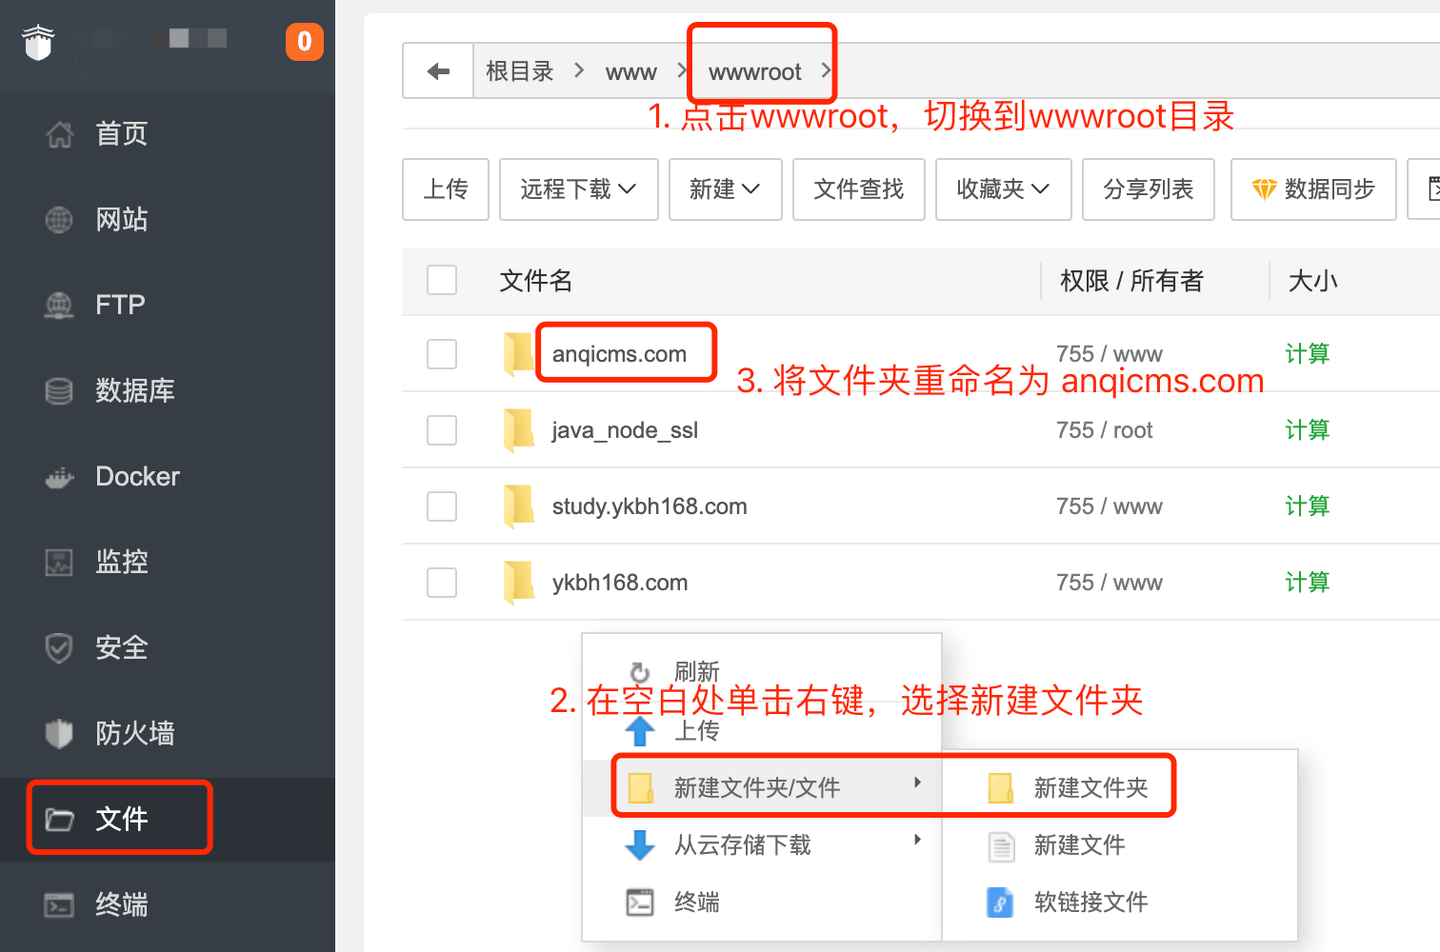
- Enter Baota panel →File→ Enter
/www/wwwroot/Table of contents - Create a directory named after the domain, such as
anqicms.com - Enter the directory, upload the Linux installation package (such as
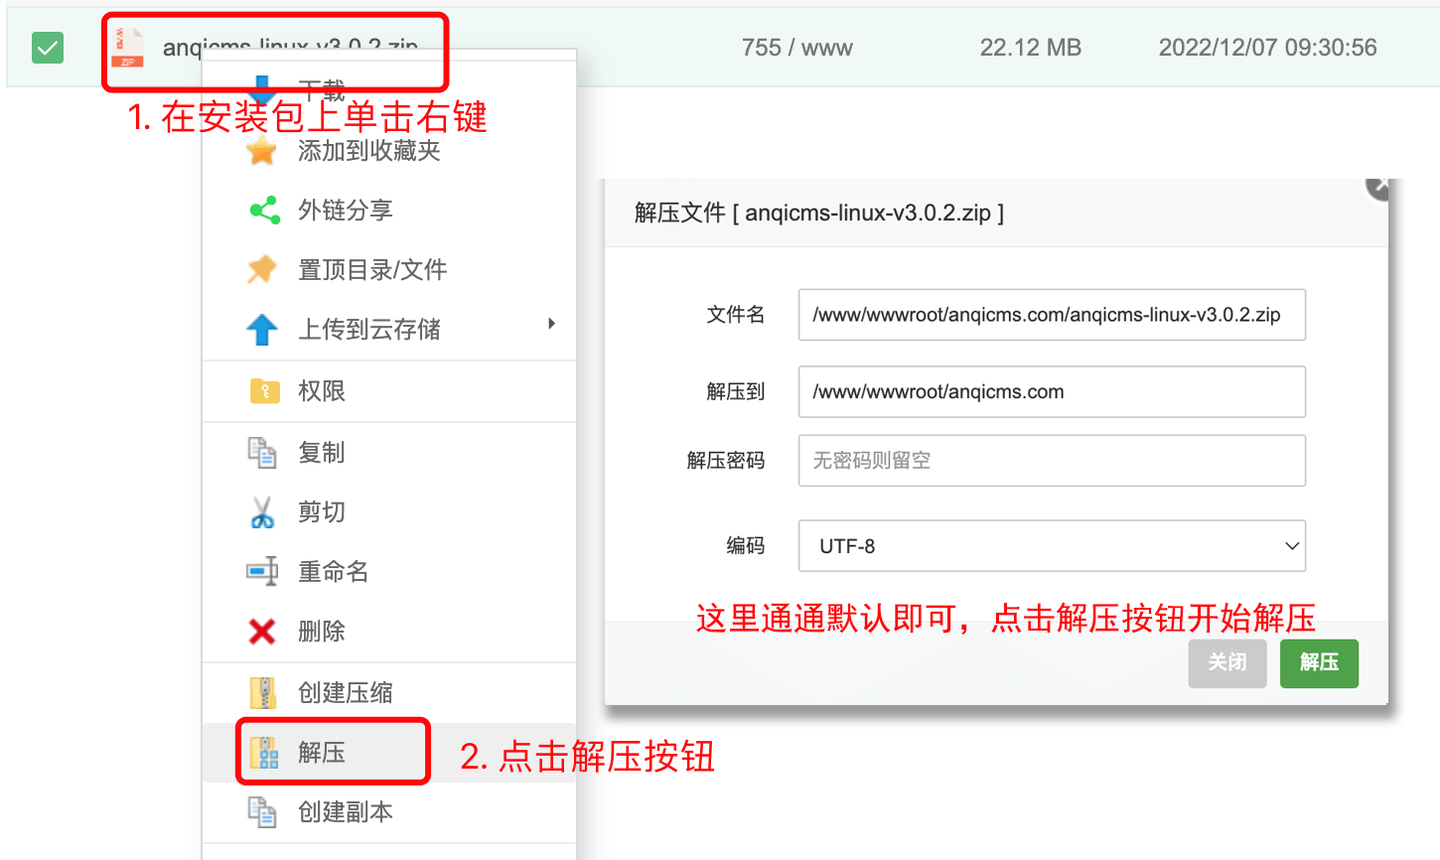
anqicms-linux-v3.6.2.zip) - Right-click on the installation packageUnzip, unzip to the current directory
Step 2: Create Go project site
- Baota panel →website→Go project→Add Go project
- Fill in the following configuration:
| Configuration item | Fill in the content |
|---|---|
| Project Execution File | /www/wwwroot/anqicms.com/anqicms |
| Project Name | AnQiCMS(Customizable) |
| Project port | 8001 |
| Execute the command | /www/wwwroot/anqicms.com/anqicms |
| Running user | www |
| Boot up | ✅ Check |
| Bind domain | Enter the resolved domain |
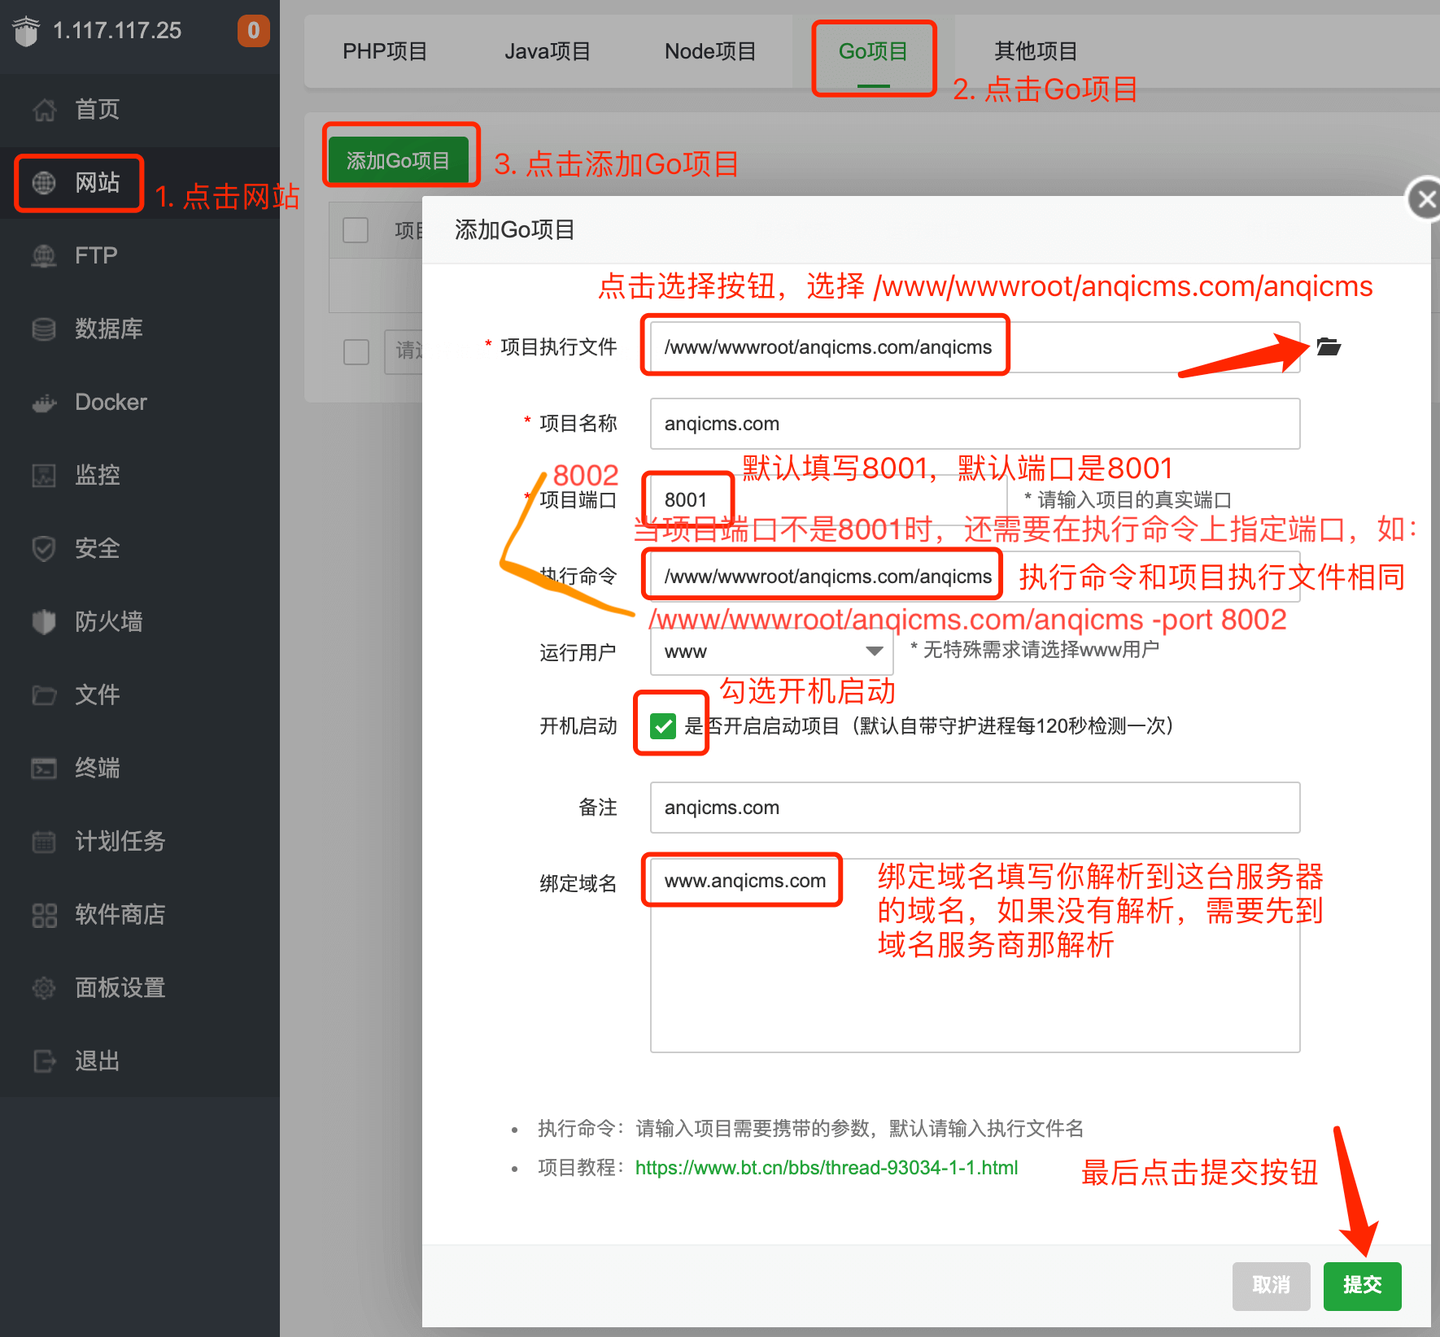
- ClickSubmit, complete the addition
Step 3: Initialize installation
- Access the bound domain in the browser
- Enter the AnQiCMS initialization installation interface
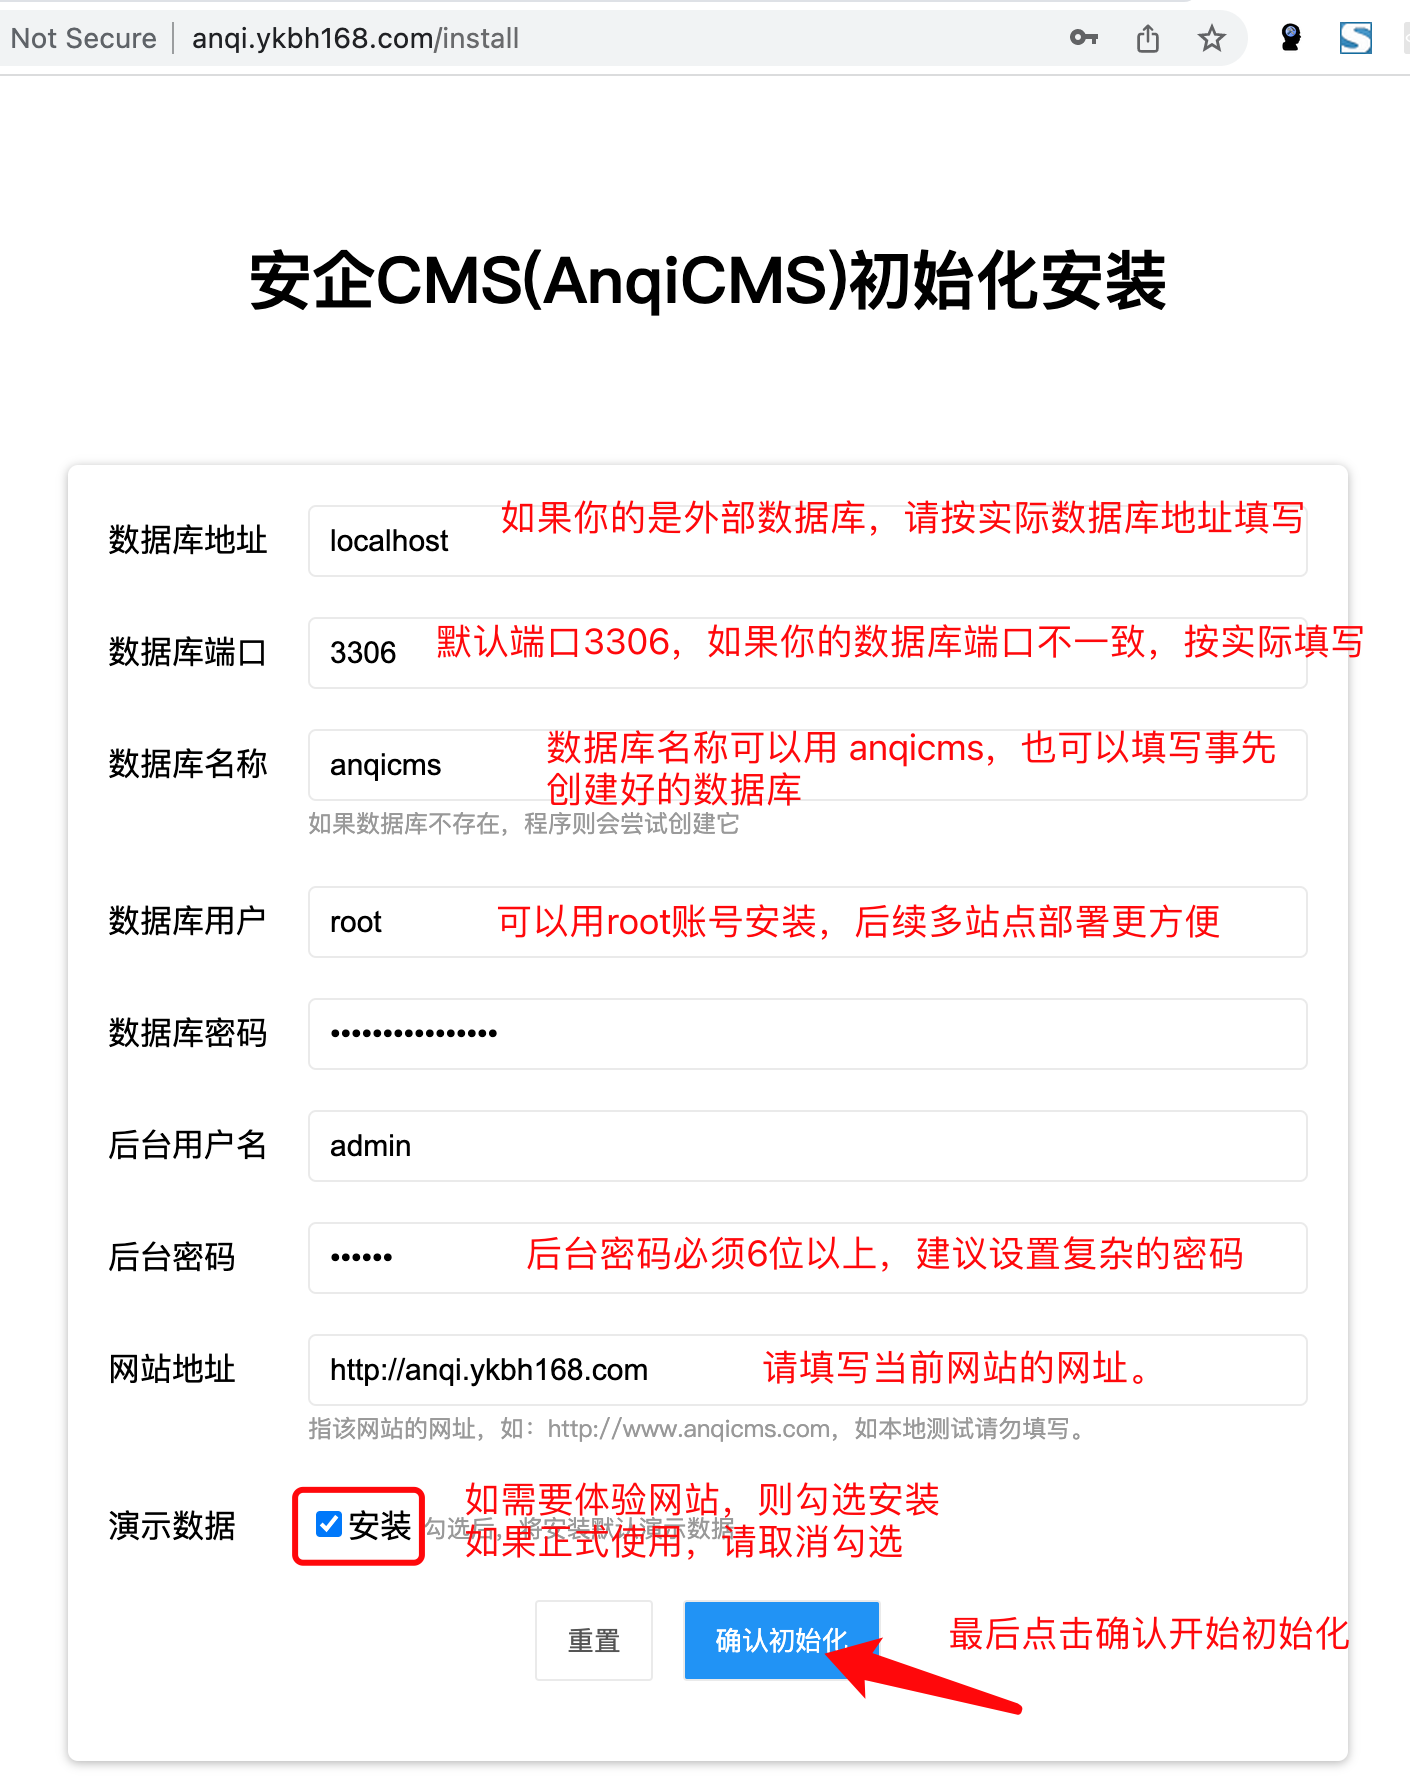
- Enter database information, administrator account password
| field | Description |
|---|---|
| Database host | Generally127.0.0.1 |
| Database port | Generally3306 |
| Database username | MySQL username (it is recommended to use root or a user with the privilege to create databases) |
| Database password | The corresponding password |
| Database name | Automatically created, such asanqicms |
| Administrator account | Backstage login account |
| Administrator password | Backstage login password (it is recommended to use a complex password of more than 8 characters) |
| website address | Bound domain, such ashttps://en.anqicms.com |
- Access after installation
域名/system/Enter the backend
Supplement to method one: Use 'Other Projects' to deploy in the old Baota (before version 9.0)
If your Baota panel version is below 7.9.3, there is noGo projectMenu, you can useOther Projects → Add Common ProjectDeploy in the same way, the configuration items are completely consistent with the Go project.
Step 1: Upload the installation package
Same as Step 1 of method one, create a directory and upload, unzip and install the package.
Step 2: Create a common project site
- Baota panel →website→Other Projects→Add Common Project
- Fill in the following configuration:
| Configuration item | Fill in the content |
|---|---|
| Project Execution File | /www/wwwroot/anqicms.com/anqicms |
| Project Name | AnQiCMS(Customizable) |
| Project port | 8001 |
| Execute the command | /www/wwwroot/anqicms.com/anqicms |
| Running user | www |
| Boot up | ✅ Check |
| Bind domain | Enter the resolved domain |
- ClickSubmit, complete the addition
Step 3: Initialize installation
Same as Step 3 in Method 1, access the bound domain in the browser to enter the initialization installation interface.
Method 2: Baota versions before 7.9.0 (Nginx Reverse Proxy)
Step 1: Upload the installation package and start.
Same as Step 1 in Method 1, upload and unzip the installation package.
Start AnQiCMS:
# 进入站点目录
cd /www/wwwroot/anqicms.com
# 执行启动脚本
./start.sh
Step 2: Create a PHP static site.
- Baota panel →website→Add Site
- Enter the domain name,PHP versionSelectstatic
- Do not create FTP and database.
- ClickSubmit
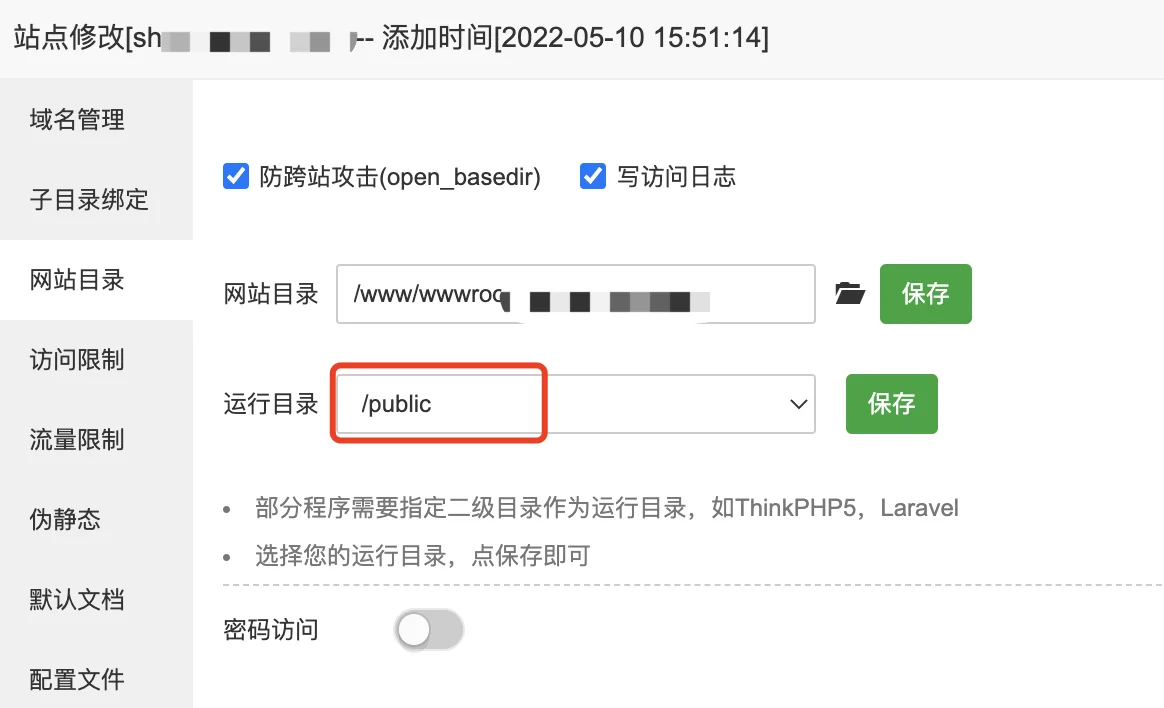
Step 3: Set the running directory.
- Click in the site list operation bar.setting
- Selectsite directoryTag
- toRunning directoryis set to
/public - ClickSave
Step 4: Configure Nginx Reverse Proxy
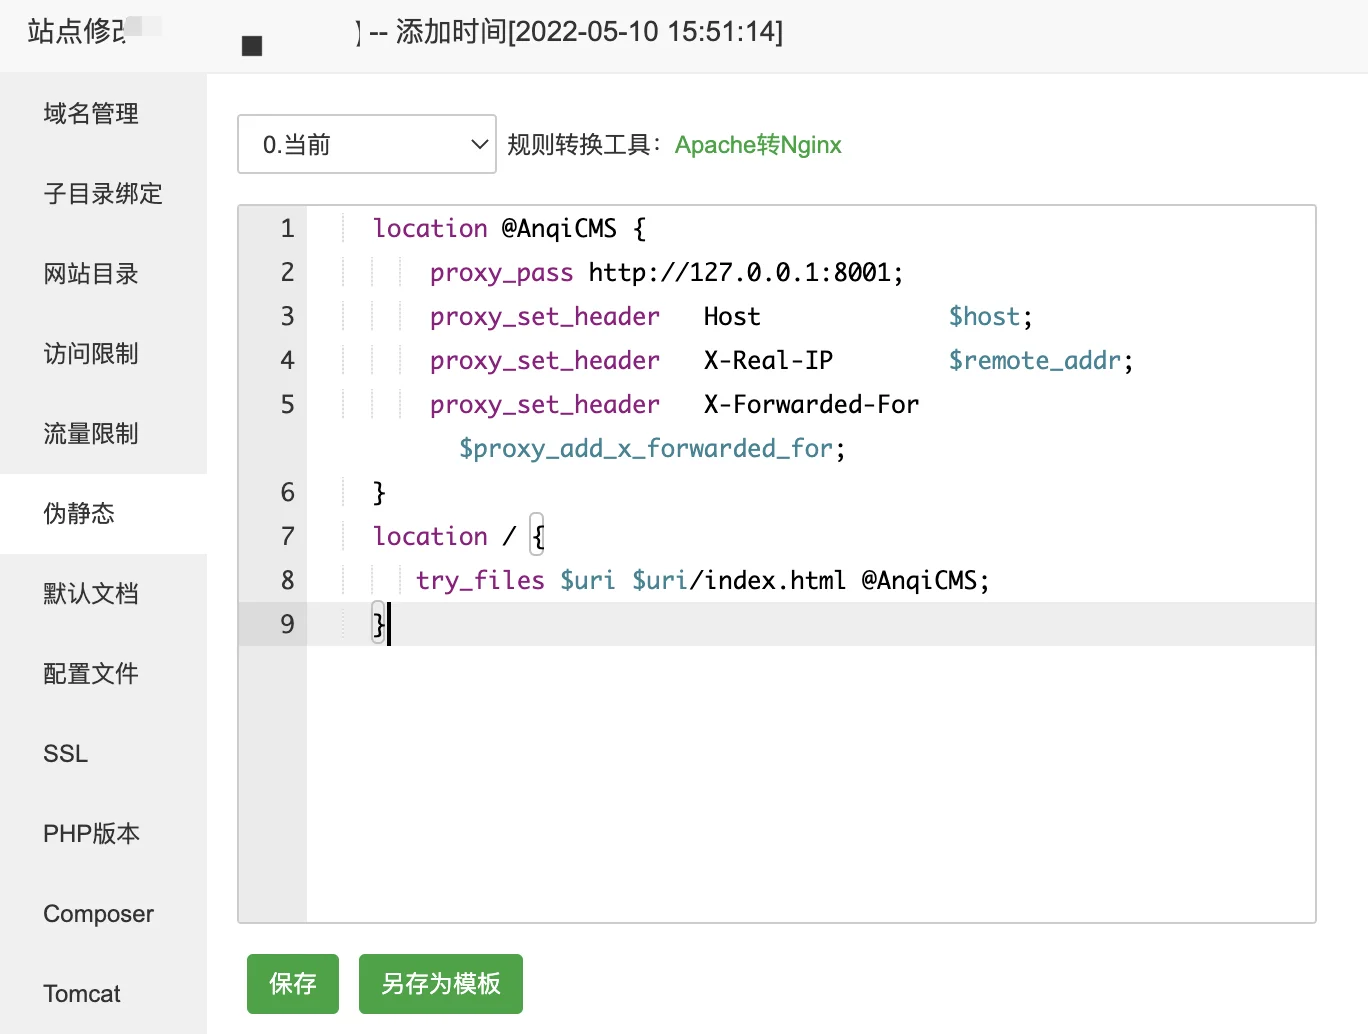
- SelectStaticTag
- Enter the following pseudo-static rules:
location @AnqiCMS {
    proxy_pass http://127.0.0.1:8001;
    proxy_set_header   Host             $host;
    proxy_set_header   X-Real-IP        $remote_addr;
    proxy_set_header   X-Forwarded-For  $proxy_add_x_forwarded_for;
}
location / {
    try_files $uri $uri/index.html @AnqiCMS;
}
- ClickSave
Step 5: Add a task to keep the service alive
To make AnQiCMS automatically run after the server restart, a scheduled task needs to be added.
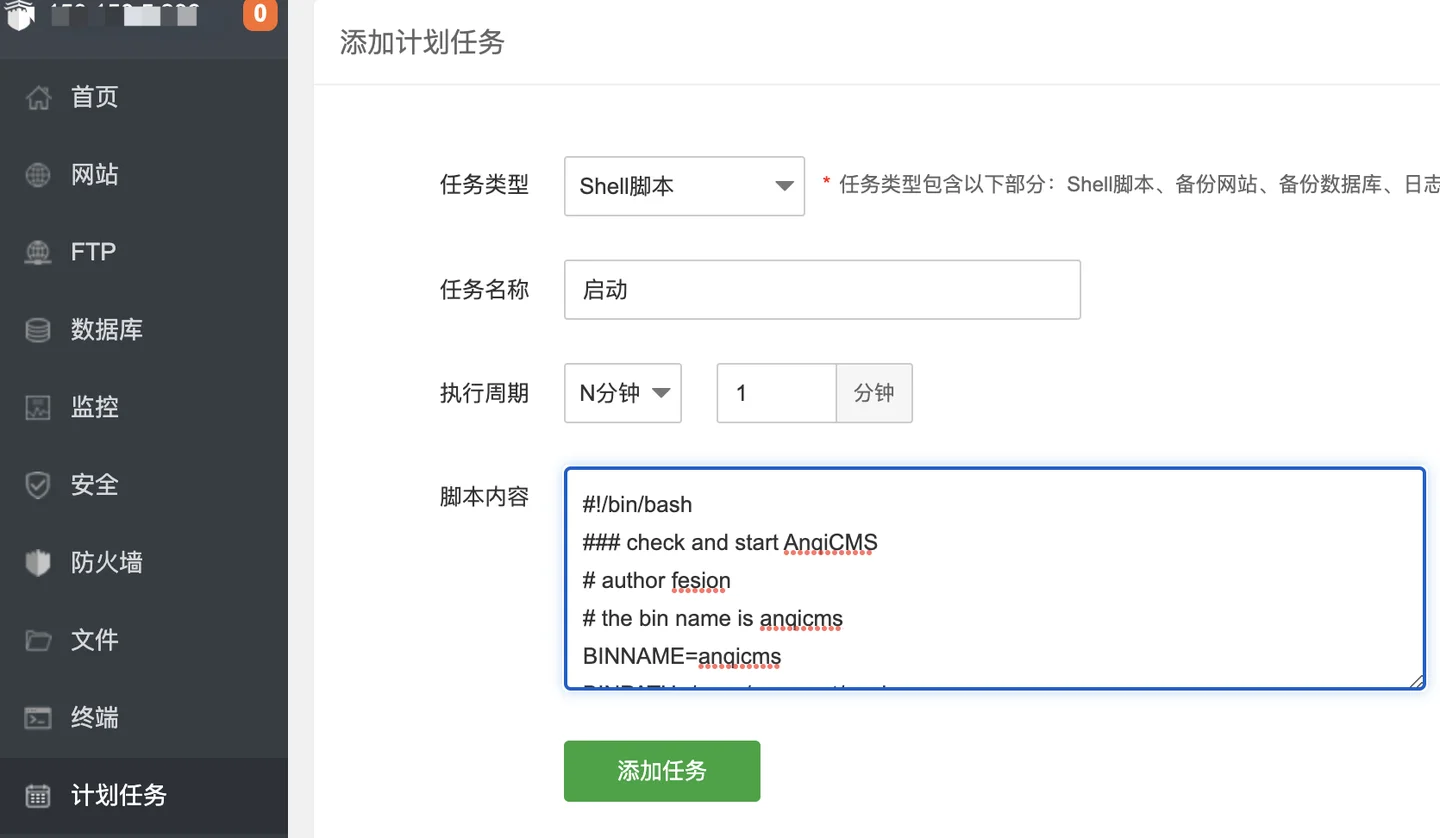
Add a startup detection task that runs every minute:
- Baota panel →Schedule Task
- Task type: Shell Script
- Execution Schedule: Every minute (
* * * * *) - Task Name:
AnQiCMS 启动检测 - Script content:
#!/bin/bash
### check and start AnQiCMS
BINNAME=anqicms
BINPATH=/www/wwwroot/anqicms.com

# 检查进程是否存在
exists=`ps -ef | grep '\<anqicms\>' |grep -v grep |wc -l`
if [ $exists -eq 0 ]; then
    echo "$BINNAME NOT running, starting..."
    cd $BINPATH && nohup $BINPATH/$BINNAME >> $BINPATH/running.log 2>&1 &
fi
Note:
BINPATHReplace it with your actual site path.
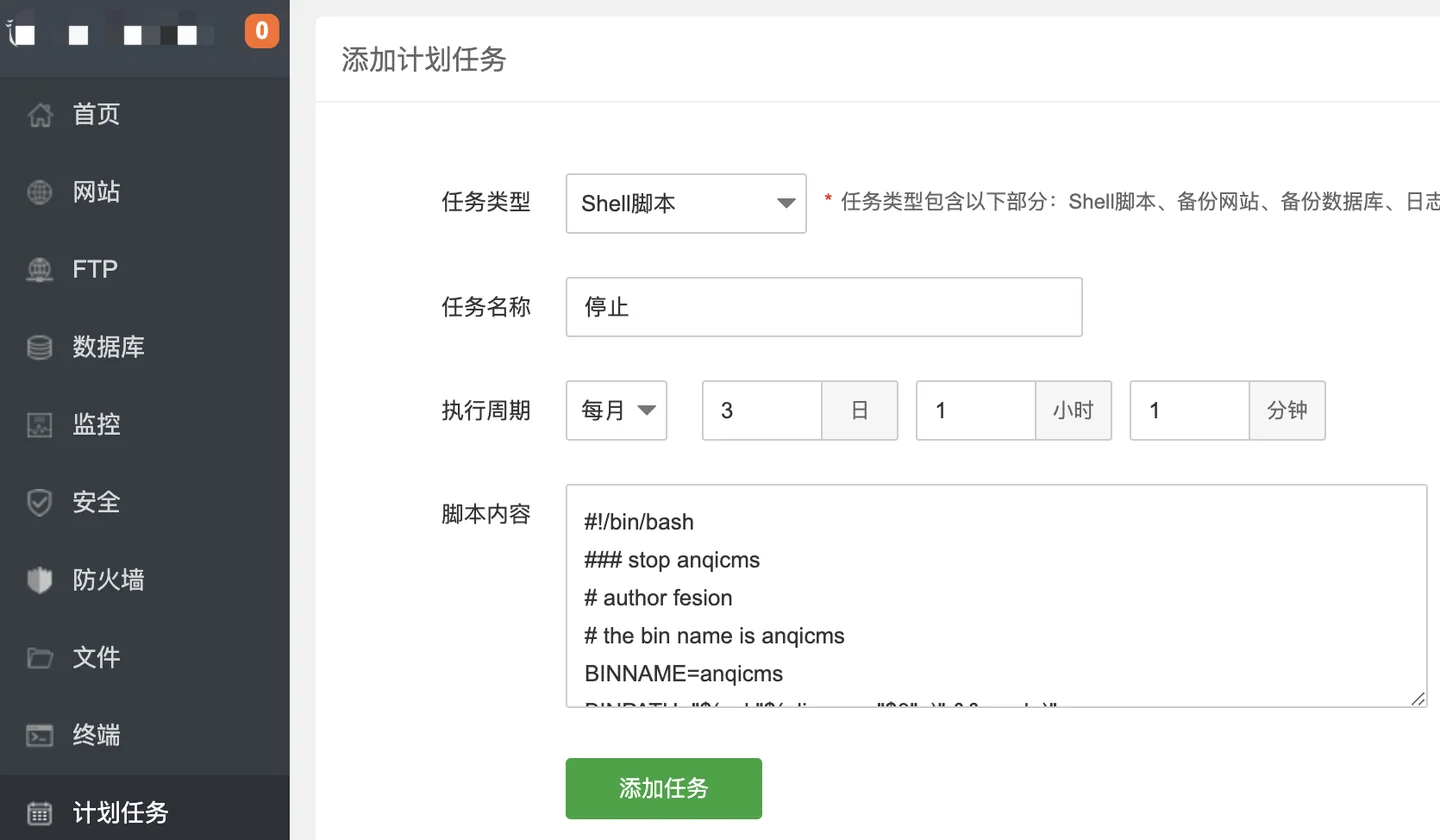
Add a monthly execution stop script (optional):
#!/bin/bash
### stop anqicms
BINNAME=anqicms
BINPATH=/www/wwwroot/anqicms.com

exists=`ps -ef | grep '\<anqicms\>' |grep -v grep |awk '{printf $2}'`
if [ -n "$exists" ]; then
    kill -9 $exists
    echo "$BINNAME stopped"
fi
Step 6: Initialize installation
Same as Step 3 of Method 1.
Verify Installation
After installation is complete, verify it in the following way:
- Front-end access: Open the bound domain in the browser, the home page of the website should be displayed
- Background access: Open in the browser
域名/system/, the backend login page should be displayed - Default account: Set the administrator account password during installation
❓ Baota has two deployment methods: 'Go Project' and 'Static+Nginx', which one should I choose?
The final effect of the two methods is the same, the main difference is the complexity of the configuration:
| Comparison item | Go Project Deployment (Method 1) | Static+Nginx (Method 2) |
|---|---|---|
| Baota version applicable | 7.9.3+ (recommended 9.x) | 7.x / 8.x / 9.x are all available |
| Configuration steps | 3 steps to complete | 6 steps to complete |
| Keep alive automatically | ✅ Baota automatic process management | ❌ Need to manually configure the scheduled task |
| Project management | Baota interface can view the running status | Need to manually check the process |
| Cost of learning | Lower | Slightly higher |
SuggestionIf your Baota panel version supports (7.9.3+),Prefer method one (Go project deployment)Easier and more convenient.
❓ When deploying a Go project, it prompts 'The project execution file does not exist', but the file is clearly in the directory?
This situation is generally becauseconfig.jsonconfiguredenvWithdevelopmentordebugmode, or the port configuration is inconsistent with the Baota settings.
Troubleshooting steps.:
- Check
config.jsonIs the port consistent with the 'Project Port' filled in Baota? - Check if the executable file has execution permission:
chmod +x /www/wwwroot/你的域名/anqicms - Check if the path of 'Project Execution File' in Baota panel ispointing accuratelyExecutable file (not pointing to a directory)
- If it is a Windows server, make sure to select
.exeFile
❓ The task is to check the anqicms process every minute, will it be too frequent and affect performance?
Don't worry at all.ps -ef | grep anqicms | wc -lThe execution time of this command is approximately0.01 secondsIt has almost no impact on the server's performance, almost negligible.
In fact, even if it is changed to every 5 seconds, there will be no significant impact. Setting it to once a minute is considered to be the minimum granularity limit of crontab, which is enough to detect abnormal process exit.
If the process exits, the detection script will restart it within 1 minute, and a 1-minute service interruption is negligible to search engines and users.
❓ How to configure HTTPS? Can it be configured directly in the external site settings?
Yes, you can configure it directly in the Baota site management.HTTPS is the responsibility of Nginx, AnQiCMS itself does not need to configure certificates.
Operation steps:
- Baota panel → Site Management → Site List → Find your site → ClickSSL
- SelectLet’s Encryptor other free certificates
- Check the domain, clickApply
- After the application is successful, enableEnforce HTTPS
Note: After configuring HTTPS, remember to go to the AnQiCMS backend →Set → Global SettingsChange the website address fromhttp://changed tohttps://. Otherwise, the links generated by the backend may still use HTTP.