
Installation of Anqi CMS - Deployment with PHPStudy (Xiao Pi panel)
Applicable scenarios: Local development environment or Windows server. PHPStudy (Xiao Pi Panel) integrates components such as Nginx, MySQL, and PHP, and AnQiCMS runs through Nginx reverse proxying.
Preparation
- PHPStudy (Xiao Pi Panel) is installed
- Switch the software running mode toNginx + MySQLPlan
- A local test domain name (such as
dev.anqicms.com) or access using IP + port - The AnQiCMS Windows installation package has been downloaded
Installation steps
Step 1: Create a site
- Open the PHPStudy software interface
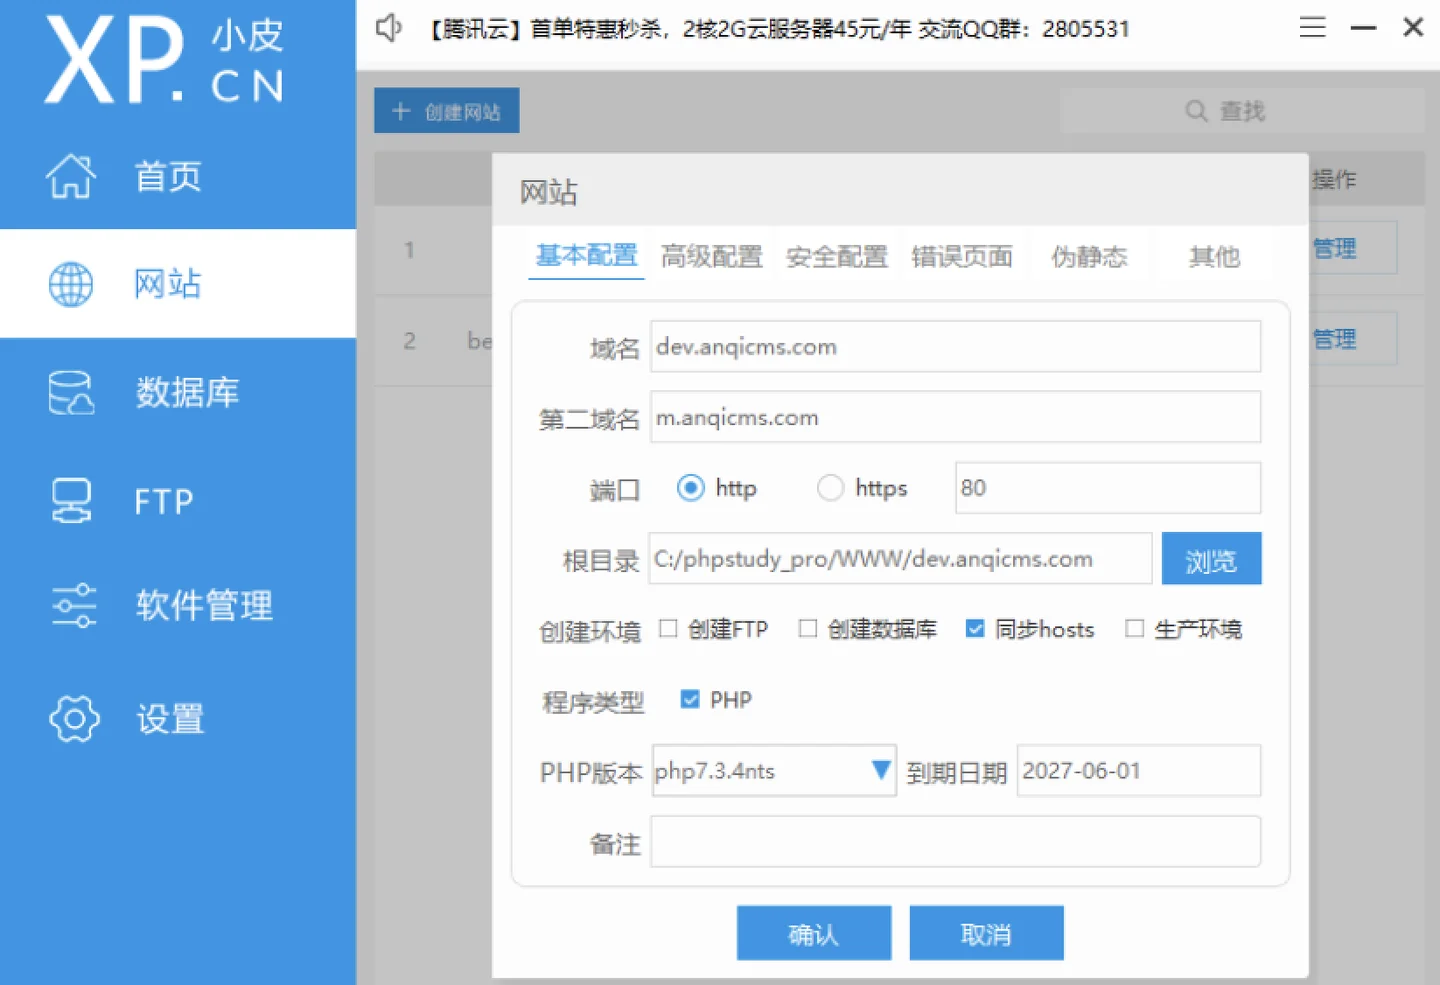
- ClickCreate a site
- Enter the domain name (such as
dev.anqicms.com) - Record the site root directory (for example
C:/phpstudy_pro/WWW/dev.anqicms.com) - Add the root directory
/public, the final root directory isC:/phpstudy_pro/WWW/dev.anqicms.com/public - ClickConfirm
Step 2: Adjust the Nginx configuration
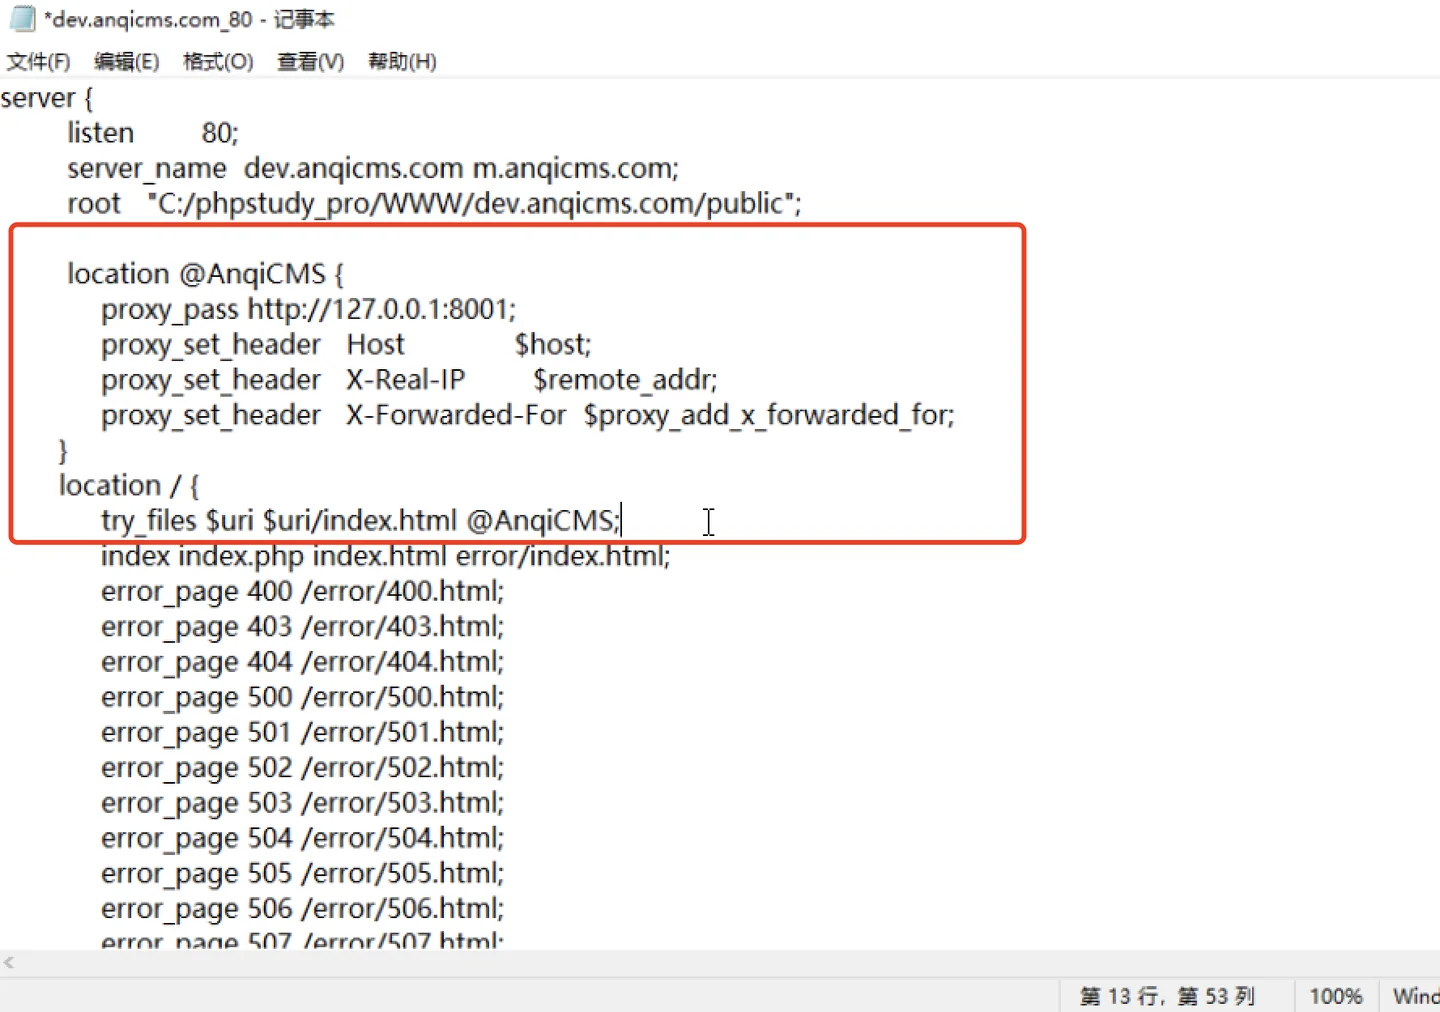
- PHPStudy →setting→configuration file→vhosts.conf
- Find the configuration file corresponding to the site created in the previous step (such as
dev.anqicms.com_80) - Find
location / {this line (about the 5th line) - Replace it with the following reverse proxy configuration:
location @AnqiCMS {
    proxy_pass http://127.0.0.1:8001;
    proxy_set_header   Host             $host;
    proxy_set_header   X-Real-IP        $remote_addr;
    proxy_set_header   X-Forwarded-For  $proxy_add_x_forwarded_for;
}
location / {
    try_files $uri $uri/index.html @AnqiCMS;
}
- Save the file
- Restart Nginx
Step 3: Place AnQiCMS files
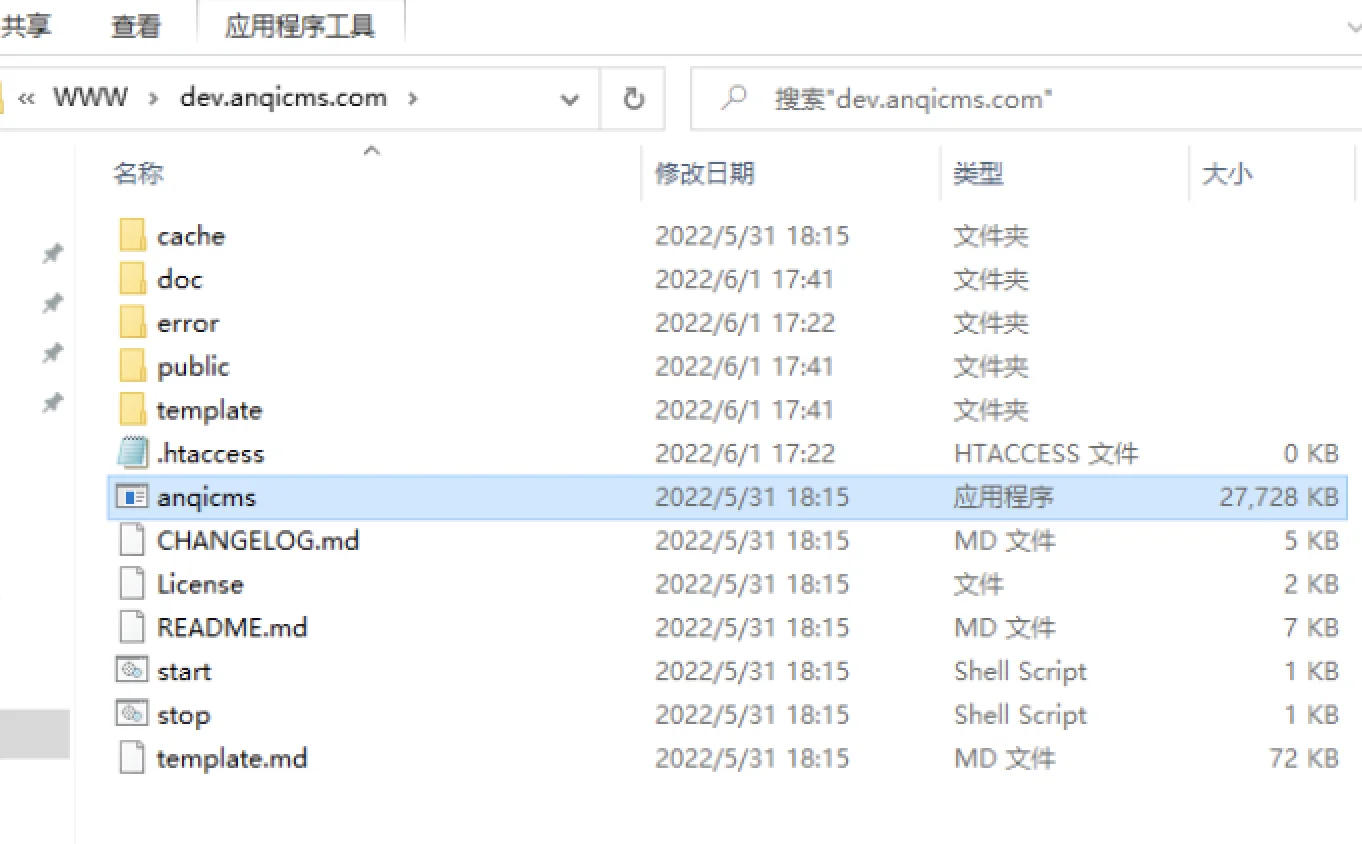
- Click on the PHPStudy website interface,Manage→Open the root directory of the website
- It will open to
C:/phpstudy_pro/WWW/dev.anqicms.com/publicTable of contents - Return to the parent directory
- Copy all files after unpacking the AnQiCMS Windows installation package to this directory
Step 4: Start AnQiCMS
- Enter the AnQiCMS directory
- Double-click
anqicms.exeRun
Note: No window will appear after running, AnQiCMS will run in the background process mode.
Step 5: Verify the run
- Open the browser
- Access
http://dev.anqicms.com(i.e. the domain set in Step 1) - If you see the initial installation interface, it means the deployment was successful
Step 6: Exit AnQiCMS
No stop script is provided on Windows, you need to exit through Task Manager:
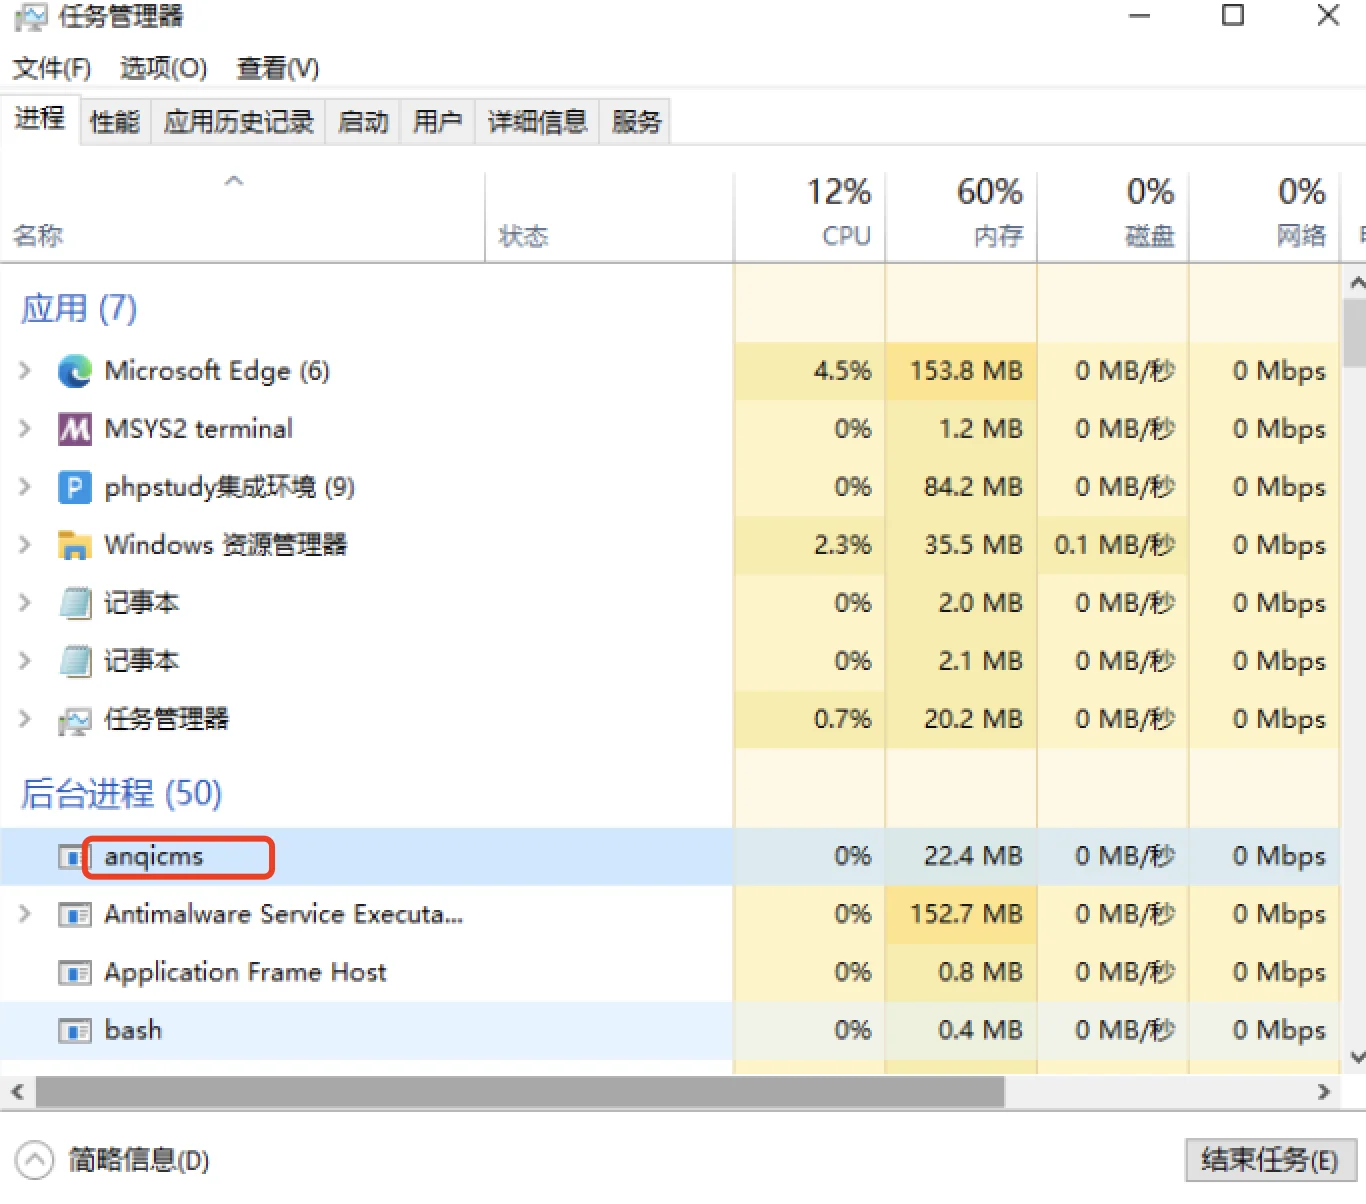
- Right-click on the taskbar →Task Manager
- toDetailsmode
- InBackground process.
anqicms.exe - Select andEnd task
Initialize installation
When you visit the domain for the first time, you will enter the initialization installation interface and need to fill in the following information:
| field | Description |
|---|---|
| Database host | 127.0.0.1(PHPStudy built-in MySQL) |
| Database port | 3306 |
| Database username | root |
| Database password | Root password of PHPStudy MySQL |
| Database name | Automatically created, such asanqicms |
| Administrator account | Custom background login account |
| Administrator password | Custom background login password |
| website address | http://dev.anqicms.com |
After installation is complete, visithttp://dev.anqicms.com/system/Enter the background.
❓ Double-click anqicms.exe and there are no windows or prompts. How can you determine if it has started successfully?
AnQiCMS isa background service program. It will not display any windows or icons when running on Windows, which is normal behavior. You can confirm whether it has started successfully in the following ways:
Method one: Check the task manager
Ctrl + Shift + EscOpen Task Manager- ClickDetails(if only the simplified view is displayed)
- toDetailsTab
- Find it in the list
anqicms.exe→ This means it has started successfully
Method two: Directly access the browserOpen the browser to accesshttp://dev.anqicms.com. If it can display the installation interface or home page normally, it means it has started successfully.
Method three: Check the port
netstat -ano | findstr :8001
# 如果输出了一行包含 LISTENING 的记录,说明 anqicms 正在监听
❓ How to make AnQiCMS automatically start with Windows boot?
Plan one (recommended): Add the startup command toTask Scheduler
- Open.Task Scheduler(Win+R →
taskschd.msc) - Right-clickCreate a basic task
- Name:
AnQiCMS AutoStart - Trigger:When the computer starts
- Operation:Start the program
- Program or script: Browse selection
C:\你的路径\anqicms.exe - Done
Option two: Create a startup script
Create astart.vbsFile, content is:
CreateObject("WScript.Shell").Run "C:\你的路径\anqicms.exe", 0, False
Place the file in the Windows startup directory (Win+R →shell:startup)to do so.
❓ Can you access it locally directly through IP + port without a domain name?
Can.Local development does not require a domain name. Operation method:
- When creating a site in PHPStudy,DomainEnter
localhostor127.0.0.1 - Or you can start anqicms.exe directly without creating a PHPStudy site, and then access
http://127.0.0.1:8001 - When initializing the installation, fill in the 'Website address'
http://127.0.0.1:8001
Use directly127.0.0.1:8001AccessNo need to configure NginxAnQiCMS is its own Web server. This method is suitable for development and debugging. However, it is still recommended to use domain name + Nginx in the production environment.<|end▁of▁thinking|>
Common questions
Q: There is no response after double-clicking anqicms.exe?
AnQiCMS is a background service program that does not display any windows. You can access the domain directly through the browser. If you still cannot access it, please check:
- Is the firewall allowing the 8001 port
- Is the Nginx reverse proxy configuration correct
- Is there another program using the 8001 port
Q: Does the service stop after closing the command line window?
Double-clickanqicms.exeNo command line window appears when running. If running through the command line, closing the window will stop the service. It is recommended to write a vbs script to hide the execution.