
AnqiCMS 2.x version installation
This installation tutorial is suitable forAnqiCMS 2.x version.AnqiCMS 3.x version uses a new installation method:New installation method
Anqi CMS (AnqiCMS) is an enterprise website content management system developed using GoLang, it is easy to deploy, software security, interface elegant, small, fast execution speed, websites built with AnqiCMS can prevent many security issues from occurring.
Supported systems
- Supports Windows 7, Windows 8, Windows 10, Windows 11, all versions of Windows server. Windows XP has not been tested
- Supports Ubuntu, Centos, Red Hat, Debian, and other Linux versions based on X86.
AnqiCMS Version
You can visit:/anqicmsorhttps://github.com/fesiong/goblogTo get the latest version.
If you install AnqiCMS, you can also keep your website program up to date through the background check for updates feature.
Install AnqiCMS
Install on Baota (recommended)
- Create a site
Create a site in the Baota background and fill in your domain name, such aswww.anqicms.com/m.anqicms.com.
- Adjust the nginx configuration
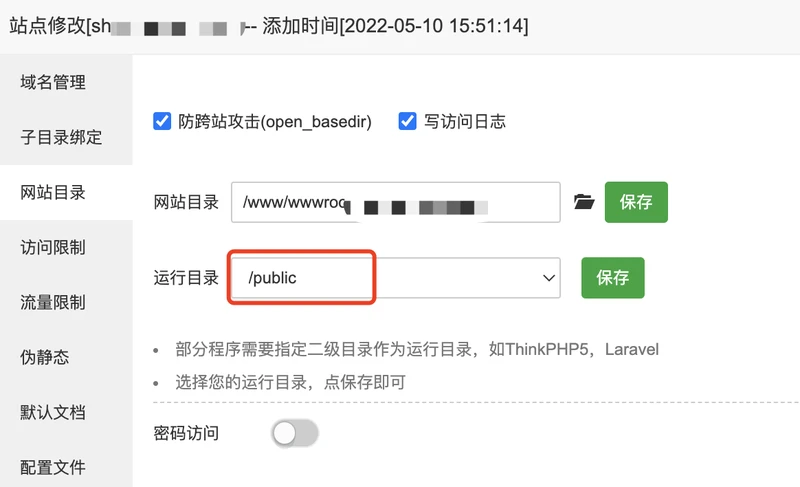
On the site list, click the corresponding site menu, click Settings in the settings interface, click the Site Directory tab, and set the Run Directory/publicand save.
Switch to the pseudo-static tag and enter the pseudo-static rule:
    location @AnqiCMS {
        proxy_pass https://en.anqicms.com;
        proxy_set_header   Host             $host;
        proxy_set_header   X-Real-IP        $remote_addr;
        proxy_set_header   X-Forwarded-For  $proxy_add_x_forwarded_for;
    }
    error_page 404 =200  @AnqiCMS;
    location / {
       try_files $uri $uri/index.html @AnqiCMS;
    }
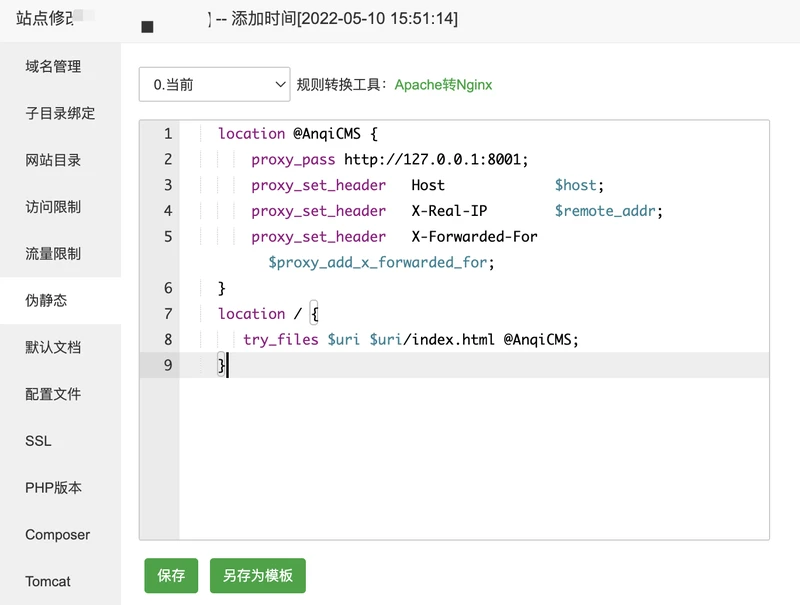
Save and the nginx configuration is complete.
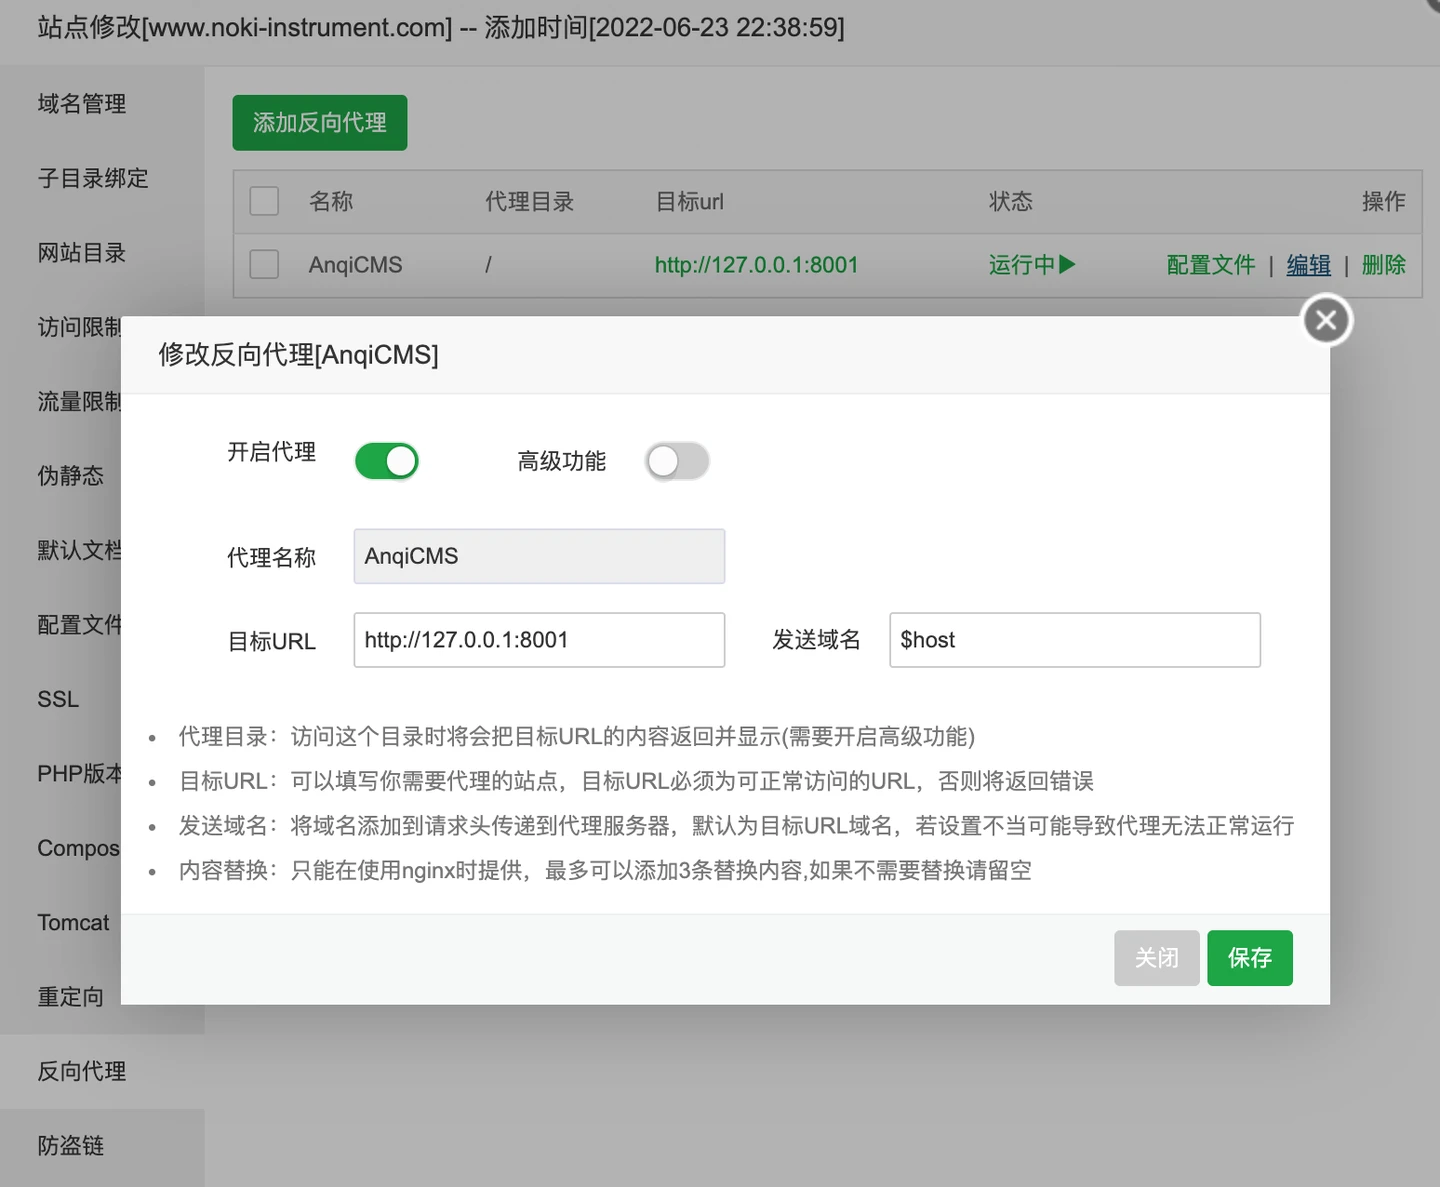
If you use Apache, this step of adding URL rewriting is different, Apache does not need to configure URL rewriting, but needs to add a proxy here in the reverse proxy, as shown in the figure:
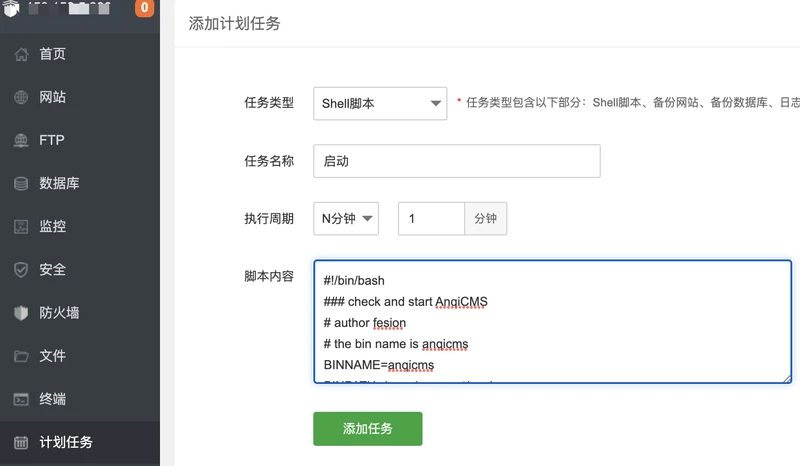
- Add task schedule
On the Baota panel, click the Task Scheduler menu, go to the Task Scheduler interface, and addstart.shandstop.shto the Task Scheduler.
Add a scheduled task that runs every minute, named Start, with the content:
#!/bin/bash
### check and start AnqiCMS
# author fesion
# the bin name is anqicms
BINNAME=anqicms
BINPATH=/www/wwwroot/anqicms

# check the pid if exists
exists=`ps -ef | grep '\<anqicms\>' |grep -v grep |wc -l`
echo "$(date +'%Y%m%d %H:%M:%S') $BINNAME PID check: $exists" >> $BINPATH/check.log
echo "PID $BINNAME check: $exists"
if [ $exists -eq 0 ]; then
    echo "$BINNAME NOT running"
    cd $BINPATH && nohup $BINPATH/$BINNAME >> $BINPATH/running.log 2>&1 &
fi
**Note:
BINPATH=/www/wwwroot/anqicmsThe path needs to be changed to the actual physical path of your site.- If the name of your executable file is not anqicms, then replace it with the corresponding name.
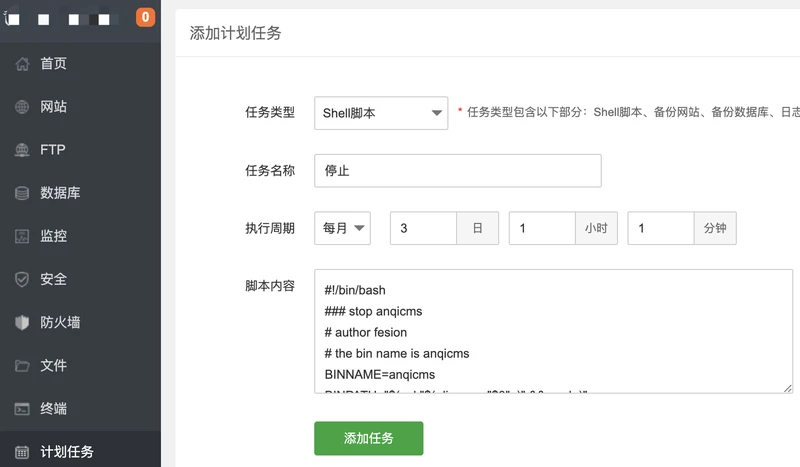
Add another task that runs once a month, named stop, with the content:
#!/bin/bash
### stop anqicms
# author fesion
# the bin name is anqicms
BINNAME=anqicms
BINPATH="$( cd "$( dirname "$0"  )" && pwd  )"

# check the pid if exists
exists=`ps -ef | grep '\<anqicms\>' |grep -v grep |awk '{printf $2}'`
echo "$(date +'%Y%m%d %H:%M:%S') $BINNAME PID check: $exists" >> $BINPATH/check.log
echo "PID $BINNAME check: $exists"
if [ $exists -eq 0 ]; then
    echo "$BINNAME NOT running"
else
    echo "$BINNAME is running"
    kill -9 $exists
    echo "$BINNAME is stop"
fi
The site configuration ends here.
Click to execute the scheduled task named Start, then the start is completed.
Install multiple AnqiCMS on the same server.
There is often a need to build multiple websites on the same server, using AnqiCMS to build multiple sets of websites, then the following work needs to be done:
- AnqiCMS's code is copied multiple times;
- Edit and change the config. in the root directory, change the port to a new port, such as 8002, 8003. Each piece of code needs to use a new port.
- Change the part about port 8001 in the nginx pseudo-static configuration to a new port.
- Rename the anqicms file in the directory to a new different filename, for example, use the middle letter of the domain name, such as if you are doing a site taobaoke.com, then you can name it taobaoke
- Add multiple instances of the startup script and stop script to the scheduled task, change the BINPATH path in the startup script to the new directory path, and the BINNAME of anqicms and
grep '\<anqicms\>'In the anqicms, change it to taobaoke.
Install on PHPStudy (Xiao Pi)
PHPStudy (Small Skin) is the same, the software switch uses the PHP + MySQL + Nginx package.
- Create a site
On the PHPStudy (Little Skin) software interface, create a site, and fill in your domain name, such asdev.anqicms.com/m.anqicms.comRemember the site root directory, such as mine is:C:/phpstudy_pro/WWW/dev.anqicms.comBased on this, add/public, the root directory becomesC:/phpstudy_pro/WWW/dev.anqicms.com/public.
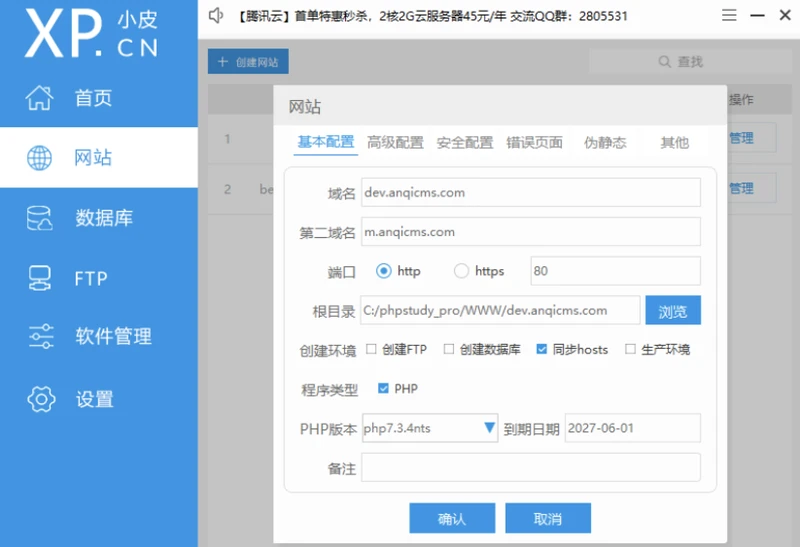
Click to confirm and complete the creation of the site.
- Adjust the nginx configuration
Switch to the PHPStudy (Xiaopi) settings menu, select the configuration file tab, and then selectvhosts.confLabel, finddev.anqicms.com_80This configuration file (based on the domain name set in the previous step), click to open inlocation / {This line (about the 5th line), replace the code with:
    location @AnqiCMS {
        proxy_pass https://en.anqicms.com;
        proxy_set_header   Host             $host;
        proxy_set_header   X-Real-IP        $remote_addr;
        proxy_set_header   X-Forwarded-For  $proxy_add_x_forwarded_for;
    }
    error_page 404 =200  @AnqiCMS;
    location / {
       try_files $uri $uri/index.html @AnqiCMS;
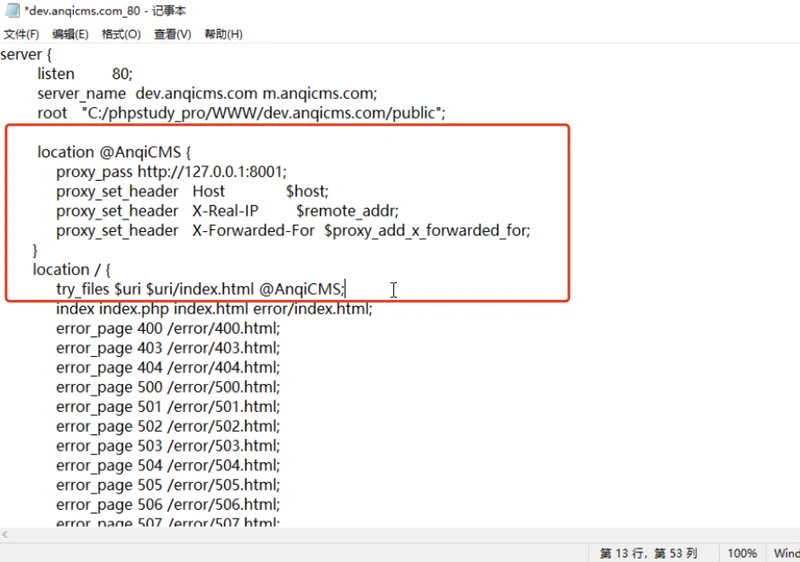
Save, then the nginx is configured and restarted.
- Place the file.
By using the website interface of PHPStudy (Xiao Pi) software, click management, open the root directory of the website, you will come toC:/phpstudy_pro/WWW/dev.anqicms.com/publicReturn to the parent directory, copy the AnqiCMS software files here:
The site configuration ends here.
Click to execute the scheduled task named Start, then the start is completed.
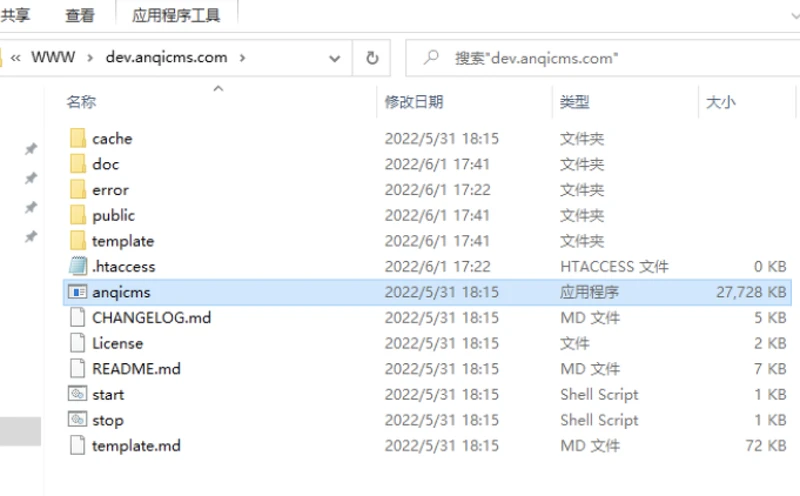
Then double-click anqicms.exe to run.
No window will appear when running, but do not panic, at this time, you open a browser, inputhttp://dev.anqicms.comVisit, and you will see the interface.
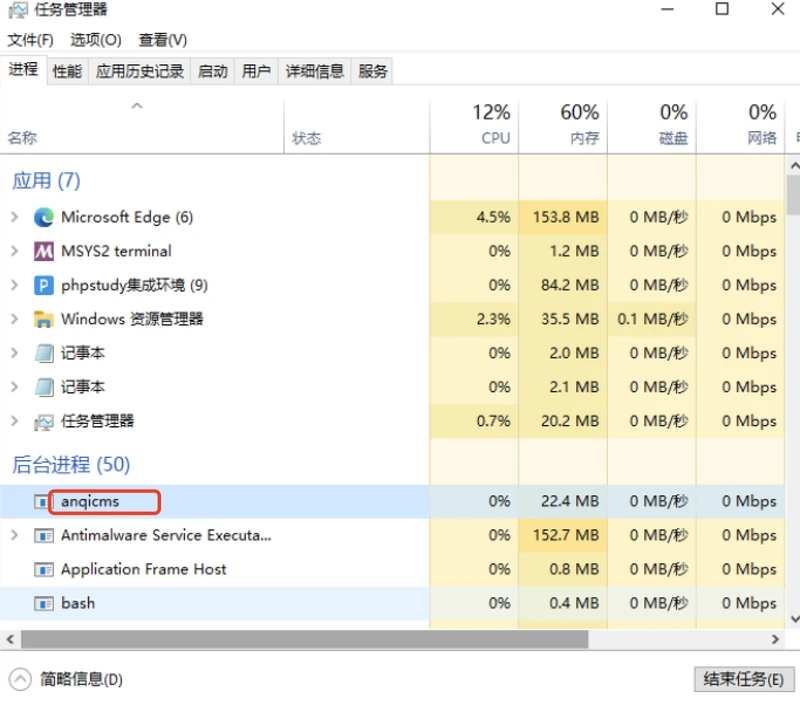
- Exit
There is no exit script on Windows, so we need to use the Windows Task Manager. We click the right mouse button on the taskbar, select Task Manager, switch to the detailed mode, find the anqicms process in the background process column, select anqicms, and end the task to complete the exit.
Install manually on the server
We take the deployment on the Centos server as an example to introduce the installation method.
- Download source code
Download address:/download
Choose the Linux version to download to the server and name it anqicms.linux.tar.gz
Unzip anqicms.linux.tar.gz and enter the directory
tar -xzvf anqicms.linux.tar.gz
cd anqicms
# 查看当前目录
pwd
- Install Nginx and MySQL
If you have already installed it, skip it. It is recommended to usehttps://lnmp.org/Install it, you can save the trouble, see the installation method.https://lnmp.org/.
- Configure the Nginx site
In general, it is necessary to configure the nginx proxy to use the 80 port or https port. Below is an example of configuring the site root directory as/data/wwwroot/anqicms, domainwww.anqicms.com/m.anqicms.com:
We need to configure the running directory of the website, which is also the nginx root directory, to the public directory under the site directory.
Set up reverse proxy, target URL:https://en.anqicms.com
Here is the nginx proxy code:
    location @AnqiCMS {
        proxy_pass https://en.anqicms.com;
        proxy_set_header   Host             $host;
        proxy_set_header   X-Real-IP        $remote_addr;
        proxy_set_header   X-Forwarded-For  $proxy_add_x_forwarded_for;
    }
    error_page 404 =200  @AnqiCMS;
    location / {
       try_files $uri $uri/index.html @AnqiCMS;
    }
Complete nginx configuration:
server
{
    listen       80;
    server_name www.anqicms.com m.anqicms.com;
    root /data/wwwroot/anqicms/public;

    location @AnqiCMS {
        proxy_pass https://en.anqicms.com;
        proxy_set_header   Host             $host;
        proxy_set_header   X-Real-IP        $remote_addr;
        proxy_set_header   X-Forwarded-For  $proxy_add_x_forwarded_for;
    }
    error_page 404 =200  @AnqiCMS;
    location / {
       try_files $uri $uri/index.html @AnqiCMS;
    }
    access_log access.log;
}
The nginx configuration is complete, restart nginx to make the configuration take effect.
- Plan task monitoring operation
To keep the website running, after the server restarts, the website still runs, add a scheduled task script, execution cycle, run once a minute, content is:
crontab -e
# 在打开的编辑界面,增加一行
*/1 * * * * /data/wwwroot/anqicms/start.sh
# ws 保存并退出。
After adding the scheduled task, execute it by hand:
./start.sh
You can now access the bound domain in your browser.
Source code compilation installation (not recommended)
If the version we provide is not usable for you, or you are very familiar with golang code, and even need to customize some special features with AnqiCMS, then you can choose to install it by compiling the source code to meet your needs.
- Software required for compiling AnqiCMS
| Software | Version |
|---|---|
| golang | 1.13 (and above) |
| mysql | 5.6.35 (and above) |
Here it is assumed that you have installed GoLang and MySQL software.If you have not installed these 2 software programs, you can search for installation methods on a search engine.
- clone code
toAnqiCMSclone the code to any local directory and enter the directory to operate
git clone https://github.com/fesiong/goblog.git
# 进入 操作目录
cd goblog
- compile AnqiCMS source code
For reasons known to all, we first need to set up a proxy and execute this code in the terminal:
go env -w GOPROXY=https://goproxy.cn,direct
Continue executing the next code, compiling the code is to compile it into an executable file, test running can modify while testing.
go mod tidy
go mod vendor
Test run AnqiCMS
go run kandaoni.com/anqicms/main
You can test the AnqiCMS by running the above code, to check the correctness of the code. After executing, you can enter the test address in the browser to access:https://en.anqicms.com
Compile AnqiCMS under Windows
go build -ldflags '-w -s -H=windowsgui' -o ./anqicms.exe kandaoni.com/anqicms/main
Compile AnqiCMS under MacOS
go build -ldflags '-w -s' -o ./anqicms kandaoni.com/anqicms/main
Compile AnqiCMS under Linux
You just need to run the make command in the root directory of AnqiCMS
make
It will generate a release directory in the current directory, and prepare template files, etc., which can be directly copied to the production environment for use.
Run AnqiCMS
- Run as a Windows user
Double-click anqicms.exe to run
First visit, you need to initialize AnqiCMS first, enter MySQL information, set the administrator account and password on the initialization interface, and then you can normally access the front desk and back end of the website.
- Linux users run
We have prepared automatic scripts for the production environment, to start the project, executestart.sh, to stop, executestop.sh.
# 启动项目
./start.sh
# 停止项目
./stop.sh
Visit the web page
After running, enter the address in the browser:https://en.anqicms.comVisit the front-end page
Visit the back-end management
Byhttps://en.anqicms.com/system/Visit the back-end page.
If you did not initialize the blog through installation, you may not have set up an admin account, and if you have not set up an admin account, the default admin account username and password are:
Account: admin
Password: 123456
?Feedback on issues
If you encounter any problems, please open an issue on Github.
You can also add my WeChat: websafety
Scan the code to join the golang development study group
License
The MIT License (MIT)
Copyright (c) 2019-NOW AnQiCMS